Emails: instructions for developers
Introduction
This documentation is a comprehensive guide for configuring and managing email-related events in the Meiro system. It provides detailed information on prerequisites, API endpoints, request structures, flow descriptions, subscribe/unsubscribe pages, and webhook setup.
|
Prerequisites for Emails To enable email event tracking in Meiro, ensure the following prerequisites are fulfilled:
|
1. Subscribe and Unsubscribe pages
Meiro provides default subscribe and unsubscribe pages for your convenience. However, if you desire to customize them to align with your brand's specific needs, you have the flexibility to implement your own custom pages using our dedicated endpoints.
1.1 Default Subscribe Pages
Meiro offers a default email subscription page, but you also have the flexibility to create your own custom subscription page and integrate it with Meiro using the ME API to meet your specific needs.
The email subscription page is hosted at the following path: https://me.client.domain/email/subscribe.html .
The default email subscription page is a straightforward form that is provided for users to enter their email addresses. Upon submitting the form, an ME request is made. If there are any errors related to the email address itself, the page displays the error message below the input field.
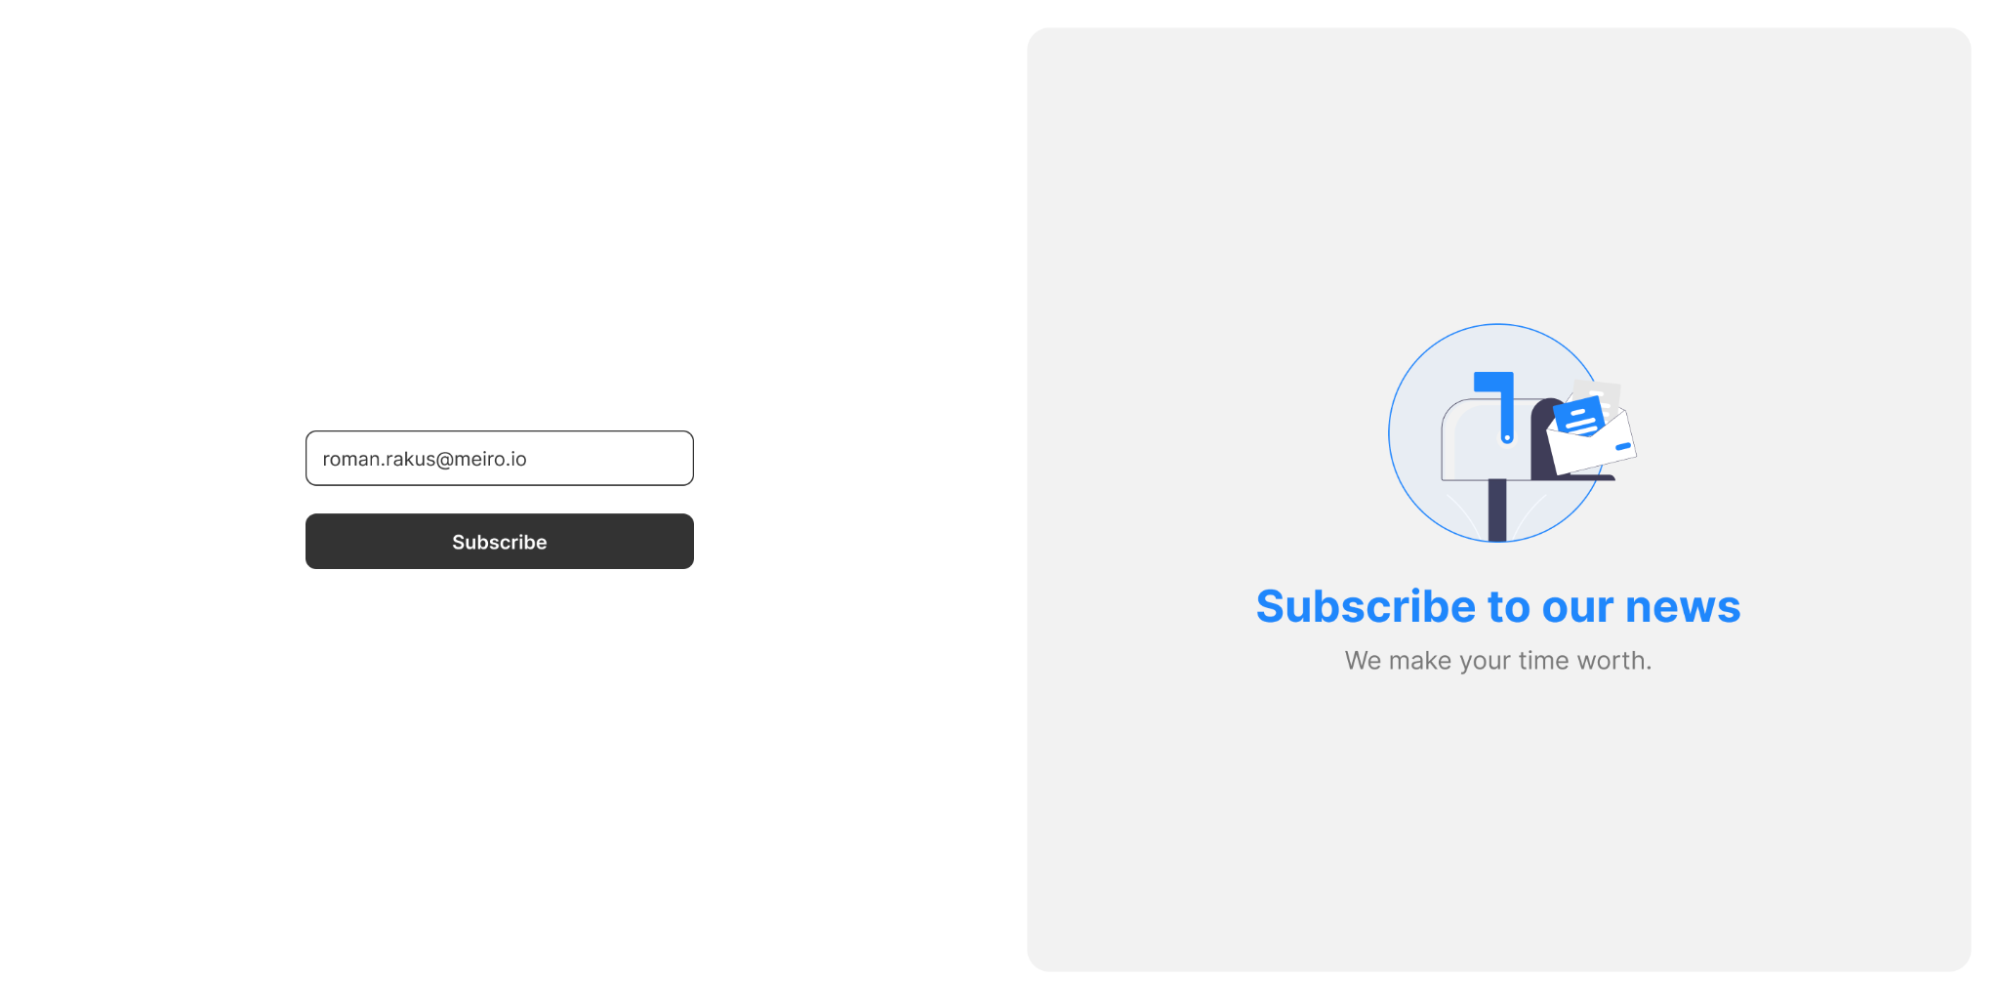
The default email subscription page is a ready-made solution offered by Meiro. However, for clients who desire a personalized and branded opt-in experience, customizing their unique subscribe pages is the recommended option.
1.2 Implementing own custom Subscribe Pages
You may implement your own solutions for subscription pages. In this case, ensuring that the "Email Subscription Requested" event is sent to the /emails/subscribe ME endpoint is essential.
Below is an example of a payload for this endpoint:
{
  "email": "a@b.com", // Required, email address regex validation
  "subscription_source": "website footer form" // Optional string
}
To understand potential errors in detail, refer to this section in this article.
1.3 Default Unsubscribe Pages
In unsubscribing from a newsletter, the system performs several checks to determine whether to change the profile's email address consent status.
The email unsubscribe page is hosted at the following path: https://me.client.domain/email/unsubscribe.html .
1.4 Implementing custom Unsubscribe Pages
You may implement your own solutions for unsubscription pages. In this case, ensuring that the "Email Unsubscribed" event is sent to the /emails/unsubscribe ME endpoint is essential.
When users are redirected to a custom unsubscribe page via an unsubscribe link from a campaign email, the URL will contain the following parameters: email, campaign_id, campaign_name, subject, and message_id. You can include these parameters in the ME request and prefill the email form input as needed.
Example of the payload:
{
  email: "a@b.com", // Required, email address regex validation
 campaign: { // Optional string, but if provided, "id" and "name" are required
    id: "campaign_id",
    name: "campaign_name"
  },
  message_id: "message_id", // Optional string
  subject: "subject", // Optional string
  unsubscribe_source: "Meiro unsubscribe page" // Optional string
}
To understand potential errors in detail, refer to this section in this article.
2. Importing Contact List
This part of the flow is designed to handle events when importing email addresses and their associated consent links.
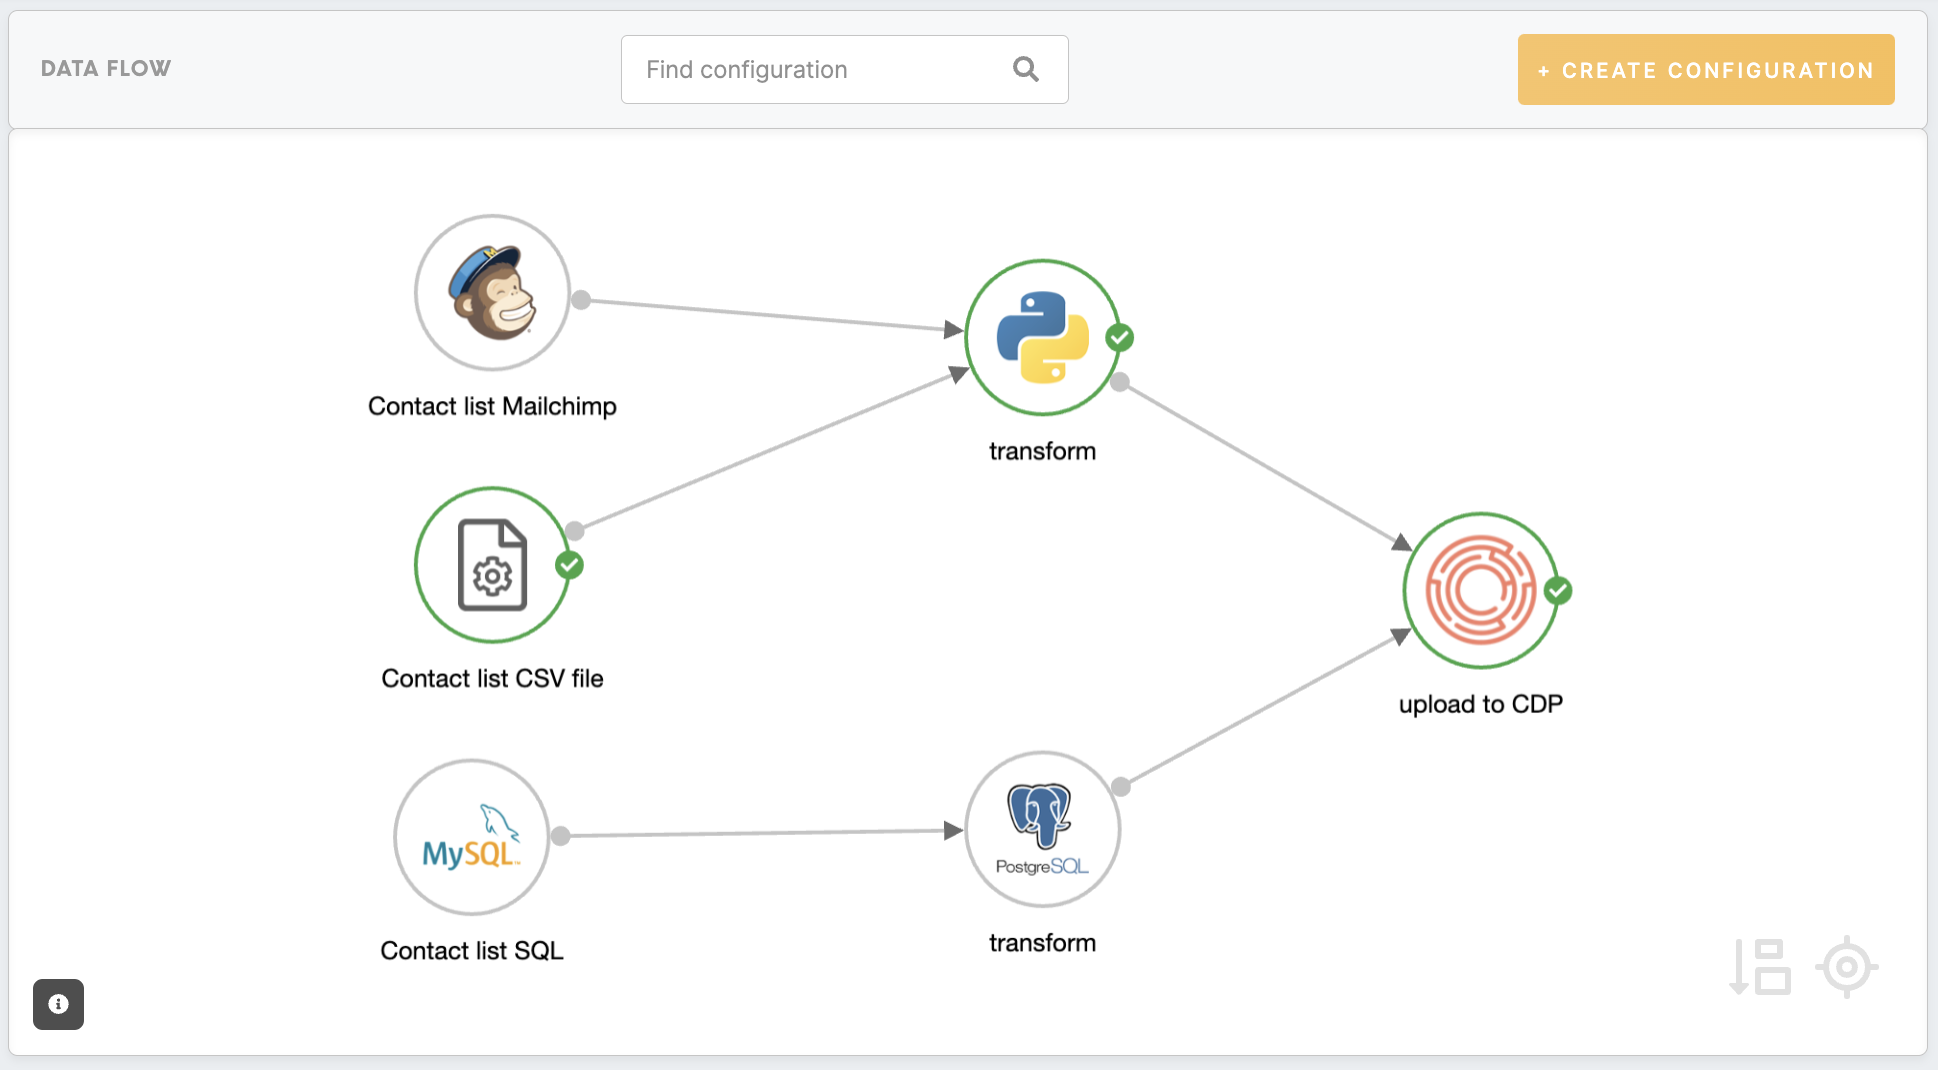
The importing of the contact list is done through Meiro Integration. Contact lists may originate from various sources, including databases (where analysts might utilize the MySQL connector), email marketing platforms like Mailchimp (using, for example, the Mailchimp connector), or CSV files containing required data such as email addresses and consent, along with optional information.
If the CSV file contains a timestamp column for the subscription event, when importing, it is necessary to set the event_time based on the timestamp of when the particular event took place in UTC time, and not set the event_time on the current date and time. This approach ensures that the event tracking and timing remain accurate.
Regardless of the source, the lists must undergo transformations to ensure they comply with the suitable format for the customer_events table. These transformations are executed using processors like Python 3 Code or the Postgres processors. Refer to this article to understand the transformations necessary to shape the data into the required structure.
To upload lists containing email addresses and subscription consents, analysts will require the CDP event loader. This involves configuring essential settings, including the URL to the client's CDP and CDP API credentials (username and password).
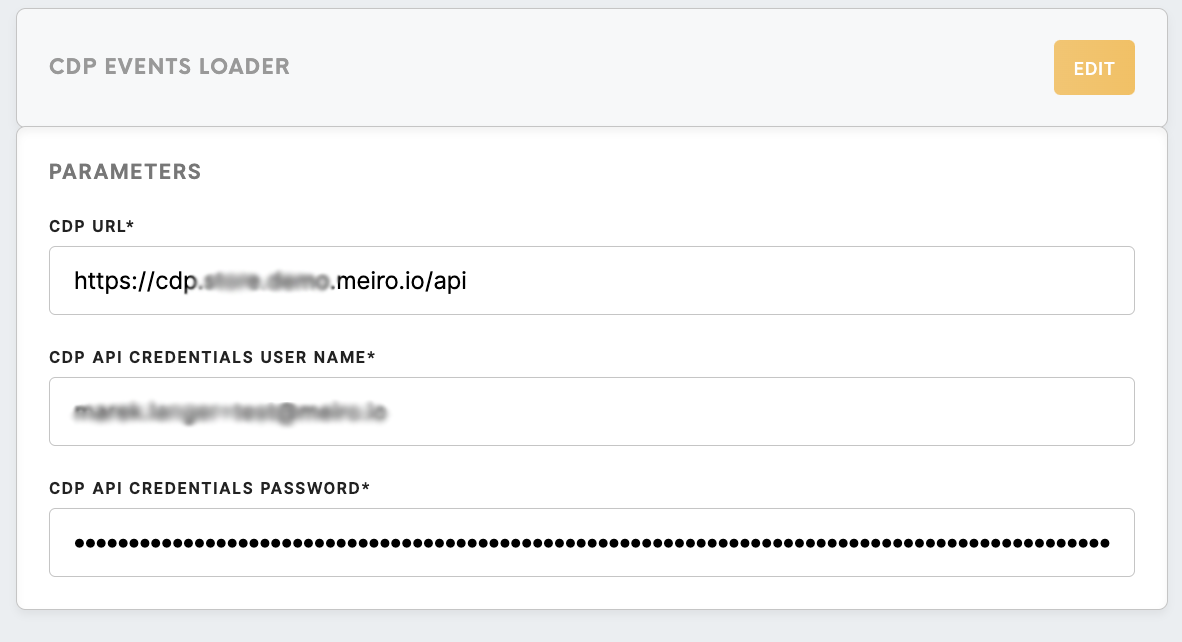
The process of importing a contact list within the Meiro Integration (MI) workspace may appear as below:
After everything is set correctly and the flow is successfully executed, the Email Subscription Imported event will be triggered. This event uploads the values to CDP, and identity stitching is performed subsequently if the email is already associated with a profile in CDP. The expected data structure of this event is as follows:
{
    "type": "object",
    "properties": {
        "email": {"type": "string", "format": "email"},
        "consent": {"type": "boolean"},
        "subscription_source": {"type": "string"}
    },
    "required": ["email", "consent"]
}
This JSON schema specifies that a JSON object should contain the appropriate data types for email, consent, and subscription_source keys. Among them, only email and consent are required.
The same steps above may be conducted when importing the blocklist containing the required blocked email addresses. In this case, the event Email Address Block Imported event will be triggered with the expected data structure coming:
{
    "type": "object",
    "properties": {
        "email": {"type": "string", "format": "email"},
        "reason": {"type": "string"}
    },
    "required": ["email"]
}
This JSON schema outlines that a JSON object should contain the appropriate data types for email and reason keys, where only email is a required field.
3. Consent Management flow
In Meiro, we strictly follow a double opt-in policy for email signups. Users are not automatically subscribed when they enter their email addresses on clients’ websites, instead, we prioritize sending a confirmation email to their inbox.
This double opt-in method maintains clients' email database quality, increasing the percentage of engaged users. It's a crucial practice that boosts the sender's reputation, improves email deliverability, and minimizes GDPR-related compliance risks.
Flow Steps:
Once a user submits a valid email address, ME generates an "Email Subscription Requested" event. Then, the consent attribute value is validated. If it's false, Meiro sends an Opt-in email to the provided email address via the Meiro Email channel, triggering an "Opt-in Subscription Email Sent" event. The process is completed when the user confirms the subscription, triggering a new event called “Email Subscription Confirmed,” and then the user's consent dimension is set to true.
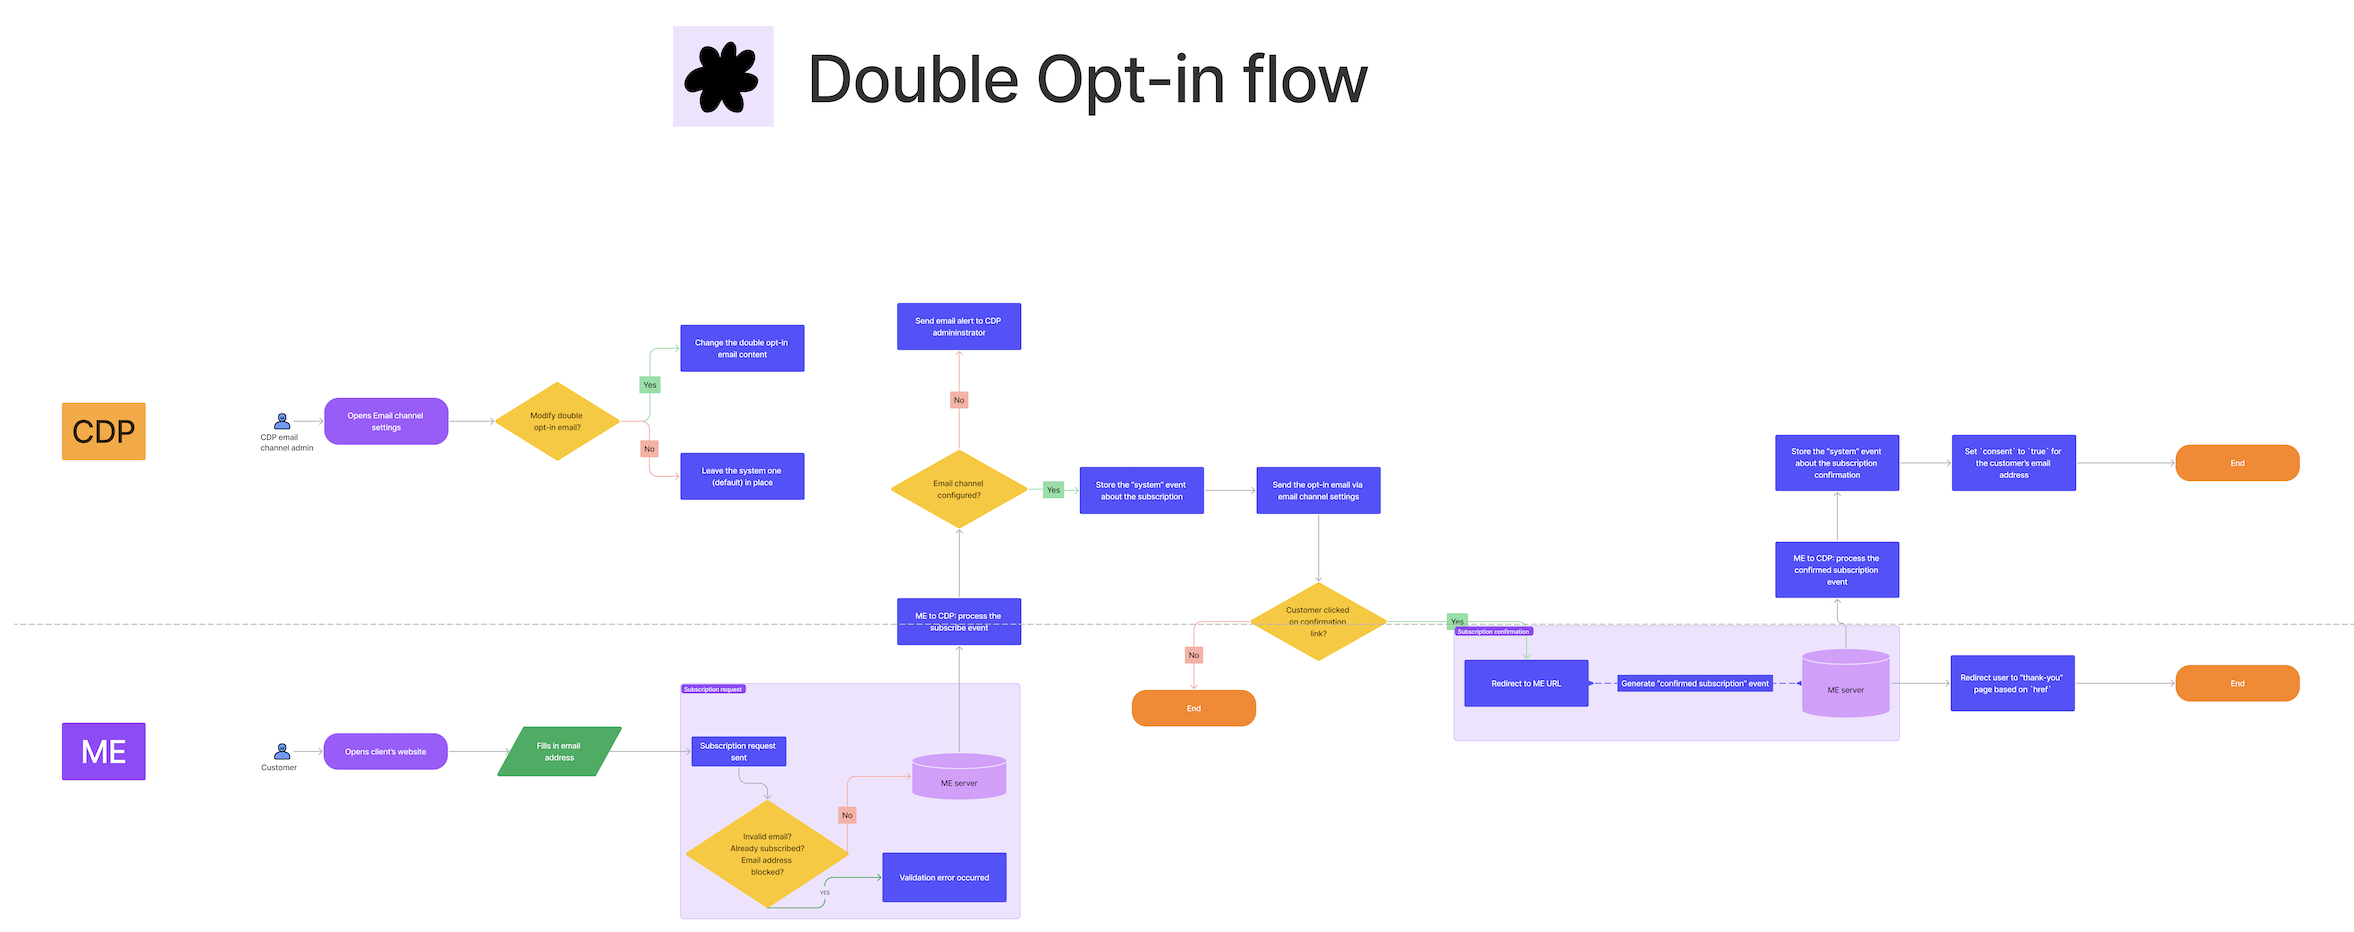
For a more in-depth analysis of the flow, click to expand the image or access the Figma project via the provided link.
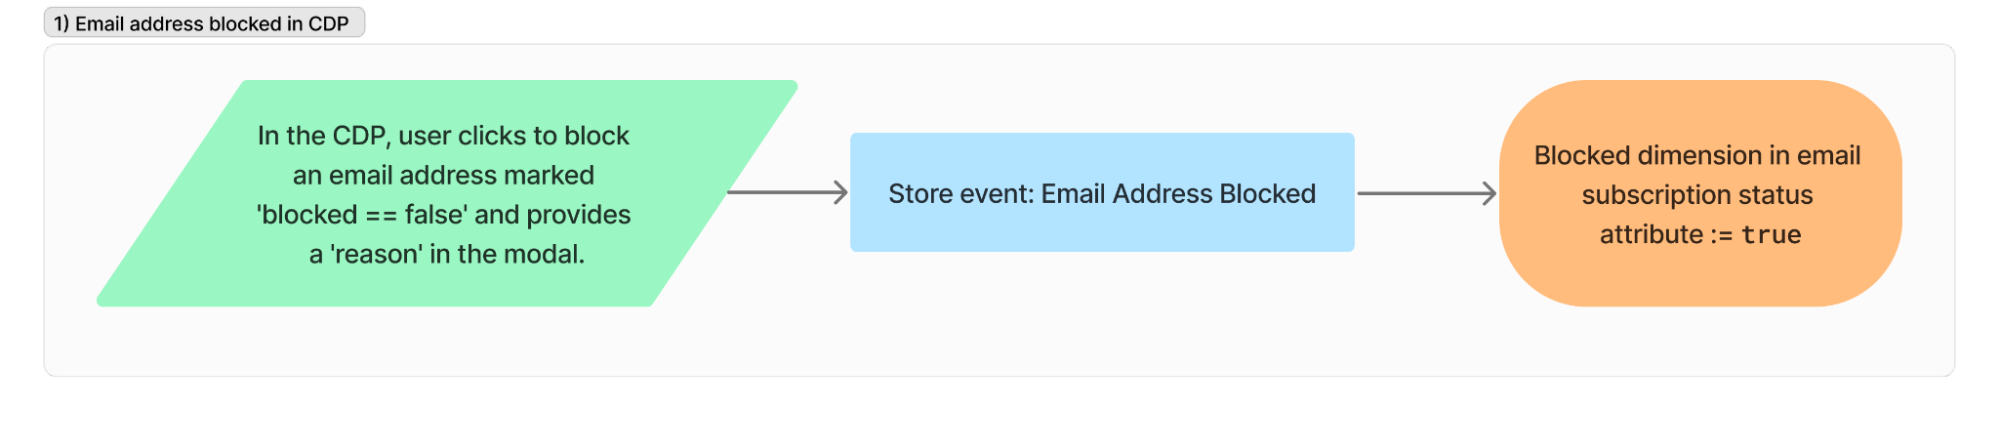
Four distinct events can lead to a change in the blocked status:
- "Email address blocked": This event is generated when an email address is manually blocked by the administrator.
- "Email address block imported": This event occurs when the import of blocked email addresses is loaded into the system.
- "Email address unblocked": This event is generated when an email address is manually unblocked by the administrator.
- "Email bounced with 'bounce_type: hard’": This event is logged when an email sent to a recipient returns with a 'hard bounce' error, typically due to problems like an invalid email address or a blocked status.
These events can lead to changes in the consent status:
- “Email Subscription Confirmed”: The event is triggered when a user confirms a subscription after receiving an opt-in email. Then, the user's consent is set to true.
- “Email Subscription Imported”: This happens when the import of email addresses with their consent values is loaded into the system. The consent status is set to the imported value accordingly.
- “Email Unsubscribed”: This happens when a user unsubscribes from email campaigns. The consent status is set to false.
3.1 Blocking and unblocking email address flow
In the CDP, users can block or unblock email addresses from the profile detail page. Buttons are provided near each email address. When users click to block or unblock, the frontend triggers an API call with a reason for the action. The backend records the event as 'Email Address Blocked' or 'Email Address Unblocked,' associating it with the user performing the action.
Learn more: about how to block/unblock profiles in CDP
3.2 Email Bounced Events
An email bounce is an automated response received from an email server when an email cannot be delivered to the intended recipient. It signifies that the email could not reach its destination for various reasons, such as an invalid or non-existent email address, a full mailbox, or other delivery issues.
Email bounces in Meiro begin with a bounce event on the provider's side when sending an email. The system checks for an existing profile and email attribute and proceeds to record an "Email Bounced" event. If it's a hard bounce, the address is blocked to prevent further communication.

4. Webhooks Setup
This section outlines the process of setting up a webhook endpoint, a unified endpoint for receiving real-time updates on email events from various email providers.
4.1 Provider configuration
To ensure that incoming webhook events are processed correctly by Meiro Events (ME), it is necessary to configure the application’s config.json file to align with the email provider being used.
-
Open the
config.jsonfile, which is located in your application directory. -
Locate the following setting within the file:
"producer": {
"email_provider": "value"
}-
Set the
email_providervalue depending on the email service you are using:-
For Brevo, use
"brevo". -
For Infobip, use
"infobip". - For Omnivery, use
"omnivery".
-
Remember: This configuration allows Meiro Events (ME) to determine how incoming webhook events are translated into a unified format that the CDP can process. Once the correct provider is set, ME will automatically translate these events into the proper format.
4.2 Brevo provider
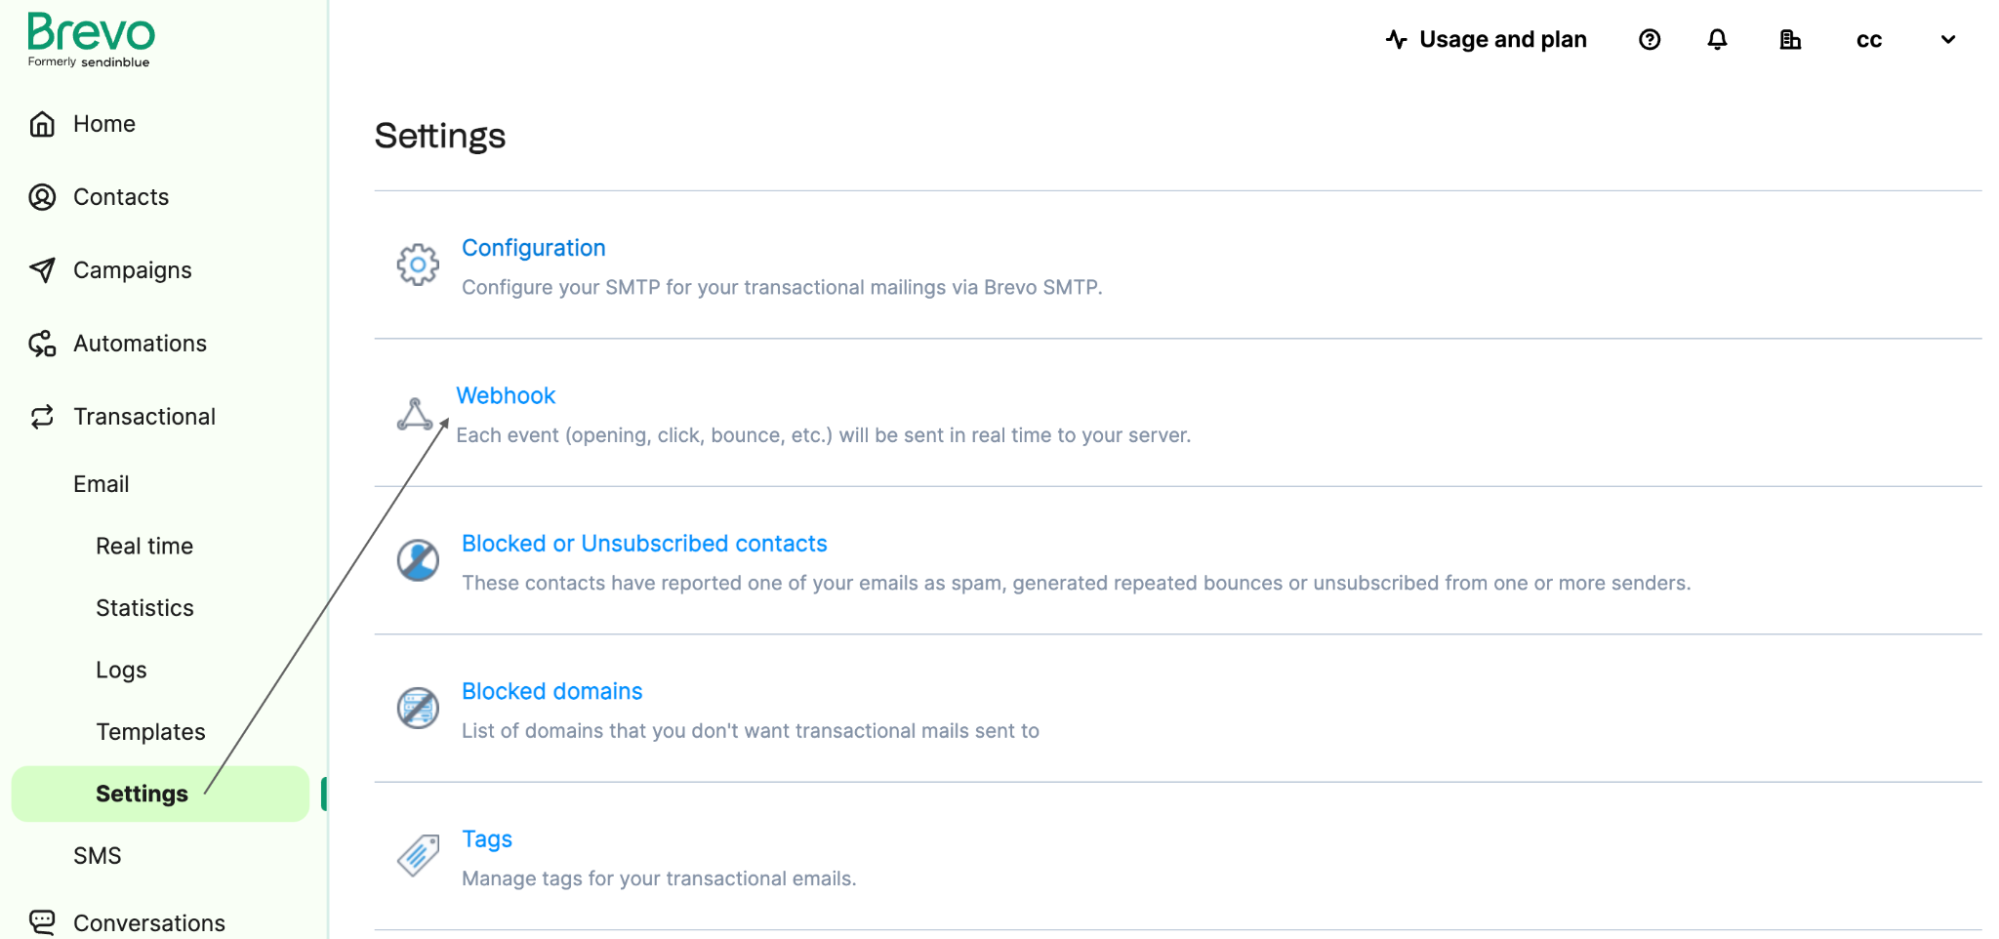
Here's a step-by-step guide for setting up a webhook endpoint in Brevo:
1. Go to the "Transactional" section and navigate to the "Settings" tab.
2. Click on the "Webhook Configure" option.
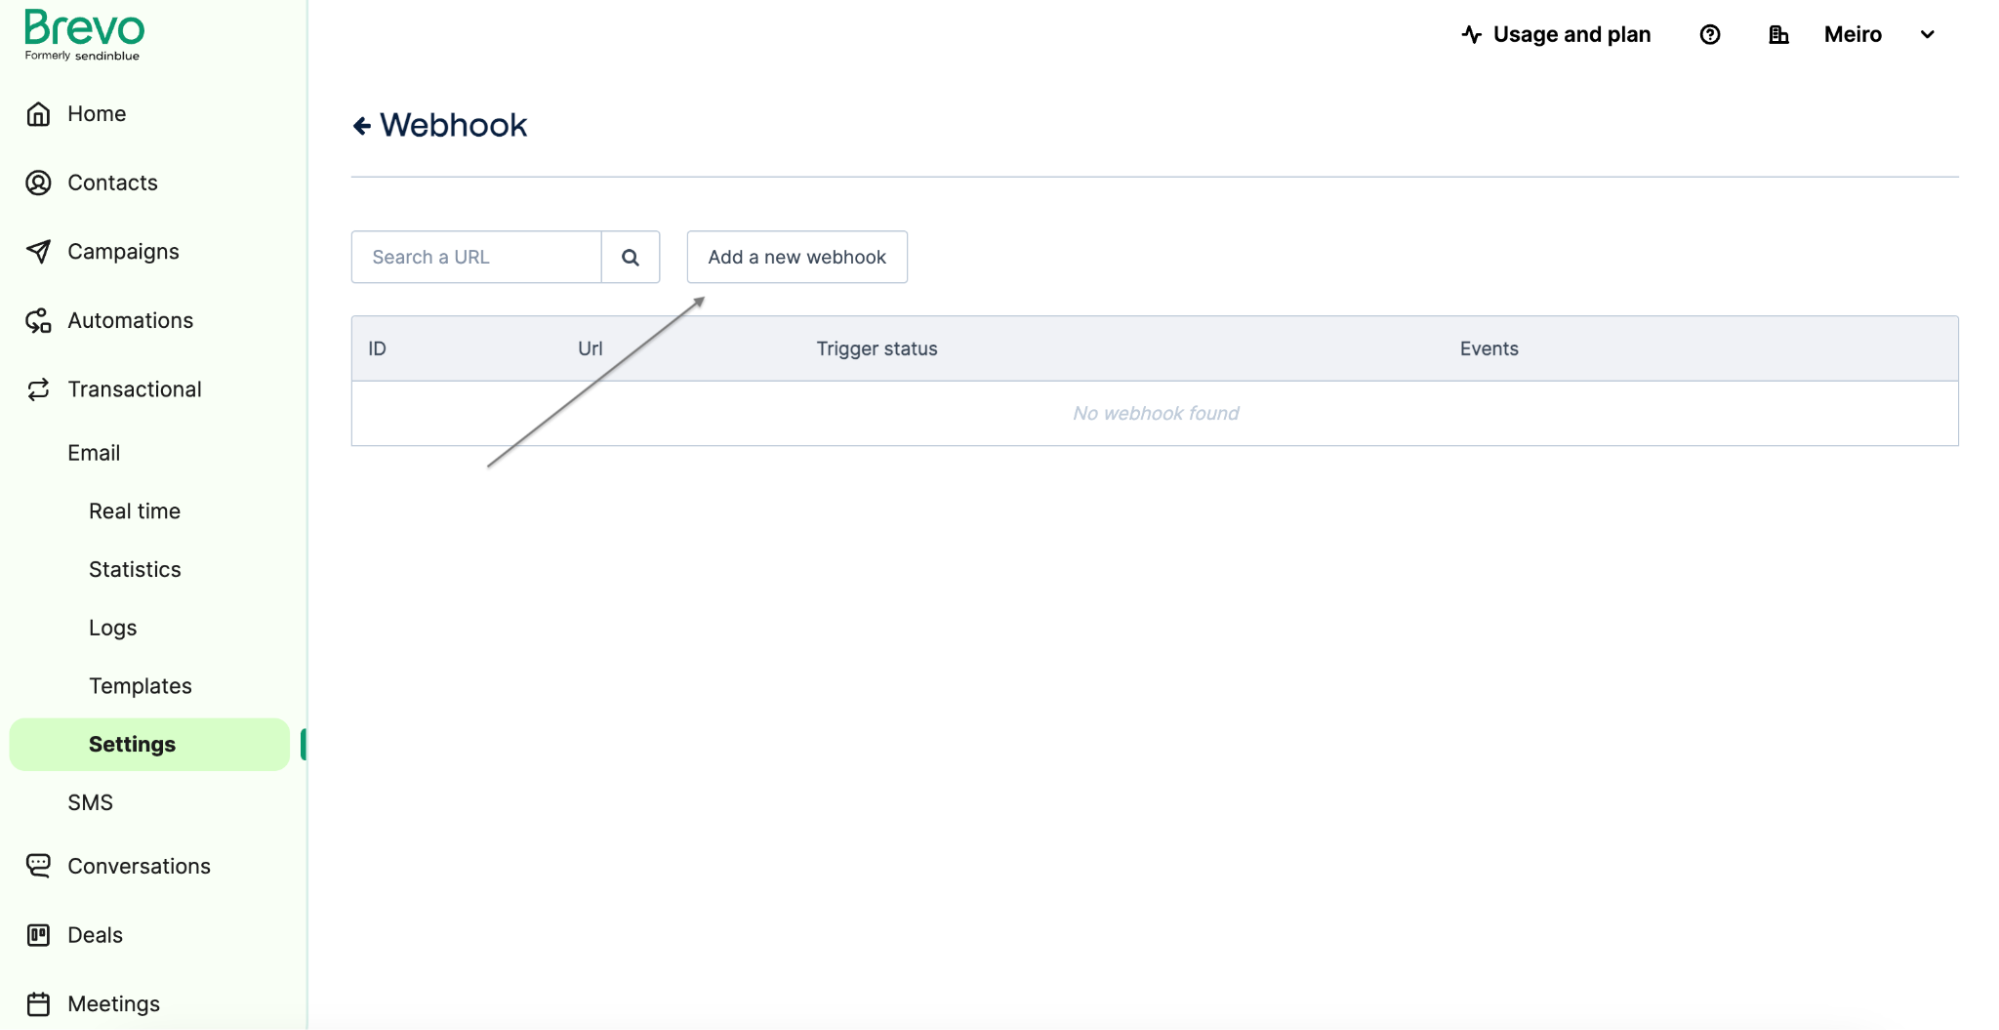
3. Locate and click the "Add New Webhook" button within the Webhook settings.
4. In the "URL to Call" field, insert the URL, e.g: https://me.client.domain/emails/feedback. Under the "When Message Is" section, select only the following 6 event types: "Delivered," "Soft Bounced," "Hard Bounced," "Complaint," "Unsubscribed," and “Blocked.”
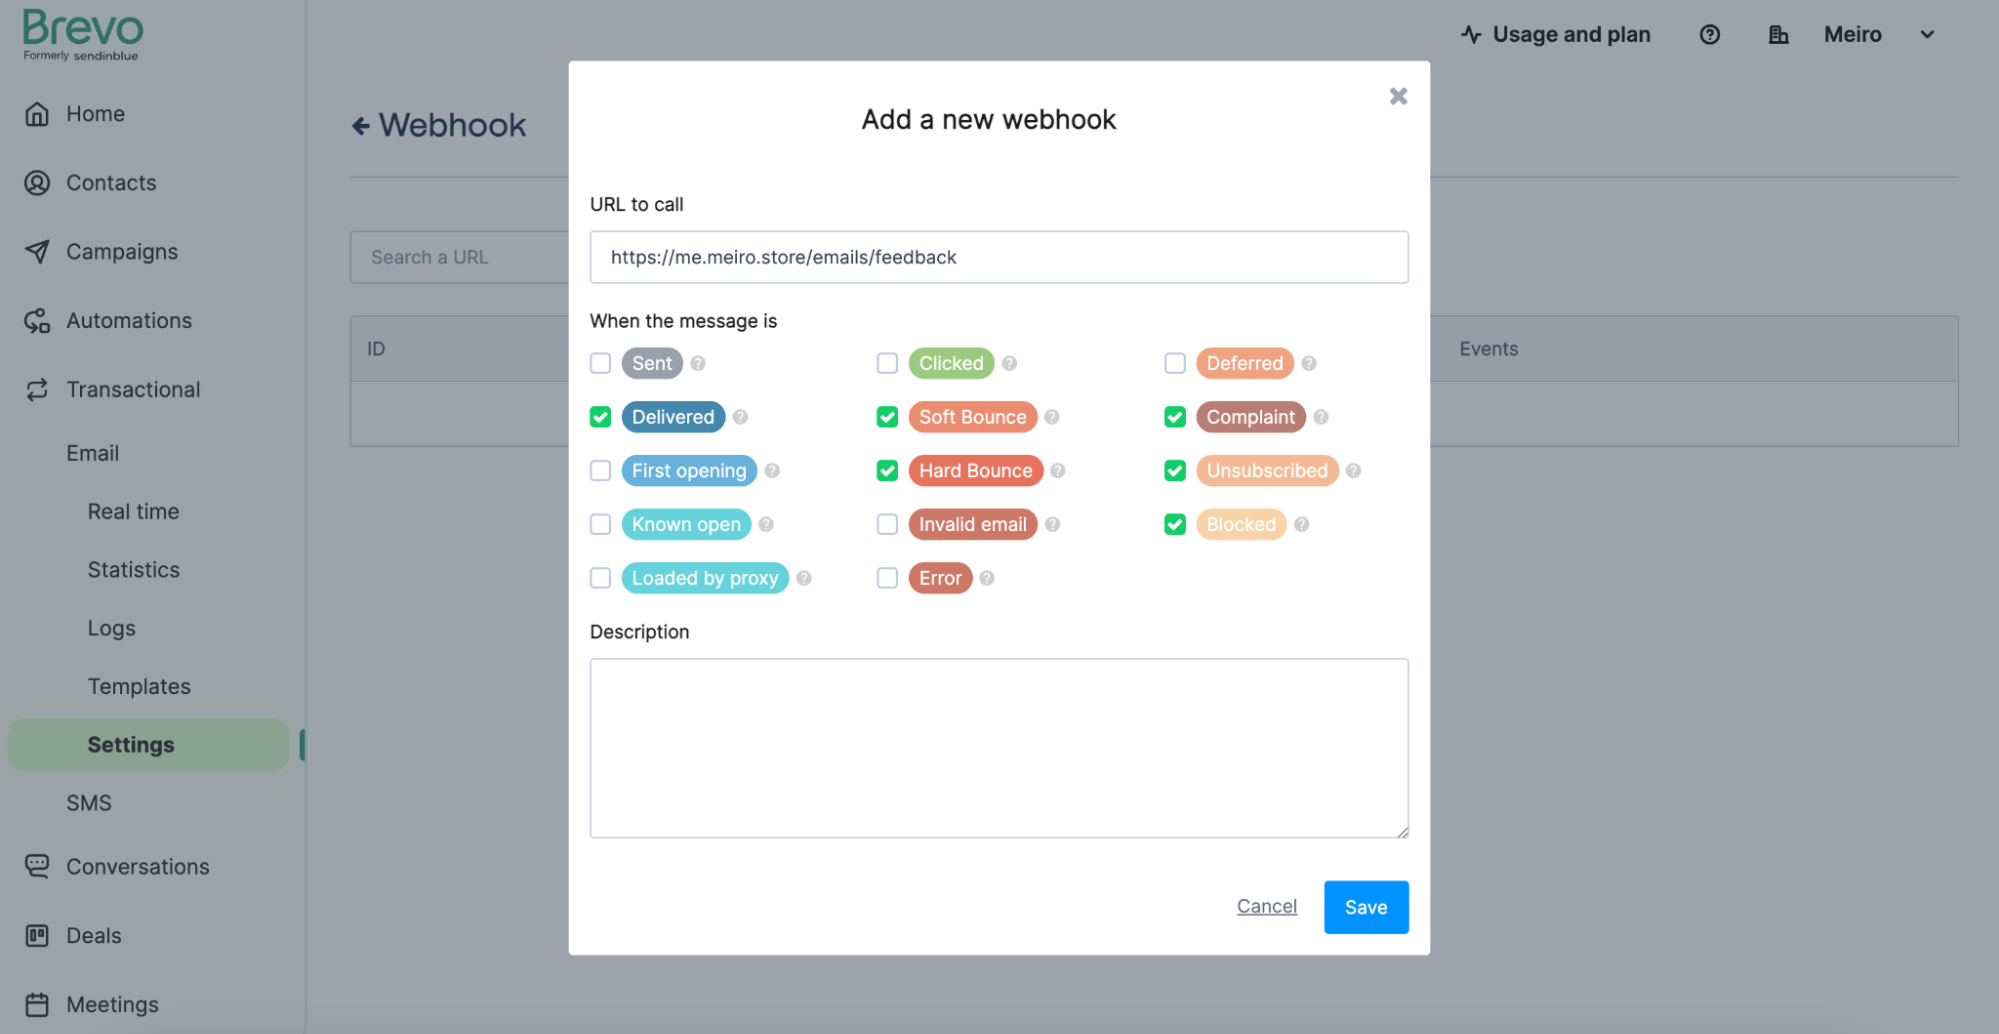
5. Once you've selected the desired events, click the "Save" button to save your webhook configuration.
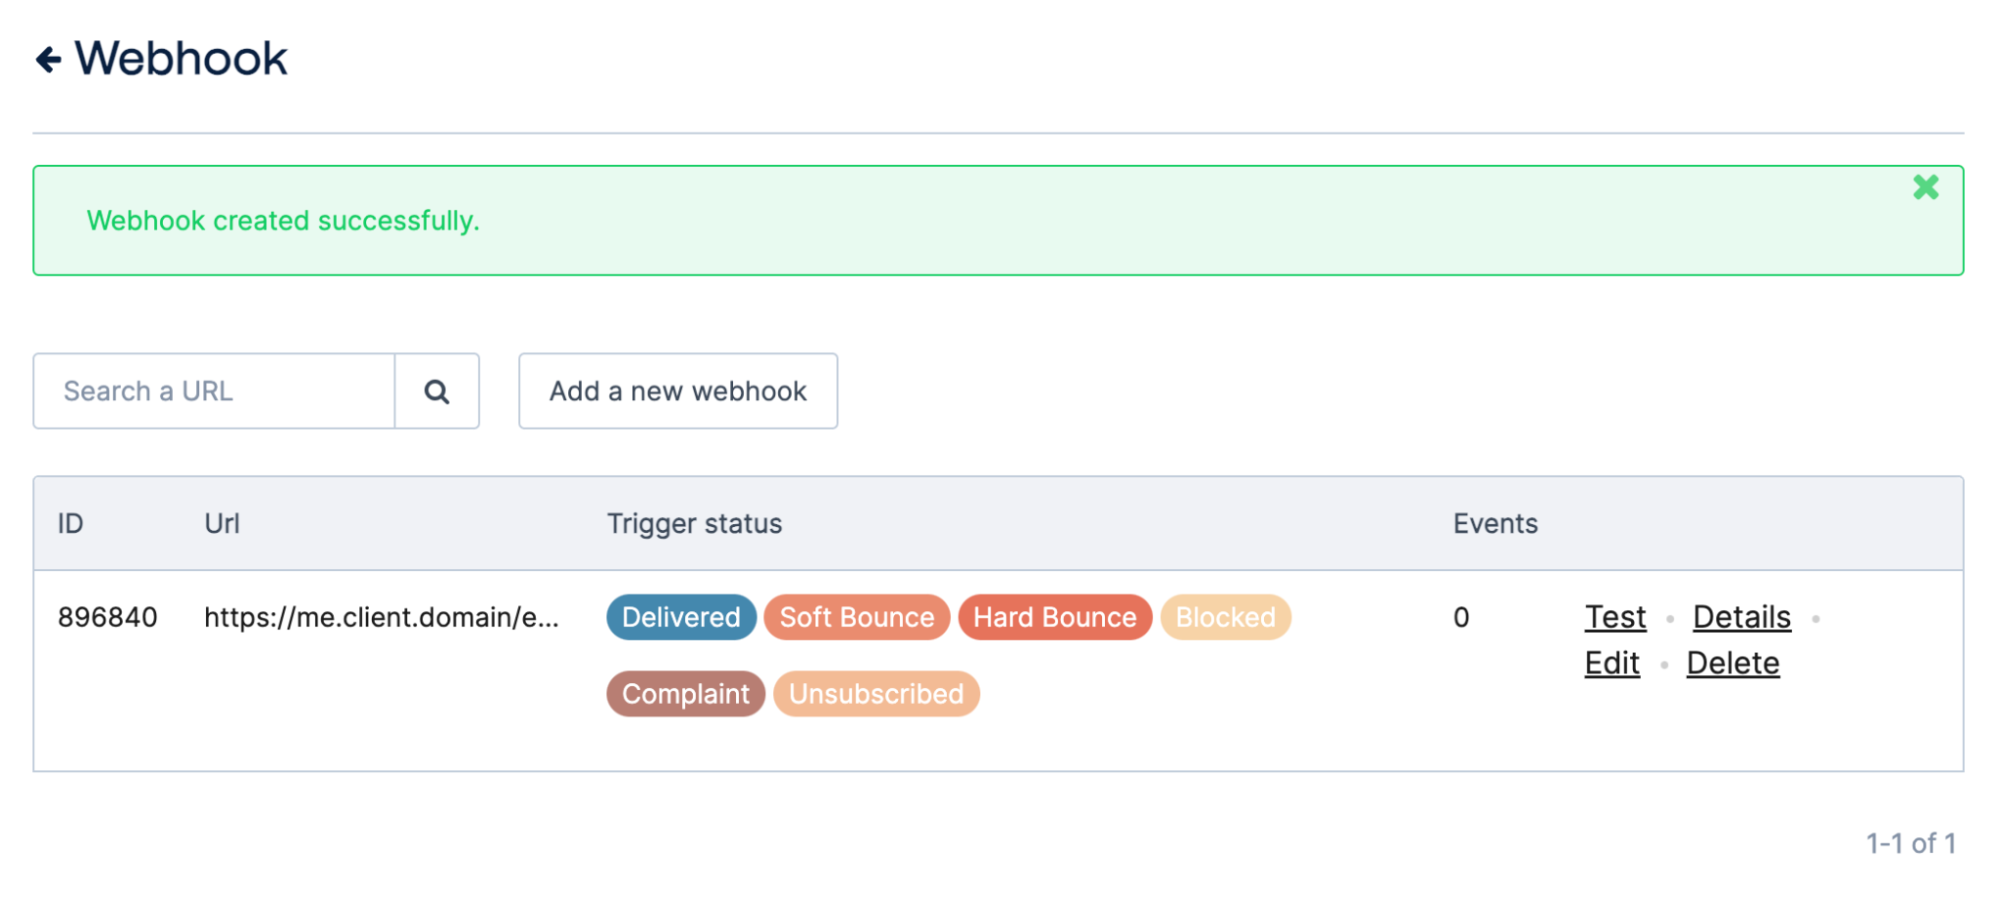
By following these steps, you'll configure your webhook endpoint in Brevo to receive event-specific data and updates for the chosen events, allowing you to stay informed about the status of your email campaigns.
Remember: in case any errors appear, it is highly recommended to check if any active incidents are not taking place in Brevo by visiting the Brevo Status Page before reaching out and raising a bug report with the Meiro team. This will help you confirm whether any ongoing issues might be affecting the behavior of your webhook or email events.
4.3 Infobip provider
Here's a step-by-step guide for setting up a webhook endpoint with Infobip:
1. Navigate to "Developer Tools" and select "Subscription Management". Click on the “Create Subscription” button within the Subscription Management area and start creating a subscription.
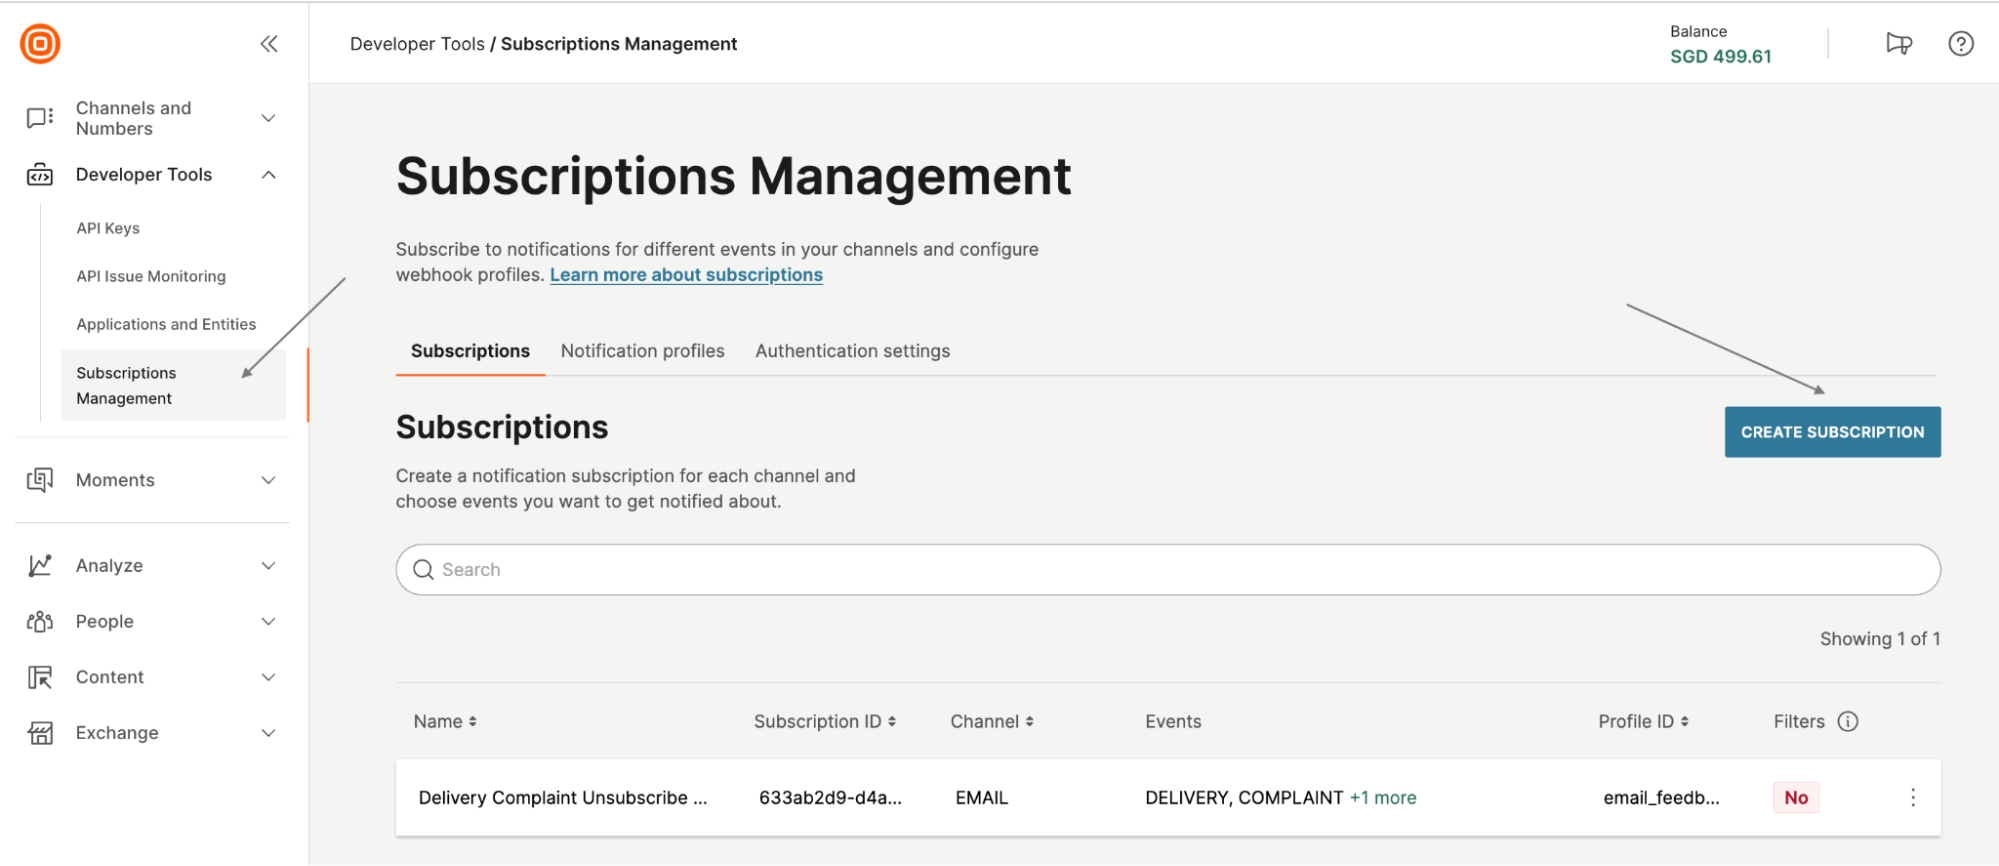
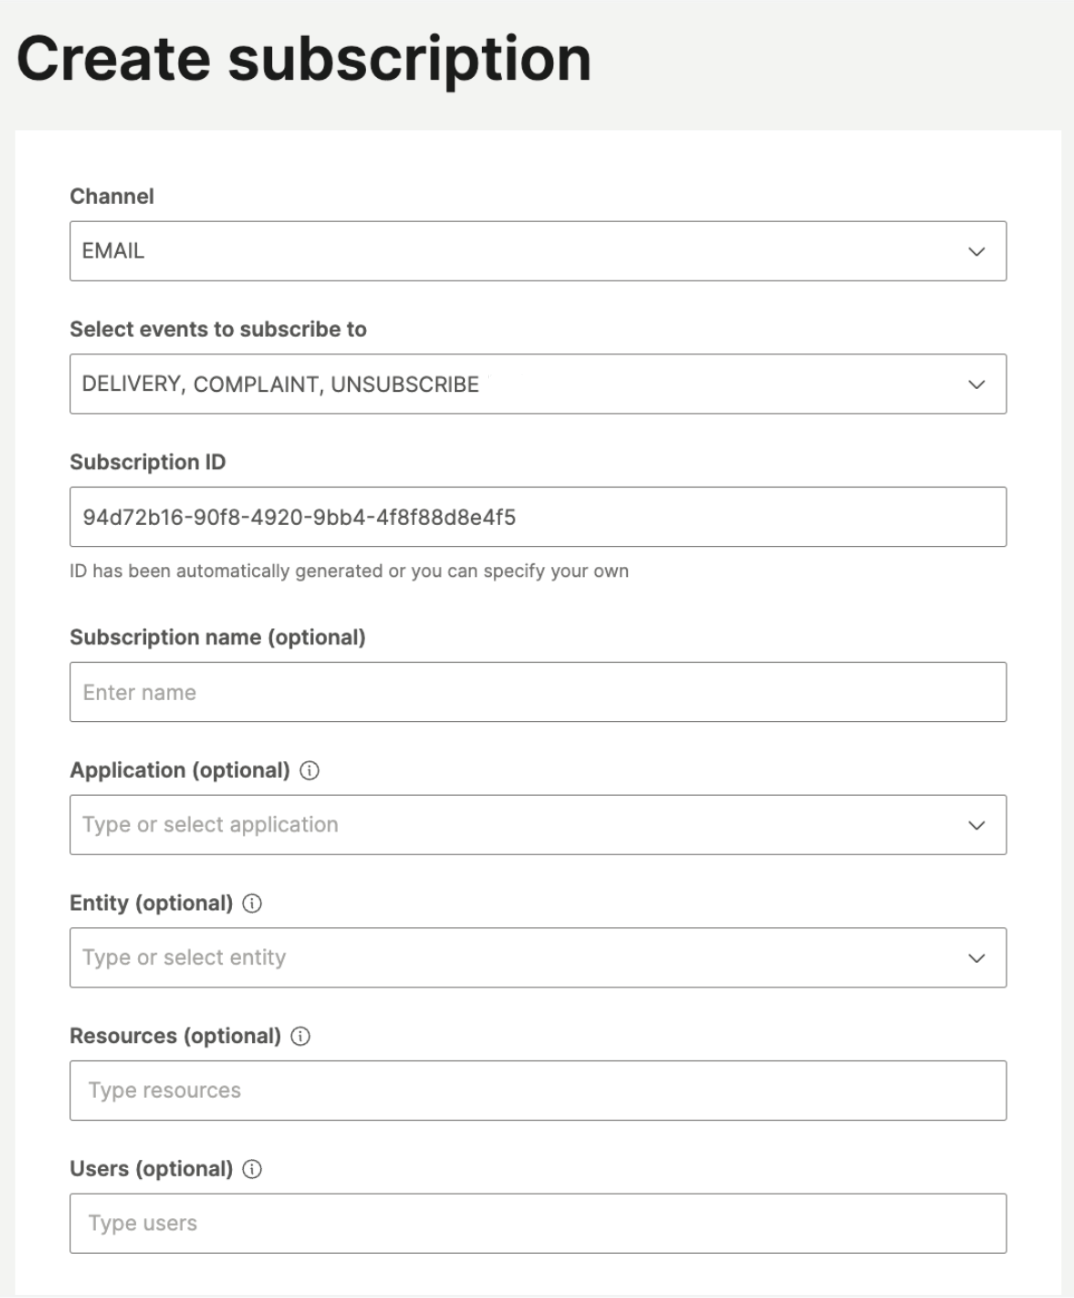
2. Configure Subscription for Email Events:
2.1. Select "Email" in the channel dropdown, and choose delivery, complaint, and unsubscribe events.
2.2. Let the Subscription ID be automatically generated or specify your own.
2.3. Add a name for your subscription (optional).
2.4. Optionally, add any active Applications, Entities, Resources, or Users to the subscription.
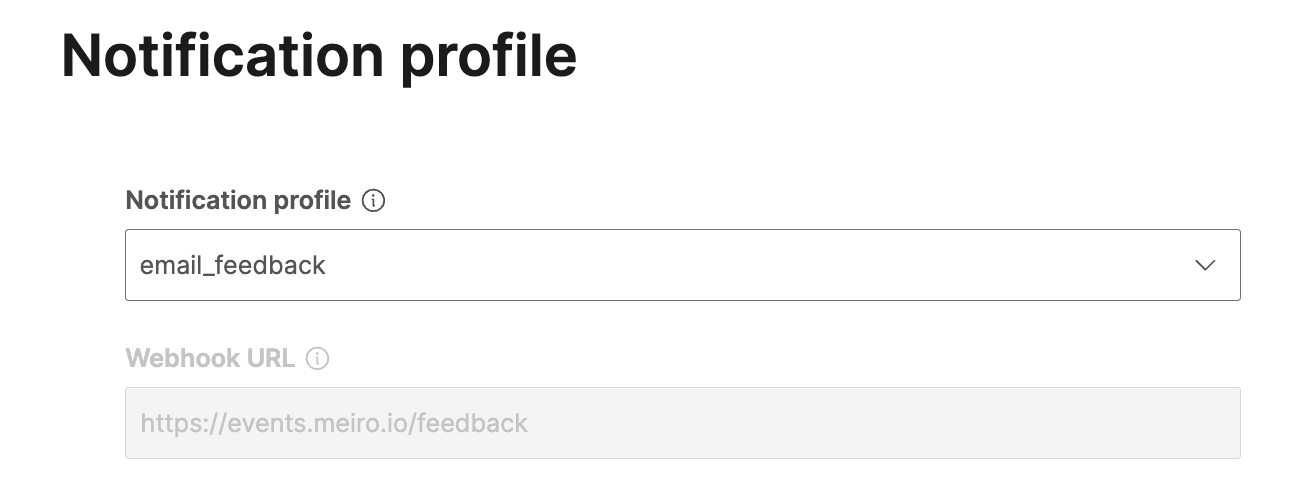
 3. Select or create a new Notification Profile. Configure the webhook URL to your feedback endpoint (e.g.,
 https://me.client.domain/emails/feedback).
 4. Define Authentication settings (create new if needed).
5. Save your subscription.
Learn more: about how to configure the Infobip webhook.
4.4 Omnivery Provider
Feedback Tracking Is Configured Automatically
When you use Omnivery as your email provider, Meiro automatically sets up feedback tracking for you.
This means you do not need to create any webhooks manually in the Omnivery dashboard.
When Meiro sends an email via Omnivery, delivery and recipient feedback events are automatically sent back to your Meiro environment. This allows Meiro CDP to track what happened to each message and update campaign statistics and customer profiles accordingly.
The following feedback events are supported:
Open and click tracking are handled directly by Meiro, so no additional configuration is required in Omnivery.
What You Need to Configure
To use Omnivery successfully:
How to Verify the Integration
After saving the configuration:
Once the channel is configured, Meiro automatically handles all required communication with Omnivery, including feedback processing.
For more information about webhook payloads, see the Omnivery Mailgun Webhooks documentation.
5. Public API interface
This section outlines the public endpoints and their corresponding request structures for handling email-related events within the system.
5.1 Endpoint: Email Subscription Requested
The endpoint allows clients to submit email subscription requests.
ME API Endpoint:
POST /emails/subscribe
Request Example:
{
  "email": "a@b.com", // Required, email address regex validation
  "subscription_source": "website footer form" // Optional string
}
Response Example:
200 - Subscription request successfully received. When a valid 'Email Subscription Requested' event is received, the system appends the subscription_request type to the event. Additionally, a unique UUID is generated and then added to the event object as the subscription_request_id, so we can match subsequent opt-in sent and confirmation events with the original request.
Warning: The subscription frequency limit is configured to allow one subscription per 24 hours. This means that a user can subscribe and trigger a subscription request event, but they will not receive the opt-in message until at least 24 hours have passed. To start receiving opt-in emails, users need to subscribe again after this period, as previously sent requests within the 24-hour window won't be processed.
Several possible validation errors may occur:
400 - Bad Request: Email Address Already Subscribed
{
  message: "Email address is already subscribed",
  status: "EmailAlreadySubscribed"
}
400 - Bad Request: Email Address Blocked
{
  message: "Email address is blocked",
  status: "EmailBlocked"
}
400 - Bad Request: Invalid Email Address
{
  message: "Email address is invalid",
  status: "EmailInvalid"
}
400 - Bad Request: Invalid Request (e.g., missing required properties in the subscription request or other validation errors)
{
  message: "validation: email is required property",
  status: "error"
}{
message: "Service unavailable.",
status: "ServiceUnavailable"
}5.2 Endpoint: Email Unsubscribed
The "Email Unsubscribed" endpoint allows users to unsubscribe from email campaigns.
ME API Endpoint:
POST /emails/unsubscribe
Request Example:
{
  email: "a@b.com", // Required, email address regex validation
 campaign: { // Optional string, but if provided "id" and "name" are required
    id: "campaign_id",
    name: "campaign_name"
  },
  message_id: "message_id", // Optional string
  subject: "subject", // Optional string
  unsubscribe_source: "Meiro unsubscribe page" // Optional string
}
Response Example:200 - Unsubscription request successfully received. When a valid 'Email Unsubscribe event is received, the system appends the 'unsubscribe' type to the event.
304 - Not Modified
Indicates that the email address is already unsubscribed or doesn't exist in CDP. In this case, no unsubscribe event is generated.
Several possible validation errors can occur:
400 - Invalid Email Address
It occurs when the provided email address is invalid.
{
  message: "Email address is invalid",
  status: "EmailInvalid"
}
400 - Invalid Request
Arises if the request does not align with the event schema or has missing required properties.
{
  message: "validation: email is required property",
  status: "error"
}{
message: "Service unavailable.",
status: "ServiceUnavailable"
}5.3 Endpoint: Email Feedback
The endpoint listens for webhook events from various email providers to collect real-time updates on email events.
Once some event is received, it undergoes transformations according to the relevant system event schema. Event transformations are different for each email provider, and they are defined according to the value on the ME config. Transformed events, regardless of their provider, are centralized under the /emails endpoint, from where the autoload feature retrieves them.
ME API Endpoint:
GET /emails/feedback
Event Types
The webhook integration supports six distinct event types. Below is an overview of the supported event types and event schema:
- Delivered:
{
  "campaign": {                     // optional block
    "id": "616ad85c-b1ae-489c-8160-3be80174d211",   // optional string (UUID format)
    "name": "NPS test"             // optional string
  },
  "email": "a@b.com",            // required, email address regex validation
  "message_id": "",             // required string
  "subject": "",                // optional string
  "type": "email_delivered"     // required, type of event
}- Soft Bounced:
{
  "campaign": {                     // optional block
    "id": "616ad85c-b1ae-489c-8160-3be80174d211",   // optional string (UUID format)
    "name": "NPS test"             // optional string
  },
  "email": "a@b.com",              // required, email address regex validation
  "code": {                        // optional block
    "basic": "421",                // string (optional but recommended if available)
    "enhanced": "4.3.0"            // optional string (not all providers support this)
  },
  "reason": "Temporary system problem. Try again later.",  // required string
  "bounce_type": "soft",           // required, enum: "soft"
  "message_id": "602e0a38-7d90-4222-9aae-543f00154a0a",     // required string
  "subject": "",                   // optional string
  "type": "email_bounced"         // required, fixed value
  ...possible additional payload data which won't be validated (campaign name, id, subject...)
}- Complaint (Spam):
{
  "campaign": {                     // optional block
    "id": "616ad85c-b1ae-489c-8160-3be80174d211",   // optional string (UUID format)
    "name": "NPS test"             // optional string
  },
  "email": "a@b.com",              // required, email address regex validation
  "message_id": "",                // required string
  "subject": "",                   // optional string
  "type": "spam_complaint"         // required, fixed value
}- Hard Bounced:
{
  "campaign": {                     // optional block
    "id": "616ad85c-b1ae-489c-8160-3be80174d211",   // optional string (UUID format)
    "name": "NPS test"             // optional string
  },
  "email": "a@b.com",              // required, email address regex validation
  "code": {                        // optional block
    "basic": "421",                // string (optional but recommended if available)
    "enhanced": "4.3.0"            // optional string (not all providers support this)
  },
  "reason": "Temporary system problem. Try again later.",  // required string
  "bounce_type": "hard",           // required, enum: "hard"
  "message_id": "602e0a38-7d90-4222-9aae-543f00154a0a",     // required string
  "subject": "",                   // optional string
  "type": "email_bounced"         // required, fixed value
  ...possible additional payload data which won't be validated (campaign name, id, subject...)
}- Unsubscribed:
You have to add just email, message_id, subject and the unsubscribe type will be added by ME itself.
{
  "email": "a@b.com",              // required, email address regex validation
  "campaign": {                    // optional object
    "id": "email_id",              // optional string (campaign UUID or identifier)
    "name": "email_name"           // optional string
  },
  "message_id": "",                // optional string (message ID if available)
  "unsubscribe_source": "",        // optional string (e.g., "footer_link", "feedback_form")
  "subject": "",                   // optional string
  "type": "unsubscribe"            // required, fixed value
}
- Blocked:
{
  "campaign": {                     // optional block
    "id": "616ad85c-b1ae-489c-8160-3be80174d211",   // optional string (UUID format)
    "name": "NPS test"             // optional string
  },
  "email": "a@b.com",              // required, email address regex validation
  "message_id": "",                // optional string
  "reason": "some reason",         // optional string
  "blocked_by": "CDP user name (userId) | hard_bounce_webhook | block_webhook",  // required string
  "subject": "",                   // optional string
  "type": "email_address_blocked"  // required, fixed value
}
The flow for the blocked events received via webhook looks like this:

For the Infobip provider, the "Email Address Blocked" event is generated when an email address has been blocked due to five consecutive soft bounces, which are classified as hard bounces.
Learn more: about events tracked with Brevo.
No Comments