Email channel configurations
The Administration/Configurations/Channels tab in Meiro Business Explorer enables businesses to configure channels for running campaigns. This guide provides a step-by-step tutorial on configuring the Email channel in Meiro Business Explorer.
Prerequisites for EmailsTo use the Email channel in Meiro Business Explorer, please ensure the following prerequisites are met:
Learn more: See the full guide for Webhook Setup and each provider configuration here. |
- Email provider settings
- Configuring Email Providers in Meiro CDP
- Available SMTP Integrations
- Configuration of email stitching category
- Verified senders
- Opt-in email customization
- Unsubscribe customization
Email provider
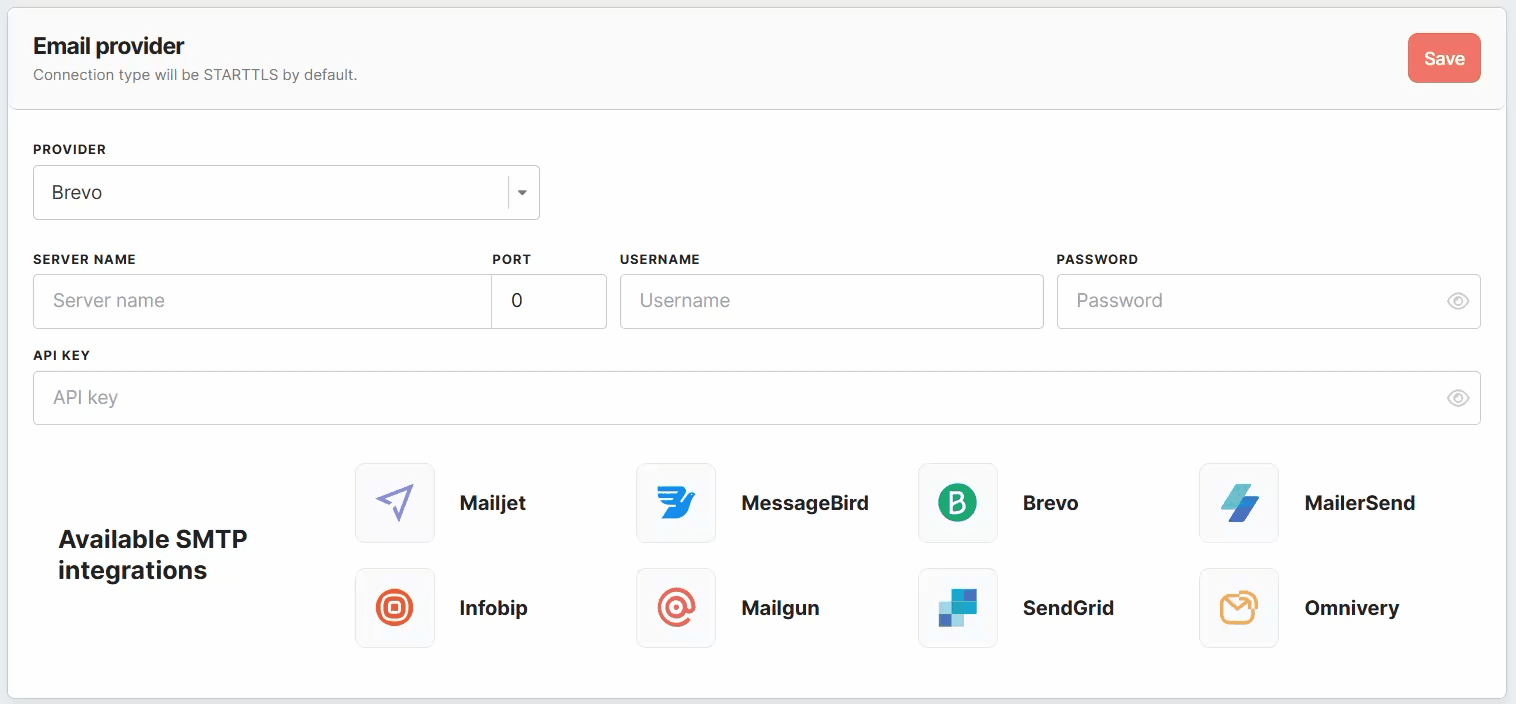
Configuring email providers in Meiro CDP
Meiro CDP supports multiple email providers, each with specific configuration fields. Below, you’ll find a breakdown of the required fields for Brevo, Infobip, and Omnivery.
Brevo Configuration
Brevo uses SMTP for sending emails. To configure Brevo, fill in the following fields:
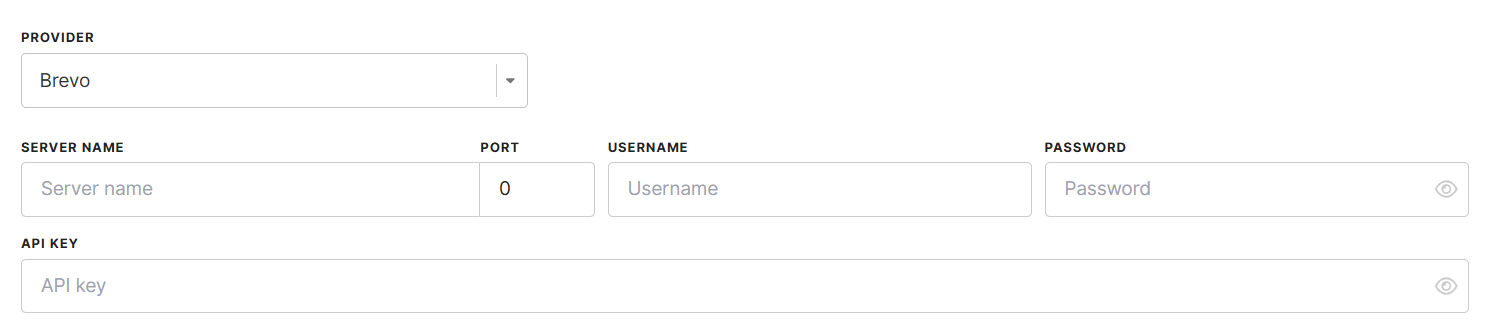
- Provider – Select Brevo from the list of available email providers.
- Server Name – The SMTP server address for Brevo (e.g.,
smtp-relay.brevo.com), that will be used to send email messages. - Port – The SMTP port used for email transmission. Brevo supports:
587(recommended for STARTTLS encryption)465(for SSL encryption)25(unencrypted, not recommended)
- Username and Password – Your Brevo account credentials used for authentication.
- API Key – The authentication credential used for secure communication with the SMTP server.
By default, the connection type is STARTTLS, ensuring encrypted communication between Meiro CDP and the Brevo SMTP server.
Infobip Configuration
Infobip supports both SMTP and API-based authentication. To configure Infobip, complete the following fields:
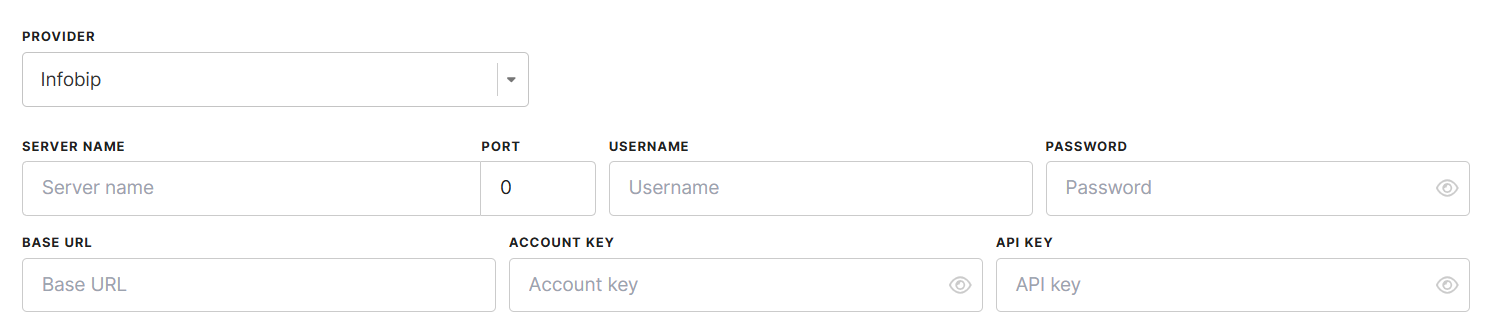
- Provider – Select Infobip from the list.
- Server Name – The SMTP server address provided by Infobip, that will be used to send email messages.
- Port – Choose a supported SMTP port:
587,465, or25. - Username and Password – These can be:
- Your Infobip website login credentials, OR
- An "App"/API key associated with your Infobip account.
- Base URL – The unique web address for API requests, ensuring optimized request routing.
- Account Key – A unique identifier for your Infobip account.
- API Key – Required for API-based email sending, adding an extra layer of security.
As with other SMTP-based providers, Infobip uses STARTTLS encryption by default.
Omnivery Configuration
Unlike Brevo and Infobip, Omnivery does not require SMTP credentials. Instead, it operates through API-based communication. To configure Omnivery, provide the following details:
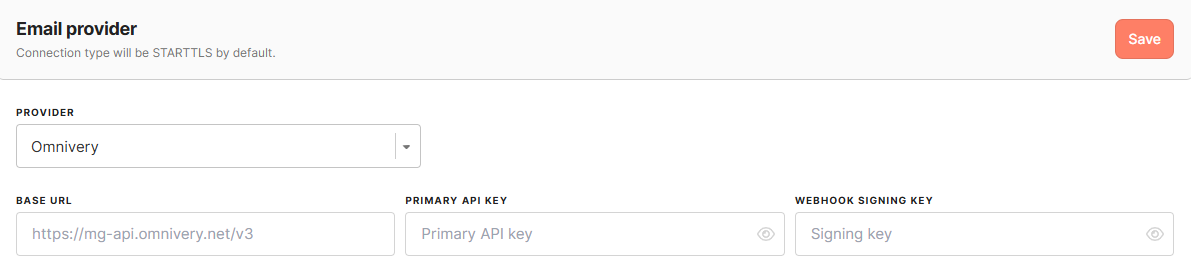
- Provider – Select Omnivery as your email provider.
- Base URL – The API endpoint for Omnivery (e.g.,
https://mg-api.omnivery.net/v3). - Primary API Key – The authentication credential for connecting to Omnivery's API.
- Webhook Signing Key – Used to verify the authenticity of incoming webhook events (optional).
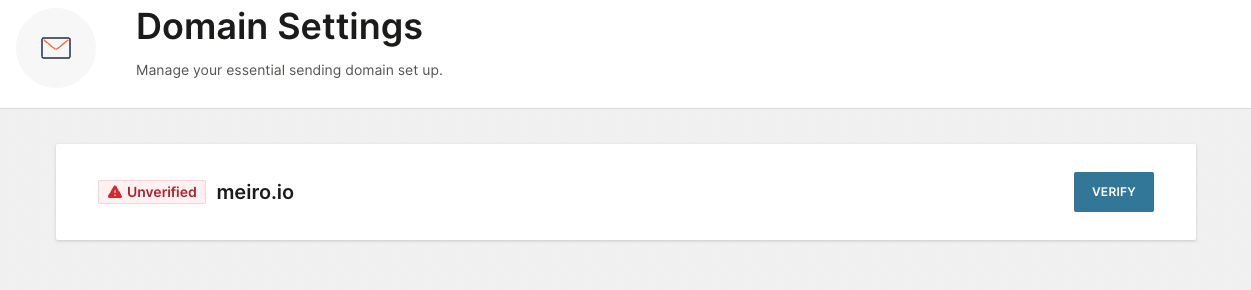
You can use sender addresses from multiple verified domains in Omnivery. Each domain must be authenticated and verified before it can be used.
Learn more about using multiple sending domains and best practices for deliverability.
This ensures seamless integration without unnecessary configuration fields.
Security & Encryption
By default, all SMTP-based connections use STARTTLS encryption to ensure secure email transmission. Omnivery, using API-based communication, follows strict security protocols to protect your email-sending process.
Learn more: For further details on each provider's setup, refer to the official documentation:
Brevo Setup Guide | Infobip Setup Guide | Omnivery Setup Guide
Available SMTP Integrations
This section presents a selection of SMTP providers suitable for email communication, including Mailjet, MessageBird, Brevo, MailerSend, Infobip, Mailgun, SendGrid, and Omnivery.

Configuration of email stitching category
At the next stage, choose the stitching category related to emails, keeping in mind that it cannot be changed later on. The email stitching category helps to associate email-related events with the correct email addresses.
You can either pick an existing category related to emails or create a new one using the “add stitching category” button if a suitable category is unavailable.

Remember: Be sure to use stitching rules based on the shared identifier message_id to link email-related events. This identifier is part of the URL query parameters of the email link click.
Verified Senders
In the "Verified Senders" section, you need to configure the email addresses that will be available for use as sender and reply addresses in your email campaigns. When creating an email, you can select from a list of email addresses you have previously verified in the configuration section. If you have marked a default email address, it will automatically fill in the email creation form.

To add a new email address to your list of verified senders, fill in the email address in the designated field and click the 'add address' button. Every email address you add must be verified by following a link sent to that email address.
Remember: you can remove an email address from the list of verified senders if it is not currently being used in any email campaign. Additionally, at least one email address must be configured in the "Verified Senders" section.
You can use sender addresses from multiple verified domains in Omnivery. Each domain must be authenticated and verified before it can be used.
Learn more about using multiple sending domains and best practices for deliverability.
Setting Stitching Rule
To enable the inclusion of email events in the profile identity graph, the analyst must establish a stitching rule for the Meiro Email Message ID attribute and associate all pertinent email events with it.
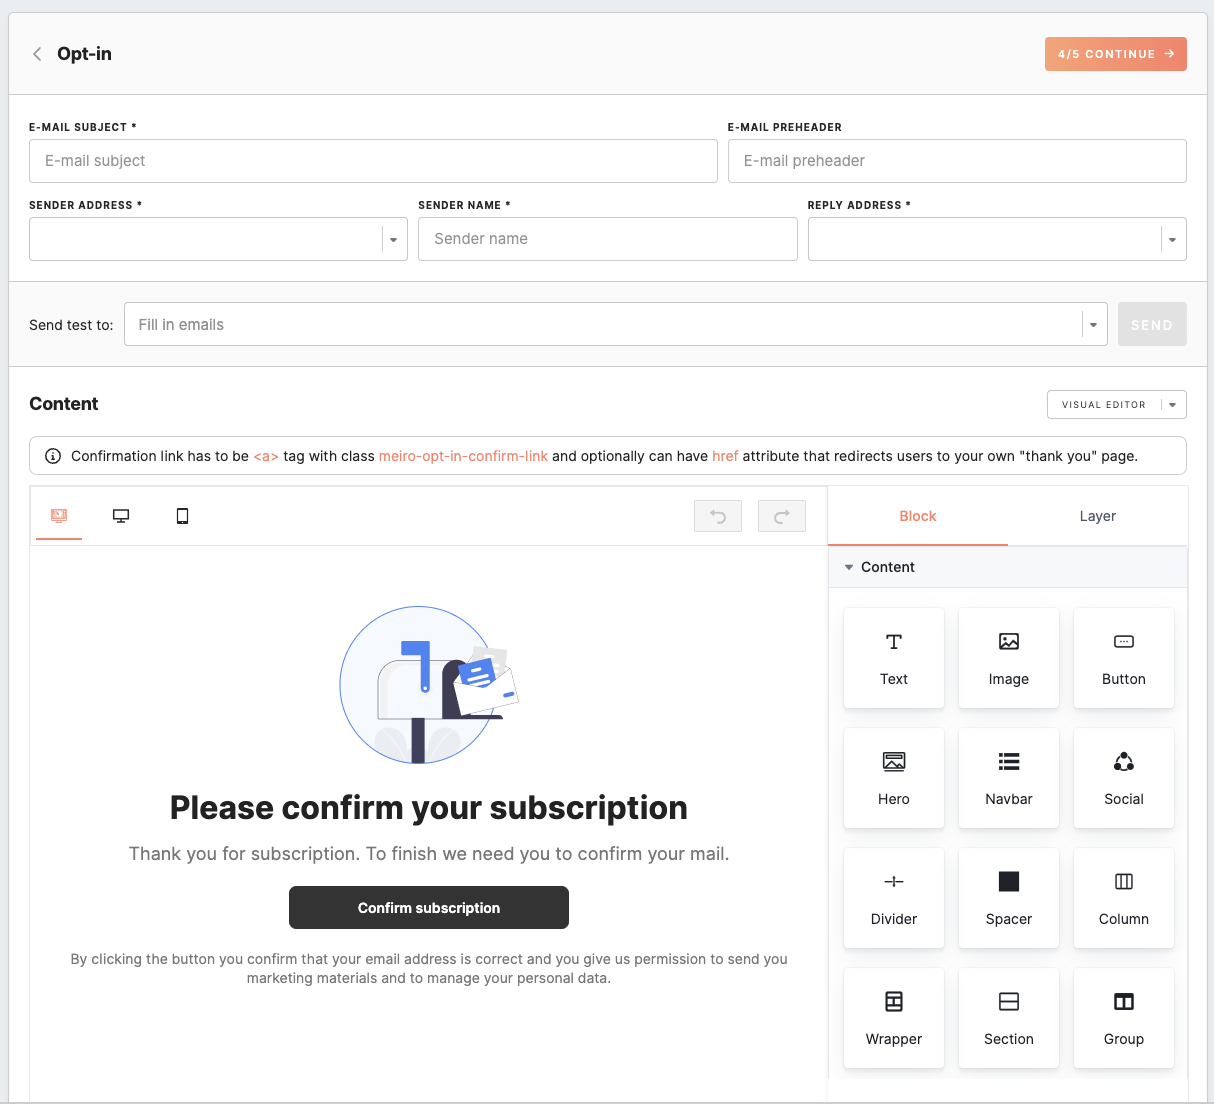
Opt-in email customization
In this section, it is possible to configure opt-in email parameters and its page. A default template design will be provided, allowing you to get started without defining your own template immediately after channel activation.
|
Email Subject (required) |
A brief description that summarizes the topic or purpose of an email message, which is displayed at the top of the email message, above the body of the email. The limit is 150 characters. |
|
Email Preheader (optional) |
The text that appears next to or below the subject line in the inbox. The limit is 100 characters. |
|
Sender address (required) |
The email address will appear as the sender of the email. You can select from a list of email addresses that you have previously verified in the configuration section. |
|
Sender name (required) |
This field allows optionally providing the sender's name that recipients will see when they receive the email. |
|
Reply address (required) |
Select one from the dropdown list of configured emails. The email address will be shown to recipients when they hit the "Reply" button in the email. |
|
Send test to (optional) |
To start testing the appearance of opt-in email, you need to fill in the email addresses of the testing users (e.g., example@gmail.com) in the field and click the “Send” button. |
|
Content of Email (required HTML or Visual email) |
The default template design will be applied after you activate the Email channel. You may proceed with changing the template to your needs. Select the desired email type (HTML or Visual editor guide) and fulfill the content. When creating a customized opt-in template, it's essential to follow these specific requirements for the confirmation link:
For adding a class to the text, image or button content block, expand the 'extra' section and fill the field with the class name
Remember: once you switch to a custom opt-in template, you cannot go back to the default template. Remember: the attribute picker has been removed from opt-in customization, and manual insertion of attributes should be avoided. This is due to the impracticality of using attribute placeholders when requester identities are typically unknown, leading to empty values in the message. Learn more: about the content block available in the Visual editor guide. |
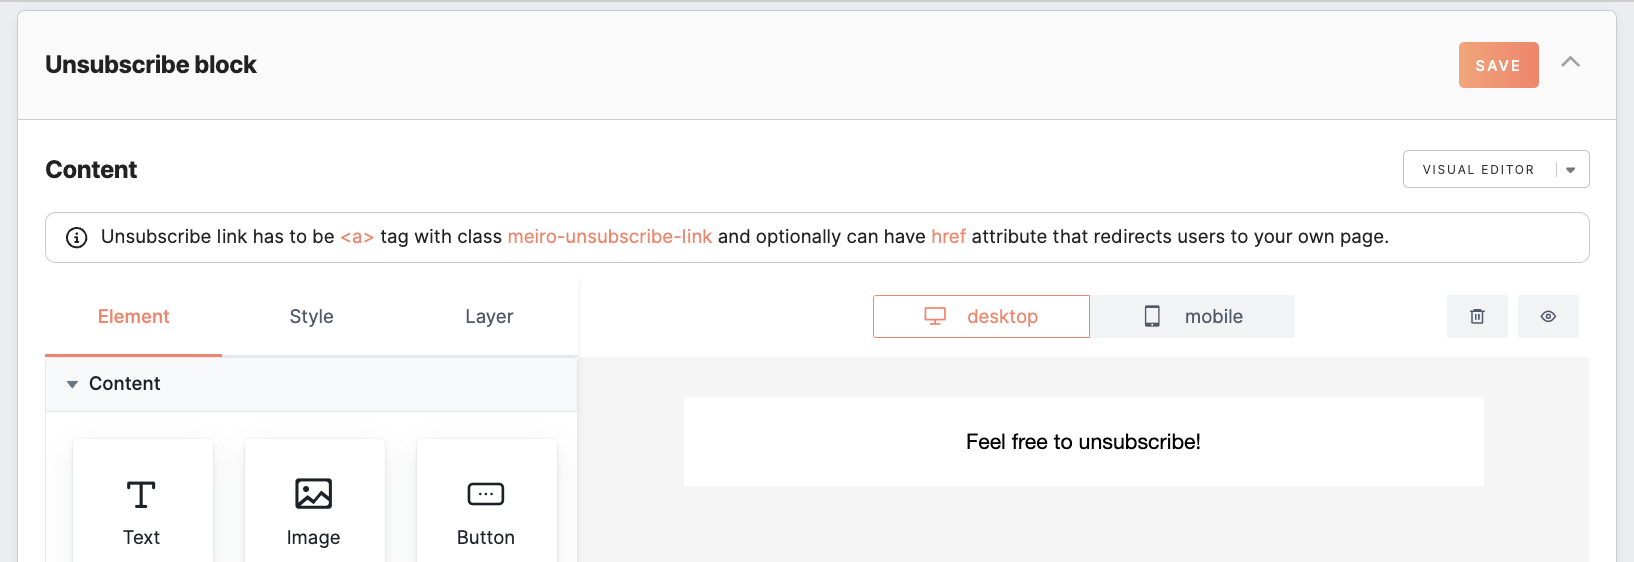
Unsubscribe customization
In this section, you can set up the unsubscribe link that will be included at the bottom of each campaign email
To create a custom unsubscribe link, it's crucial to adhere to the following specific requirements:
- The link must contain the class name
meiro-unsubscribe-link; - It can either be an
<a>tag or a wrapper tag containing at least one<a>tag. - The
<a>tag may have one of the followinghrefattributes:hrefwith a valid URL to the custom “thank you” pagehref="#"(anhrefattribute with the value "#" indicating no action)
You can assign a class to a text block within HTML mode, and for other elements, you can include the class in the 'extra' section.
After setting all sections, the email channel will be configured and activated for use.
Remember: You can choose to include or exclude the unsubscribe block directly when creating an email campaign (both in the Visual and HTML editors). This gives you the flexibility to send transactional messages without the unsubscribe footer or one-click unsubscribe button.
Sending transactional emails without unsubscribe options requires using a dedicated transactional sender.
Learn more: Unsubscribe Footer Control in Email Campaigns →
Email tech setup for the best deliverability
1. Consider a separate domain for emailing
If you send many marketing emails, consider using a subdomain (e.g., mail.yourdomain.com) or a different domain altogether for these communications. This can help protect your primary domain's reputation if there are deliverability issues with the marketing emails.
- To separate transactional, promotional emails, and informational newsletters from each other.
- To track the analytics, such as deliverability rate, more accurately.
- To separate emails from different teams, such as global, events, sales, and outreach teams, so that they can analyze their metrics separately.
Example of Apple: no_reply@email.apple.com ; news@insideapple.apple.com
Example of Google: comments-noreply@docs.google.com ; no-reply@accounts.google.com
Using multiple sending domains
Omnivery allows you to use multiple sending domains for your email campaigns.
This is useful if your organization manages several brands, regions, or departments that send from different domains (for example, news@brand-a.com and promo@brand-b.com).
Each sending domain must be authenticated and verified in Omnivery before it can be used.
After verification, you can select any sender address from that domain directly in Meiro when creating or editing a campaign.
2. Shared vs. private IP address
Choosing between shared and dedicated (private) IP addresses for email sending largely depends on your sending volume, budget, and desire for control over your sending reputation. Both options have their advantages and disadvantages. Let’s explore them:
Shared IP Address
Advantages:
- Cost-Effective: Shared IPs are usually less expensive or included in the pricing of email service providers.
- Reputation Management: The email service provider manages the reputation of the shared IP, so you don’t have to manage it yourself.
- Low Volume Sending: For senders who don’t send large volumes of email, a shared IP can provide the benefit of a good sending reputation (assuming the ESP enforces good sending practices for all users).
Disadvantages:
Dedicated (Private) IP Address
Advantages:
- Control Over Reputation: With a dedicated IP, you have full control over your sending reputation. Your practices directly impact your deliverability without interference from other senders.
- Consistent Deliverability: High volume and/or enterprise senders can ensure more consistent deliverability by maintaining their IPs.
- Customization: It can be configured and managed according to your specific sending needs and practices.
Disadvantages:
- Cost: Dedicated IPs come at an additional cost, which might not be justifiable for small senders.
- IP Warm-Up Required: New dedicated IPs must be “warmed up” by gradually increasing sending volume over time to establish a good reputation.
- Ongoing Management: The ongoing management and monitoring of a dedicated IP’s reputation are your responsibility.
Recommendations:
- Small to Medium Senders:
- If you’re sending low to medium volumes of email and have a tight budget, a shared IP may be more suitable.
- Large Volume Senders:
- If you send high volumes of email, especially transactional emails, a dedicated IP might be more suitable to protect your sender reputation.
- High-Stakes and Critical Transactional Emails:
- If your emails are mission-critical (like password resets, order confirmations), a dedicated IP could be worthwhile, even at smaller volumes, to control deliverability tightly.
- Hybrid Approach:
- Some businesses opt for a hybrid approach, using dedicated IPs for transactional emails (to protect these high-priority messages) and shared IPs for bulk or promotional emails.
3. Authenticate Your Domain:
3.1 SPF (Sender Policy Framework): Helps servers verify that emails coming from a domain are legitimate.
The Sender Policy Framework (SPF)
An SPF record is a piece of text in the DNS settings of your domain (yourbusiness.com) that protects it from being spoofed (misused by others). Many spam filters and mail servers use an algorithm to mark emails as wanted or unwanted, often based on this record. The Sender Policy Framework tells the receiving mail server (like Gmail) that the domain is used by someone who's allowed to do so.
- Email without SPF
Email communications happen between two mail servers: yours and the one your recipient uses - the SMTP protocol. Your server hands over the information you want to send to your recipients. The problem, however, is that a sender can use any name or sender address. We could easily fake the sender and say we're Google, Amazon, or any other big brand, a.k.a. spoofing. - Email with SPF
With the Sender Policy Framework (SPF) in place, the receiving server can check whether the email you send actually comes from you. The SPF record holds a list of IP addresses that are allowed to send on your behalf. If the sender sends the email from an IP address that isn't on that list, it will not pass the SPF check.
The general manual approach to setting up the SPF can look like this:
1. Determine Your Sending IP Addresses:
Identify all IP addresses and services that send email on behalf of your domain. This includes your email service provider, marketing automation platform, helpdesk software, etc.
2. Create Your SPF Record:
The SPF record is a type of Domain Name Service (DNS) record.
An SPF record looks something like this:v=spf1 ip4:123.45.67.89 ip4:98.76.54.32 include:exampleesp.com -all
In this example:
ip4:123.45.67.89andip4:98.76.54.32are IP addresses authorized to send email on behalf of the domain.include:exampleesp.comindicates that the email sending IPs of exampleesp.com (e.g., an email service provider) are also authorized.-allindicates that only the IP addresses and domains specified in the SPF record are permitted to send email for the domain. Emails from all other sources will be considered unauthorized.
3. Add or Update SPF Record in DNS:
Log into your domain's DNS management platform.
Look for a section to manage DNS records.
If you already have an SPF record, update it to include the new values. If not, create a new TXT record.
Set the hostname or subdomain field to @ or leave it blank (depending on your DNS provider).
Paste your SPF record into the value or content field.
Remember: Every Email sending provider has more or less an automated onboarding process for SPF setup.
Check their documentation, e.g., Infobip, Brevo.
3.2 DKIM (DomainKeys Identified Mail): Allows the receiver to check that an email claimed to have come from a specific domain was indeed authorized by the owner of that domain.
1. Generate DKIM Keys:
For most Email sending providers: They will generate the DKIM keys for you within their platform. You'll typically find this in the domain/email authentication settings.
Warning: follow the Email provider's info with a specific process, e.g., Infobip, Brevo.
Manual generation: If you're not using a mainstream provider or need to do this manually, there are online tools that can help you generate DKIM keys.
2. Configure Your DKIM Record:
Once the keys are generated, you'll have:
- A Selector: A simple string used to distinguish between multiple DKIM records on a single domain.
- A Public Key: This will be part of the DKIM record you add to your DNS.
- A Private Key: This stays on your email server and should be kept secure. It's used to sign outgoing email.
Your DKIM record will look something like this (format may vary based on the provider):selector._domainkey.yourdomain.com. IN TXT "v=DKIM1; k=rsa; p=yourPublicKeyHere"
Replace selector with the actual selector provided by your provider and yourPublicKeyHere with the public key.
3. Add DKIM Record to DNS:
Log into your domain's DNS management platform.
Create a new TXT record.
For the hostname or subdomain field, enter the full name, e.g., selector._domainkey (it might vary based on your DNS provider).
Paste the DKIM record value into the appropriate field.
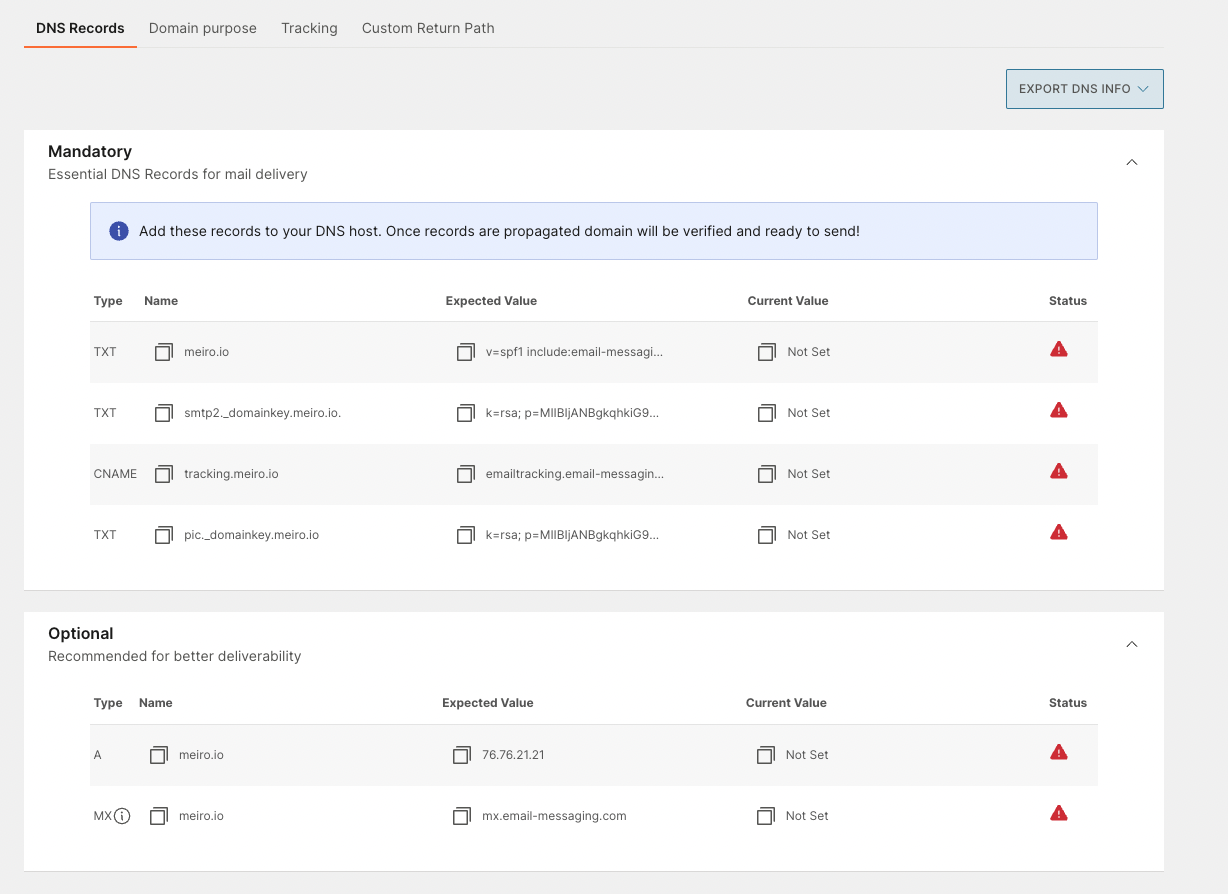
Showcase of Infobip-generated records to update DNS:
4. Verify Your DKIM Record:
Wait for the DNS to propagate (this might take anywhere from a few minutes to 48 hours).
Usually, email providers also include a validation checker when setting the authentication.
Or you can use a DKIM validation tool to check the record. Simply enter your domain and the selector.
Additionally, you can send a test email to a service like Mail Tester, which will give feedback on your DKIM and other email settings.
3.3 DMARC (Domain-based Message Authentication, Reporting, and Conformance): Builds on SPF and DKIM protocols to give domain owners the ability to protect their domain from unauthorized use.
DMARC is another text record located in DNS, specifically in the sending subdomain of the _dmarc.example.com domain, and should contain a p= flag meaning "policy". As a domain owner, you can enforce a policy for your DMARC record to define what should happen to email messages that fail the DMARC authentication checks.
You can choose between three different policies:
- none: Takes no action on the message and delivers it to the intended recipient.
- quarantine: Marks the message as spam and sends it to the recipient's spam folder. Recipients can review the spam message to identify legitimate messages.
- reject: Rejects the messages. With this policy, emails usually return soft bounces.
Learn more: about DMARC and setup here.
General approach to setup DMARC:
1. Ensure SPF and DKIM Are Already Set Up:
Before implementing DMARC, ensure you've correctly set up and tested both SPF and DKIM for your domain.
2. Create Your DMARC Record:
A basic DMARC record might look like this:
v=DMARC1; p=none; rua=mailto:reports@yourdomain.com
In this example:
v=DMARC1: This defines the version of DMARC.p=none: This is the policy. It can be set to none, quarantine, or reject. Starting with none is advised for monitoring before enforcing stricter policies.rua=mailto:reports@yourdomain.com: This specifies where the aggregate reports should be sent. These reports provide an overview of the DMARC authentication status for emails sent from your domain.
3. Decide on a Policy:
- none: Take no specific action; use this to just monitor the results.
- quarantine: Place unauthenticated emails in the recipient's spam/junk folder.
- reject: Reject unauthenticated emails.
For the initial setup, it's recommended to start with the none policy to monitor how many emails would be affected without actually affecting deliverability. Once you're confident in the setup, you can update to quarantine or reject.
4. Add the DMARC Record to DNS:
- Log into your domain's DNS management platform.
- Create a new TXT record.
- For the hostname or subdomain field, enter
_dmarc. For some DNS providers, this might be_dmarc.yourdomain.com. - Paste the DMARC record value into the appropriate field.
5. Verify Your DMARC Record:
Wait for DNS propagation. Use a DMARC validation tool like MXToolbox or a similar platform to verify that the record is correctly set up.
6. Monitor Reports:
Review the DMARC reports sent to the email address specified in the rua tag. Tools and services like DMARCIAN can help parse and interpret these reports.
The reports give insights into which services are sending mail on behalf of your domain and whether those emails are passing SPF, DKIM, and DMARC.
An important part of the DMARC mechanism is the reporting of what has happened to the messages for each recipient. You can receive aggregate reports at set intervals.
Aggregate reporting
An aggregate report contains statistical information about the messages you have sent us in a certain time interval and how these messages were evaluated. You activate this aggregate reporting by adding the parameter rua in the DNS record, where you specify the target email address for sending reports, e.g., rua=mailto:mail@adress.com.
By default, you usually receive daily reports. If you want to receive reports for a longer time interval, change the record by adding the ri parameter and filling in the desired interval in seconds. For example, parameter ri=604800 will send reports every 7 days.
The reports are sent in XML format.
7. Adjust Policy As Needed:
After monitoring and ensuring legitimate emails are passing DMARC, consider updating the policy from none to quarantine or reject.
If you notice legitimate services are failing DMARC, you might need to adjust your SPF/DKIM configurations or work with the service provider to ensure they're correctly authenticating email.
4. Warm Up IP Addresses:
If you are using dedicated IP addresses, start by sending a low volume of emails and gradually increase the volume over time. This helps in building a good sending reputation.
Warming up IP addresses is a best practice for any use case involving email marketing or transaction email sending. During an IP warm-up period, email sending volume is slowly increased. This allows sending patterns to appear more natural to mail service providers and anti-spam services. The recommended schedule for an IP warm-up strategy is to start with a maximum of 50 emails per day to avoid spam filters, and then double that value every 3 days. This schedule provides the best opportunity to maintain a healthy IP reputation while avoiding blacklists.
5. Clean Your Email Lists:
- Regularly prune inactive subscribers and remove hard bounces.
- Consider using double opt-in to ensure that the email address is valid and the recipient truly wants to receive your emails.
6. IP address blacklist check
Regular blacklist checks are essential, especially for businesses and organizations that rely on email communications. An IP address that is blacklisted can lead to emails being undelivered, which could affect business operations, customer relationships, and reputation. Using tools like multirbl.valli.org provides an efficient way to perform these checks.
No Comments