Salesforce Marketing Cloud destination
|
Prerequisites for setting up Salesforce Marketing Cloud Loader
After you finalize the first step, you can proceed with the following: 2. Connect Meiro CDP to Salesforce Marketing Cloud. Described here. 3. Grant API access to the user profile on Salesforce Marketing Cloud. Follow instructions on how to do this. 4. Set up the loader as a destination in CDP below in this article. 5. Proceed with exporting segmented customer profiles to the destination. Refer to this part of the article. |
Step 1. Connect Meiro CDP to Salesforce Marketing Cloud
| 1. Go to the top right-hand corner of the interface. Click on Settings > Setup. | 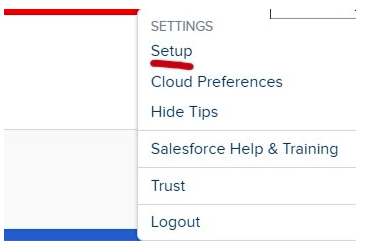 |
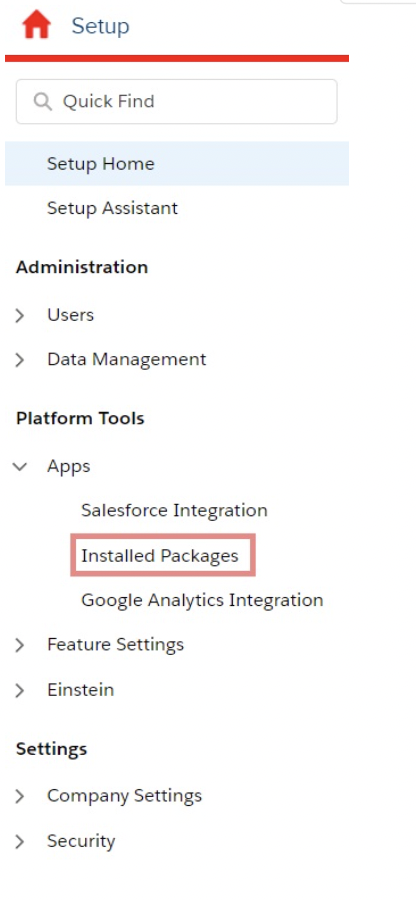
| 2. Click on Apps > Installed Packages > New. |
|
| 3. Fill in the “Name” and “Description”. | 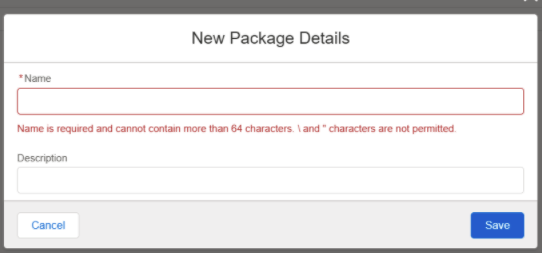 |
| 4. Click on “Add Component” under the Components section. |  |
| 5. Select “API Integration”. | 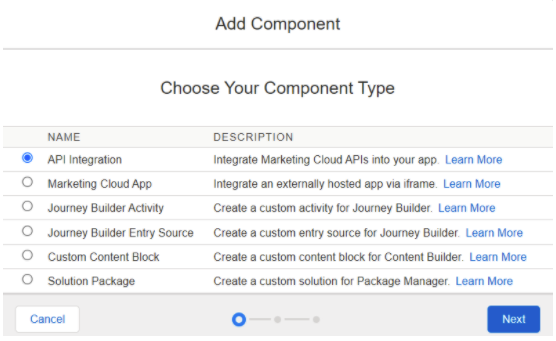 |
| 6. Select “Web App”. | 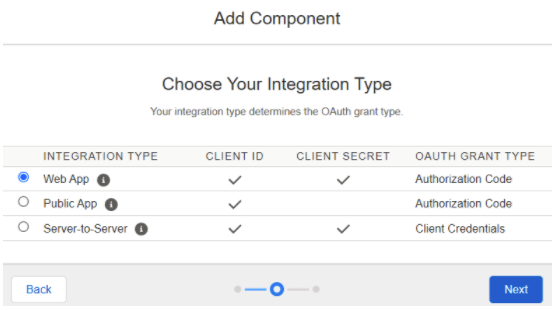 |
|
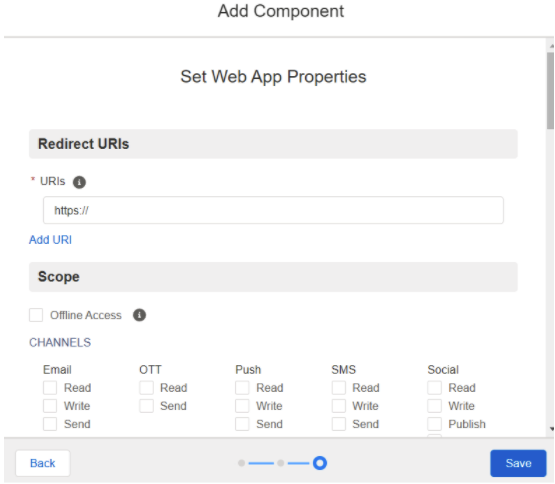
7. Obtain the URI from the Meiro team. Grant Meiro with the following access and click “Save”.
|
 |
| 8. Inform the Meiro team that steps 1-7 are completed and they will set up the connection on Meiro Integrations for you. |
|
Step 2. Grant API access to the user profile on Salesforce Marketing Cloud
In addition, you will need to grant API access to the user profile on the Salesforce Marketing Cloud for the Meiro team to use the API endpoints to push data into the data extensions.
| 1. Go to the top right-hand corner of the interface. Click on Settings > Setup > Cloud Preferences. | 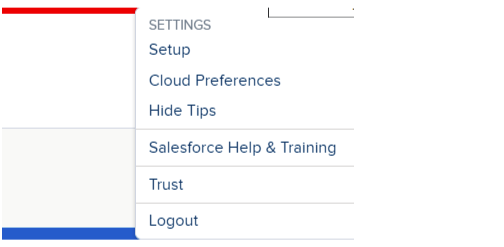 |
| 2. Click “User Settings”. |  |
| 3. Check the “API user” box to enable the user profile access to API. | 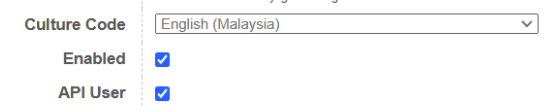 |
Step 3. Setup destination in CDP
The destination can be set in the Meiro Business Explorer in the Administration/Entities/Destination tab. The setup is usually done by the Meiro technical consultant
|
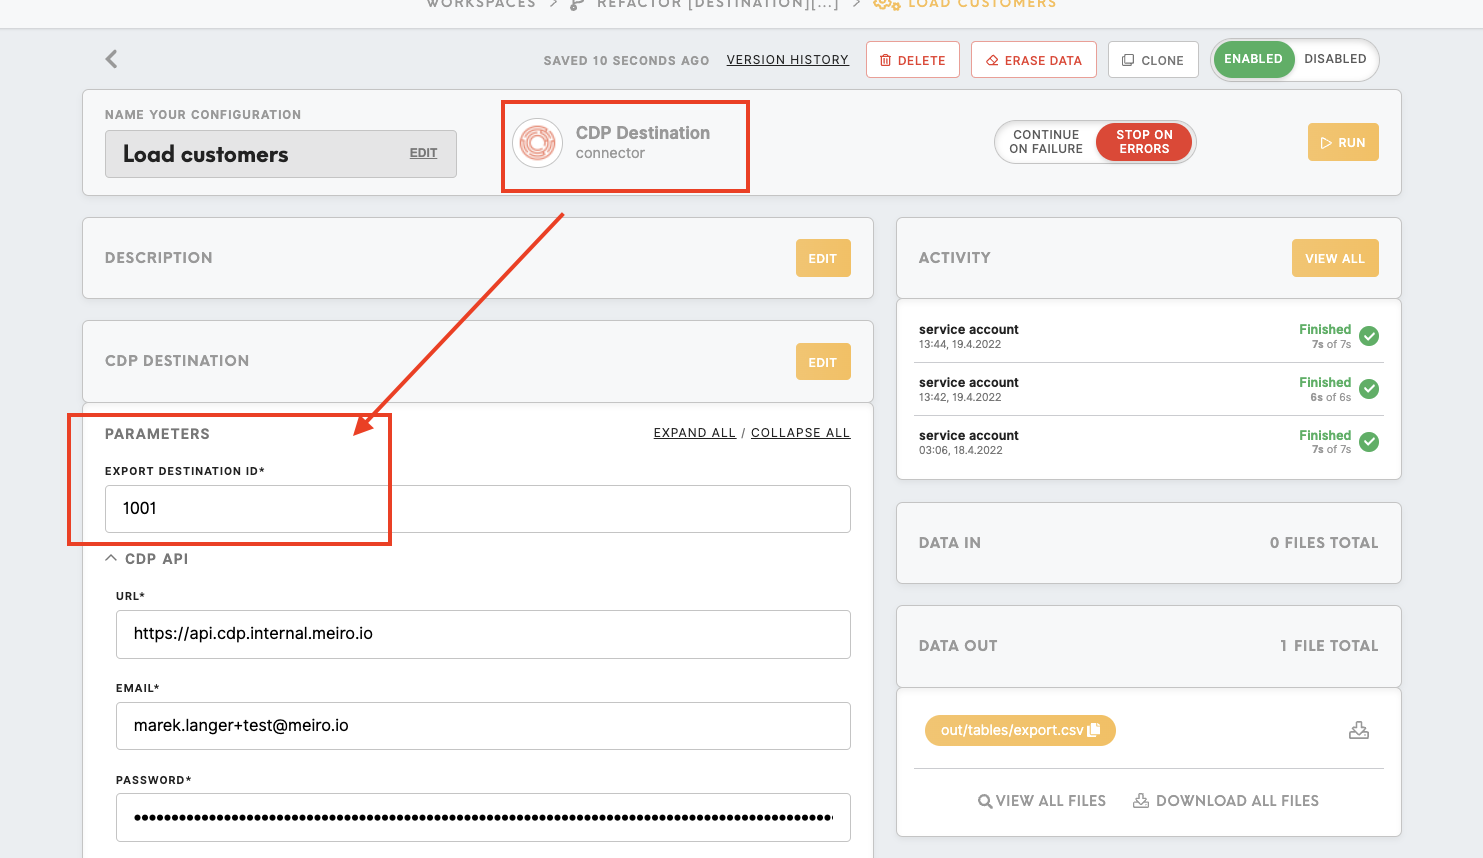
Destination ID (required, not editable) |
"The Destination ID" is a numeric value that analysts will refer to within the Meiro Integrations environment. After you choose the ID, it will not be possible to change it later on. Find the right workspace in Meiro Integrations and check Destination ID:
Insert Destination ID in the Meiro Business Explorer.
|
|
Name (required) |
The name will be visible across the Meiro Business Explorer for the users (Data library/ Destination tab, segment detail) |
|
Description (optional) |
It is possible to add a description to the destination. The description will be displayed for use in the Data library/ Destination tab. |
|
Icon (required) |
The icon will be visible across the Meiro Business Explorer for the users (insights, Data Library/ Attributes, Sources and Destinations tabs, segments, and customer profiles). |
|
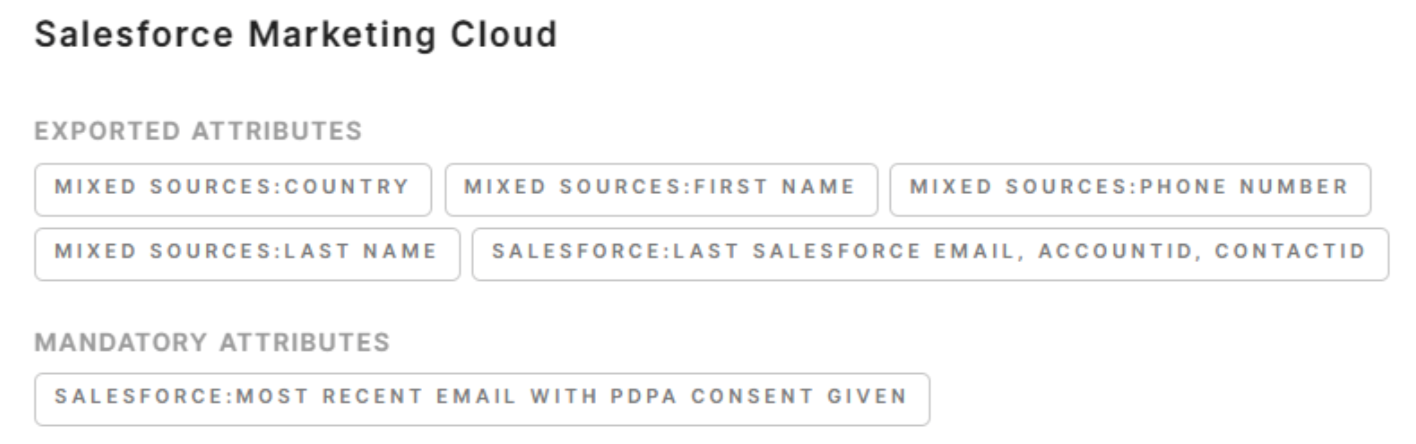
Exported & Mandatory attributes (required) |
"Exported attributes" - values of exported attributes will be sent to the dedicated Meiro Integrations workspace, then to the destination. "Mandatory attributes" all customers in the export must have those attributes' values known. For Salesforce Marketing Cloud exported & mandatory attributes are custom per client. For more information, reach out to the Meiro team. |
|
Meiro Integrations (required) |
"MI workspace" refers to the workspace in Meiro Integration which will be executed when the segment is exported. To run exports you need to know the name of the workspace. You should get the name of the respective workspace from the Meiro data analyst. Meiro data analyst takes care of the Meiro Integration's workspace preparation, and data transformation for a specific destination (e.g. Facebook, Twitter, Google Analytics). Each destination requires a different (very specific) data structure. |
|
Parameter: Data Extension Key (required) |
Meiro Integrations Key (required): It is set up by analysts and needs to be the same key as in workspace variables in Meiro Integrations. Name (required): The name will be displayed for the user in the segments export parameter section. Required field (checkbox): This field is required to be filled in to export to Salesforce. Value from the list (checkbox): Ticked makes a possible selection from the value drop-down list. Unticked disables drop-down list. User input (checkbox): This field is required to be filled in to export to Salesforce. Warning: The fields in the data extension have size limits that can be defined. If any value exceeds the size limit on the field, it will fail the whole export! For email and phone number fields, if any value fails the validation from Salesforce Marketing Cloud, the whole export will fail. Do validate the fields before sending them. Learn more: about data extension limits from the Salesforce documentation. |

Export segment to Salesforce Marketing Cloud
New data extension in Salesforce Marketing Cloud and export setting in Meiro
To export audience segments from Meiro CDP to Salesforce Marketing Cloud, you must create a new data extension in the Salesforce Marketing Cloud environment.
There are two ways to access the Data Extension section:
- Email Studio
- Contact Builder
1. Email Studio
| 1. Go to the top right-hand corner of the interface. Click on Settings > Setup | 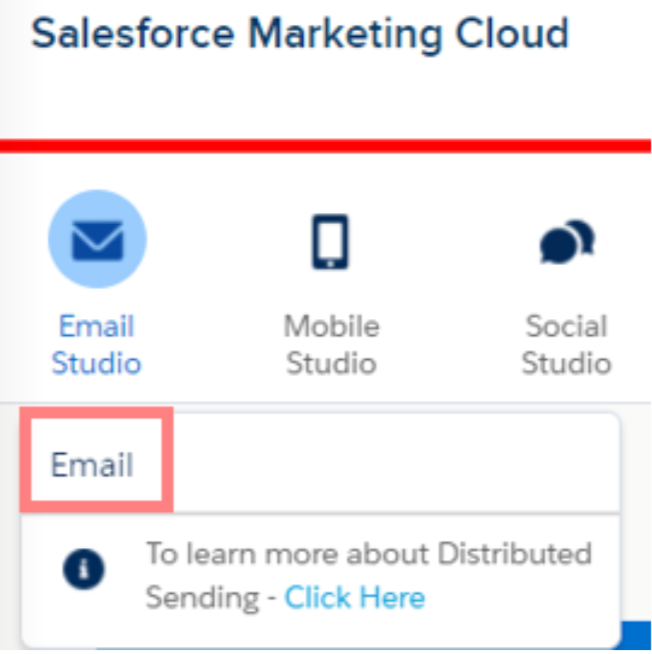 |
| 2. Go to Subscribers > Data Extensions | 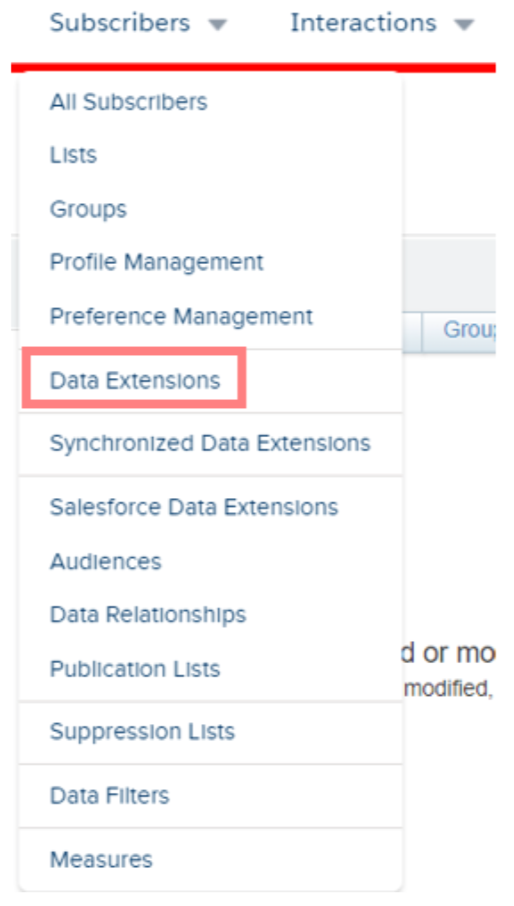 |
| 3. If a folder needs to be created, right-click on Data Extension > New Folder | |
| 4. Click on Create > Standard Data Extension |  |
|
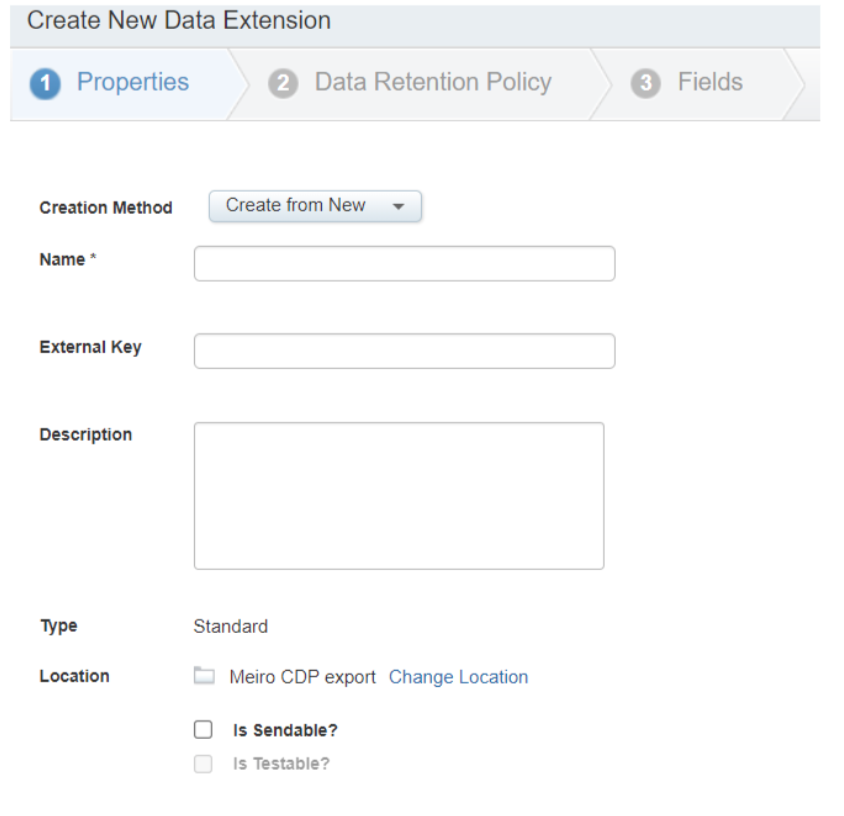
5. Fill in the information and select the relevant data retention policy required for your use case. Learn more: about Data Retention Policy |
 |
|
6. Add in all the fields that are set on Meiro CDP Salesforce Marketing Cloud destination. Click “Create”. Warning: All fields have to be added to the data extension otherwise it will result in an error. |
Example:
|
| 7. Click into the new data extension and copy the “External Key” into the segment on Meiro CDP under “Parameters” | 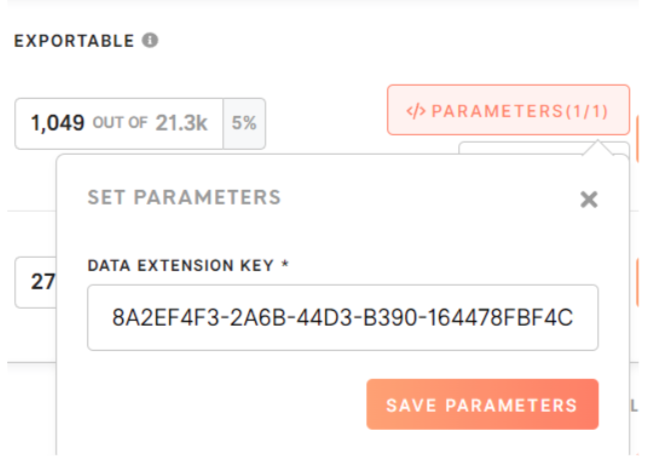 |
2. Contact Builder
| 1. Go to the Audience Builder button on the interface and click on “Contact Builder” | 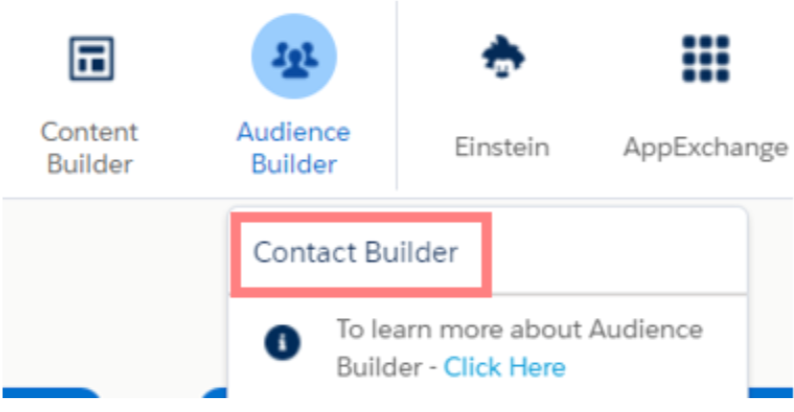 |
| 2. Click on Data Extensions | 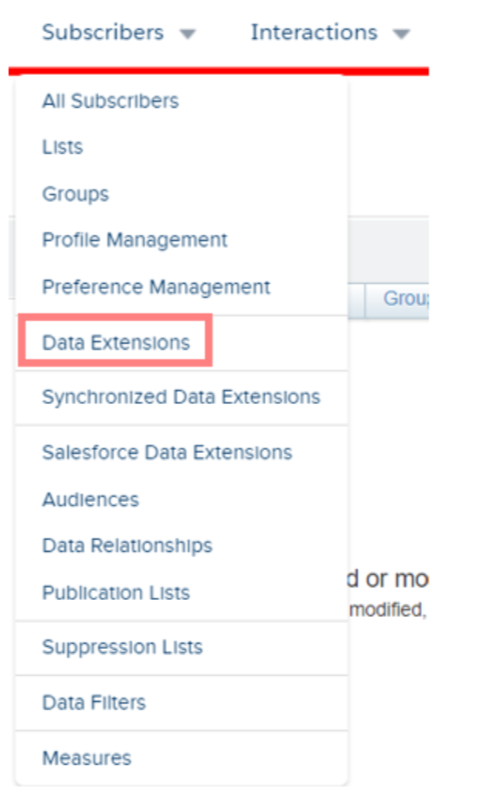 |
| 3. Click on Create > Standard Data Extension |  |
|
4. Fill in the information and select the relevant data retention policy required for your use case. Learn more: about Data Retention Policy Warning: The fields in the data extension have size limits that can be defined. If any value exceeds the size limit on the field, it will fail the whole export! For email and phone number fields, if any value fails the validation from Salesforce Marketing Cloud, the whole export will fail. Do validate the fields before sending them. |
 |
|
5. Add in all the fields that are set on Meiro CDP Salesforce Marketing Cloud destination. Click “Create” Warning: All fields have to be added to the data extension otherwise it will result in an error. |
Example:
|
| 6. Click into the new data extension and copy the “External Key” into the segment on Meiro CDP under “Parameters” |
|

Remember: Each segment on the CDP needs to have a separate data extension key. If the same key is used, the audience will overwrite the existing one with every export.
Export tab settings
| Exportable |
Exportable shows how many customers will be exported to your destination. This number is defined by the conditions you choose to segment the audience but also by mandatory attributes that have been set up by the administrator (that must be present to export to your destination). For example, if you segment 1000 profiles but only 10 profiles have mandatory attributes present, only those 10 will be exported to your destination. Mandatory attributes are visible in the Data Library/ Destinations tab and are to be defined according to the use cases. |
|
|
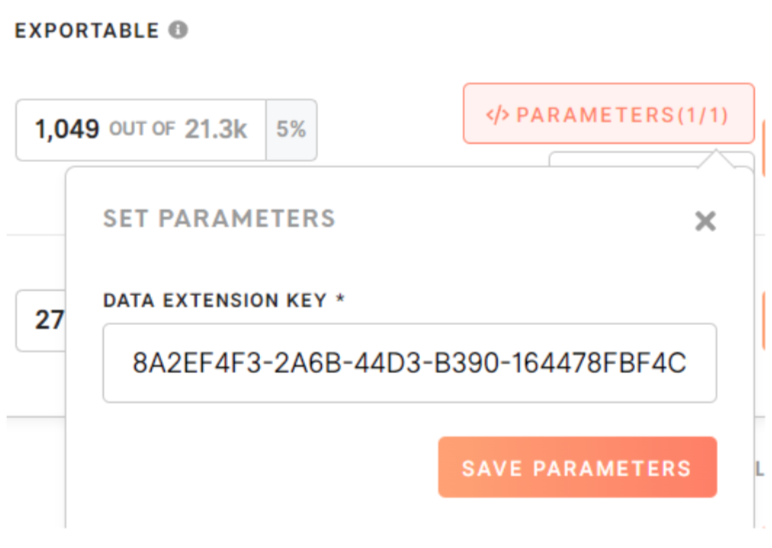
Parameters |
Data Extension Key (required) Data extension key can be obtained as described above in chapter 1. New data extension in Salesforce Marketing Cloud and export setting in Meiro Load is incremental (to the data extension indicated in the export settings), the primary key is an email. Warning: The fields in the data extension have size limits that can be defined. If any value exceeds the size limit on the field, it will fail the whole export! For email and phone number fields, if any value fails the validation from Salesforce Marketing Cloud, the whole export will fail. Do validate the fields before sending them.
|
Salesforce Marketing Cloud environment
If export is successful, you will see the numbers appearing under the data extension that you have created.

FAQs
|
Is the load overwriting the content or incremental? |
Load is incremental (to the data extension indicated in the export settings), the primary key is an email. If changes need to be made to the data extension, it can be done within the Salesforce Marketing Cloud. |
|
How long does it take to load the data from Meiro to Salesforce? |
Exported data can be seen in the Salesforce Marketing Cloud almost immediately. |
No Comments