Tab: Workspaces Detail
Workspace Detail
By clicking on a particular workspace in the Workspaces tab, you will be able to see its content.

Workspace's Header
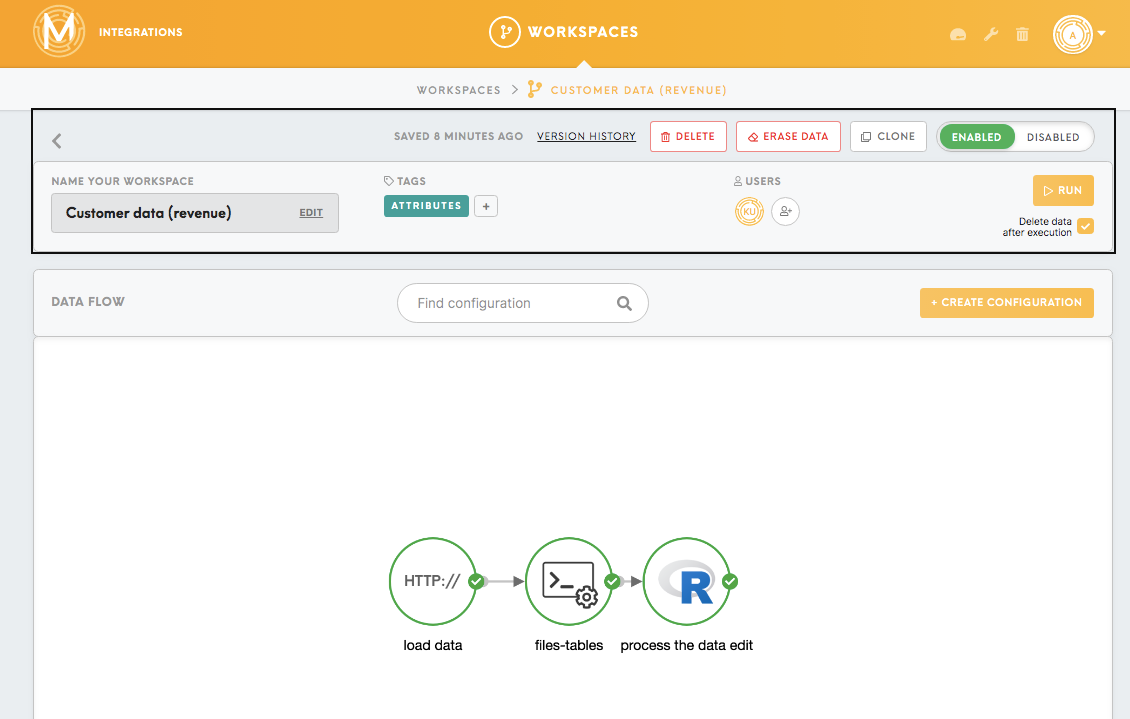
- Saved (...): Displays the latest activity on this workspace.
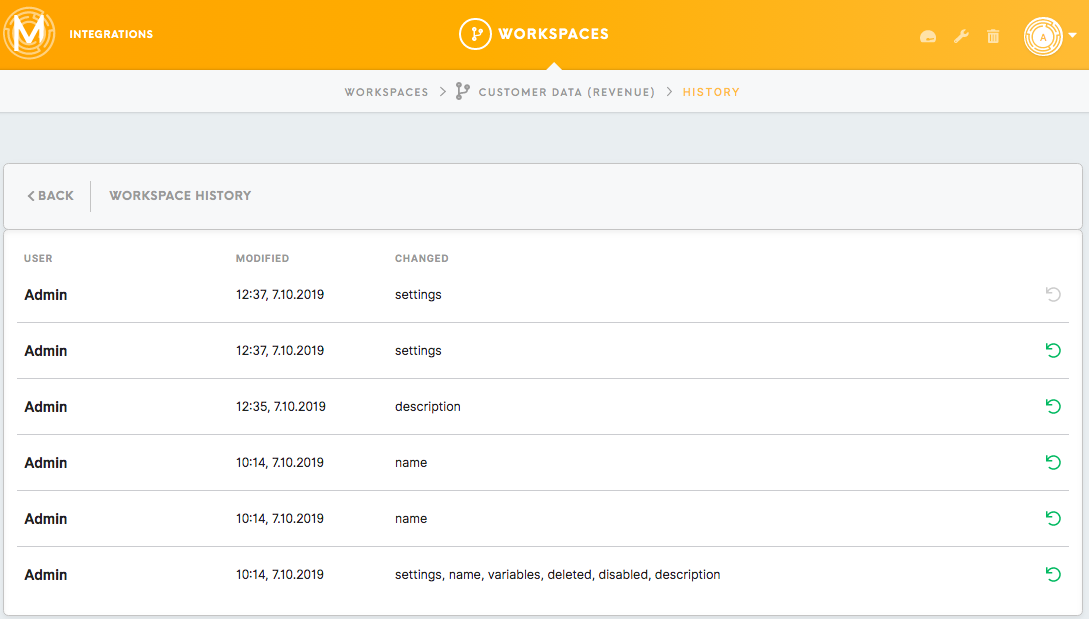
- Version History: By clicking on the Version History, you will be able to view the history of the workspace along with listed modifications (i.e. user, date, and time, what has been changed) to the workspace.
- Delete: Clicking on the Delete button will delete the entire workspace. Deleted workspaces can be found in the Trash tab.
- Erase Data: The Erase Data button will remove data from the workspace (configuration containers).
- Clone: By clicking on the Clone button, you will be able to copy your workspace.
A pop-up window will appear asking you to confirm or cancel. Your cloned workspace will appear in the list of workspaces. Cloned workspaces will have the word ‘copy’ appended to the name of the original workspace that they were cloned from.
- Enable/Disable: Toggle the Enable/Disable button to enable/ disable the workplace to run. This feature could be useful for workspace scheduling purposes.
- Name your workspace: Edit and save the name of the workspace. You can edit this name at any time.
- Users: List users who have access to the workspace. You can invite more users by clicking on the Invite button. To invite the user to the Meiro Integrations contact Meiro administrator.
- Run: Clicking the Run button will run the DAWG workspace.
- Delete data after execution: By checking this box, data will be deleted after the workspace execution. By default deleting data after execution is enabled.
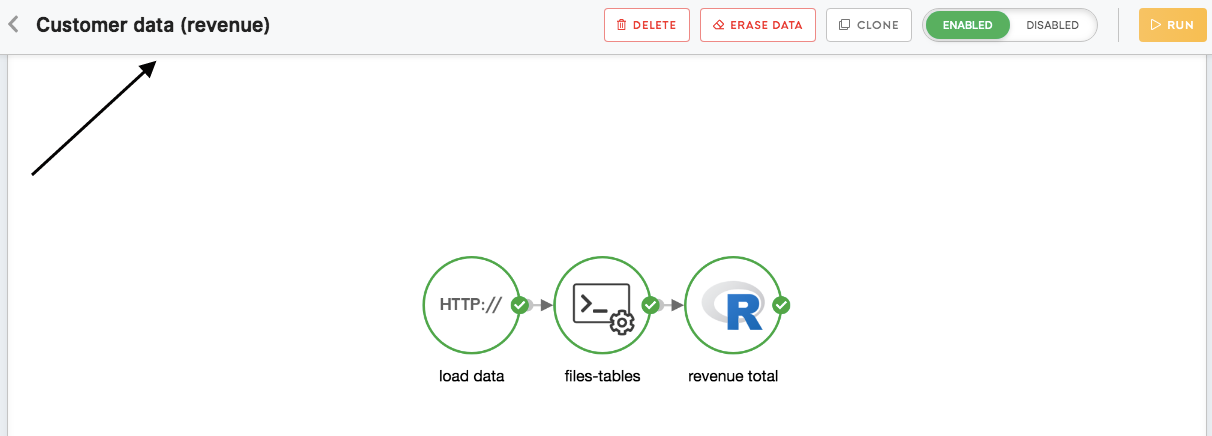
By scrolling down through the workspace you will notice that some of the features from the workspace's header stay on the top to make use of the workspace easier and quicker.
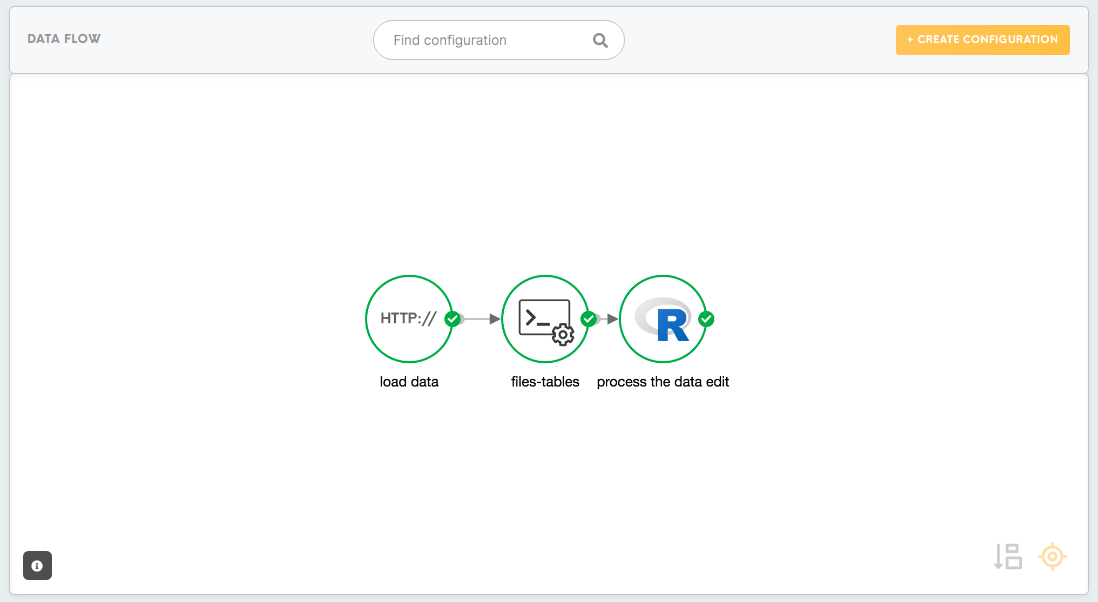
Data flow
- Search box
The search box lets you search for a configuration that has already been created in this workspace. Input the name of the configuration ( character matching is supported).
- Create configuration
By clicking on the Create configuration button, you can add components to the data flow. The different components that can be used are connectors, processors, and loaders:
- A connector lets you connect to the data source that you intend to use.
- A processor processes the data that has been taken as the input from the previous component (which is usually the connector) as per your needs.
- A loader lets you load the processed data that it receives as the input from the previous component (which is usually the processor) on to the preferred destination.
Learn more: about different components refer to this article.
More Information: about particular components refer to the articles about connectors, processors, loaders.
Learn more: how to create a workspace using our guide.
- Data flow
Data flow refers to the area in your workspace that contains the workspace’s components.
You can zoom in/out the data flow by pressing CTRL / ⌘ + scroll.
Hold Shift + mouse click: select or deselect multiple nodes.
Hold Shift + select area by mouse: select multiple nodes.
Click on the blank space workspace data flow: deselect multiple nodes.
Drag and drop selected nodes.
- Organize button

- Center button


Workspace’s additional features

- Description section to describe your workspace and its components. This feature is optional and can be edited at any time.
Learn more: how to edit the description field, please go to this article.
- Variables section to manage your workspace’s variables.
Learn more: about variables in this article.
- Schedules section to set up a schedule for your workspace to run at your preferred times.
Learn more: how to set up the schedule in this article.
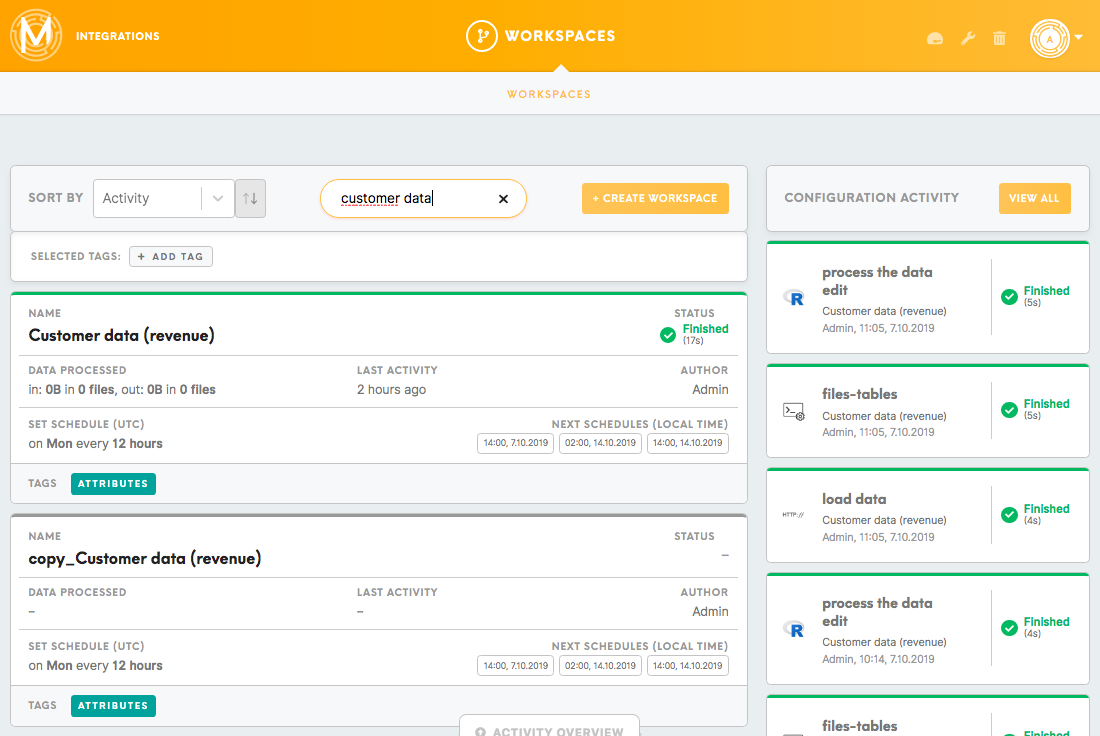
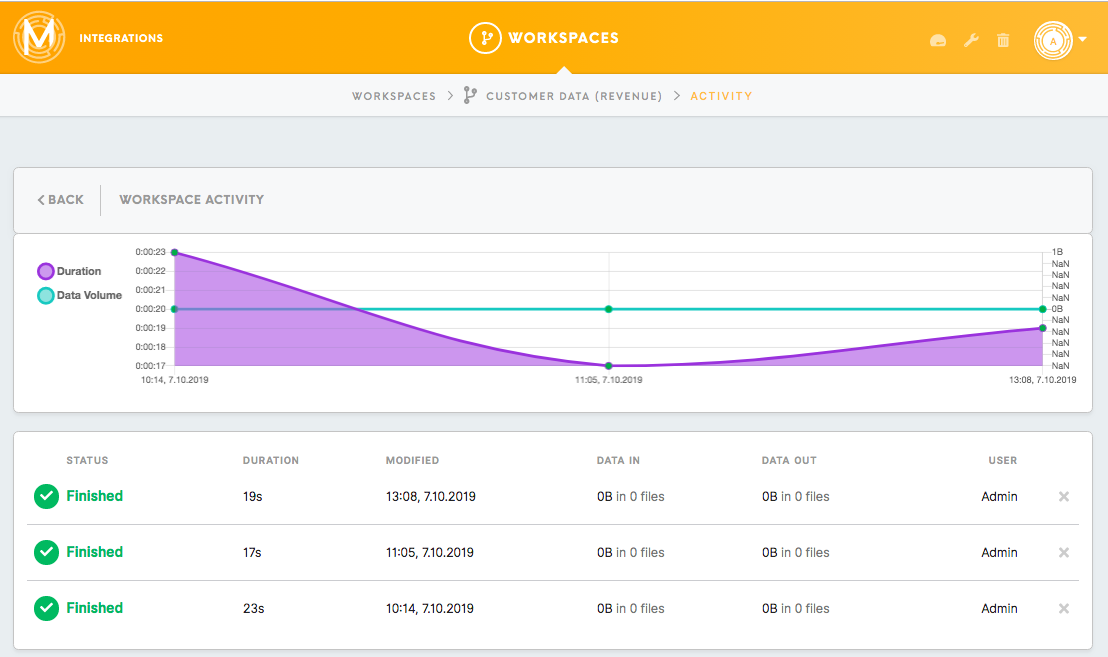
- Workspace Activity
The Workspace Activity section displays when the whole workspace has been run, along with details of who ran the workspace, the date and time of when it was run and the activity’s status and duration.
Clicking on the View All button will bring you to a summary of all activities for this workspace (status, duration, time and date of modification, data in, data out, user).
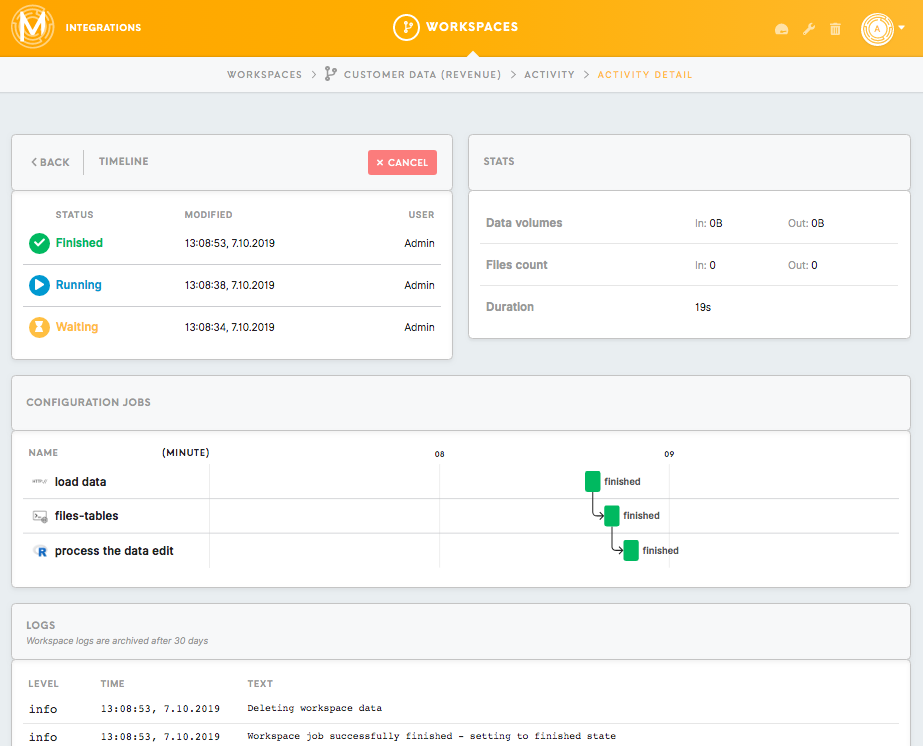
Clicking on a particular workspace activity will bring you to the workspaces' Activity Detail tab.
Learn more: about activity details and different statuses please refer to this article.
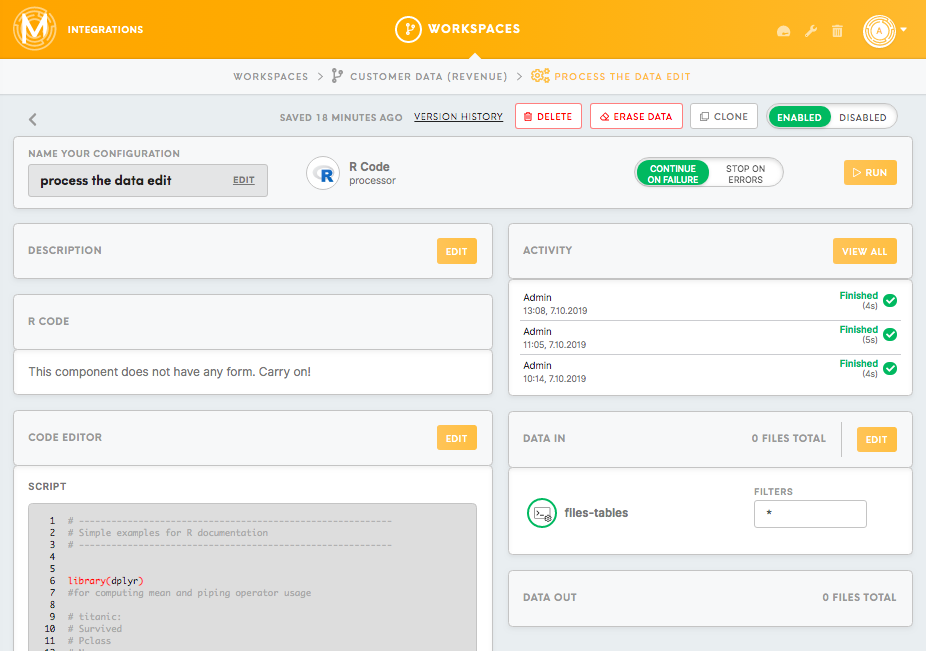
- Configuration Activity
The Configuration Activity section displays specific components and their respective activity statuses.
Clicking on the View All button will bring you to the Workspace Configuration Activity tab (name, status, duration, time and date of modification, data in, data out, user).

Clicking on the particular activity will bring you to the component’s page.
Learn more: about activity details and statuses please refer to this article.
No Comments