Processor R from Git repository
The R from Git repository processor allows you to run an R code located in a Git repository. Meiro Integrations clones the Git repository into the /data/repository folder and runs the code in the configuration. The code repository is a file archive and a web hosting platform where a source of code for software, web pages, and other projects are kept publicly or privately.
Git is a version control system for tracking changes in a project, or in a set of files to collaborate effectively with a developer team or to manage a project. It stores all the information about the project in a special data structure called a Git repository.
This is a Git directory located in your project directory.
R is a programming language and free software environment for statistical computing and graphics. The R language is widely used among statisticians and data miners for developing statistical software and data analysis.
Requirements
To set up a configuration for an R from Git repository component, you need an account in any version-control platform that supports Git with a created repository containing R script in it. More details in the Structure of the project section below.
Lean more: code repositories you can find in the article.
To work with R from Git repository component comfortably, you need to be familiar with:
- Programming in general
- R syntax (enough for writing simple scripts)
- Git, a version control system
- any version-control platform supporting Git (for example, GitHub).
Topics in R you need to be familiar with include (but are not limited to):
- Data structures
- Control flow tools
- Working with files (opening, reading, writing, unpacking, etc.)
- Modules and packages
We recommend you begin with the official tutorial if you are not familiar with R syntax but have experience in programming in other languages. If you are a complete novice in programming, we suggest you check the tutorials for beginners.
Learn more: R package official website, Official documentation, R documentation search engine
Learn more: Git handbook - what a version control system, How to create a repository on GitHub, GitHub flow, Git official documentation
Features
- R Version - 3.5
- Libraries available
- BTYD,
- car, caret, caTools, ChannelAttribution, Cubist,
- data.table, data.tree, digest, doParallel, dplyr,
- earth, ellipse, e1071,
- forecast, foreach,
- gam, gbm, gdata, ggplot2, gsl,
- ipred, ISOweek,
- kernlab, klaR,
- lattice, lubridate,
- MASS, mda, mgcv, mlbench,
- nlme, nnet,
- party, pamr, pls, plyr, pROC, proxy, purrr,
- randomForest, RANN, reshape2, R6, RcppArmadillo, rgdal,
- spls, sqldf, stringi, stringr, subselect, superpc,
- testthat, tidyverse, timeDate, tree
Data In/ Data Out
|
Data In |
Files for processing and transformation can be located in in/tables/ (CSV files) or in/files/ (all other types of files) folder depending on the previous component in the dataflow and the type of the file. |
|
Data Out |
Output files should be written in out/tables (CSV files) or out/files (all other types of files) folder depending on the need for the next component and the type of the file. |
Learn more: about folder structure in configuration here.
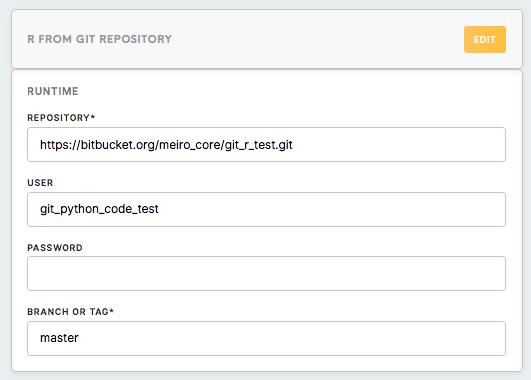
Runtime
|
Repository (Required) |
This is the link to the Git repository that you are planning to work with. To find it on GitHub, click on the Clone or Download button in the repository and copy the displayed link. |
|
User (Optional, Required only for private repositories ) |
Your account name on a version control platform |
|
Password (Optional, Required only for private repositories) |
The password to your account on a version control platform |
|
Branch or Tag (Required) |
Name of the branch or tag of the Git repository you are using. Here you can read more about the concept of branches in Git. |
Code Editor, Parameters
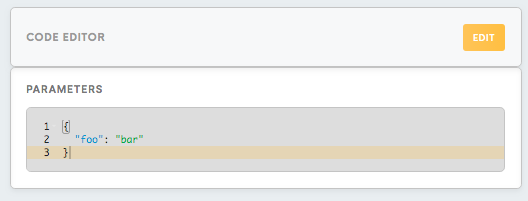
Parameters are the property in config.json file, which allows you to keep the necessary values and to make them accessible from the script. It is supposed to be in the JSON format and represents a collection of property-value pairs. Parameters are accessible via property “parameters”.
Parameters can be useful in different cases, such as:
- Keeping sensitive information, such as a username and password or API key for authentication on a third-party platform outside your code repository.
- Keeping parameters of a test environment, so after moving to a stage or production phase, you can change parameters fast without changing the script.
You can use parameters to keep whatever values you want to make it easily accessible and changeable through the Meiro Integrations platform. It is shown in the example section below.
To connect main.R (in your Git platform) to the Parameters, you need to:
- Install the R package which will allow you to work with a JSON file
install.packages(“name_of_the-package”)
- Open the package you installed
library(name_of_the_package)
- Connect to the Parameters
file <- name_of_the_package::fromJSON(“/data/config.json”)
file[[‘parameters’]] [[‘Username’]]
For example, let’s say we want to connect main.R to “Username” from Parameters in Meiro Integrations. Therefore we will use RJSONIO package (which allows working with the JSON code) and will write in main.R script:
install.packages("RJSONIO")
library(RJSONIO)
file <- RJSONIO::fromJSON("/data/config.json")
In Parameters we will specify the value for “Username” and write:
{“Username”:”name_for_the_username”}
Learn more: How to search & replace within a code editor
|
Structure of the project |
The file in the repository with the code you want to run should have the name If there is no such file in the repository (for example if the file will be named In case of problems with the renaming of the file, you can find useful tips under the link. If your code in the Git repository is too long, consider organizing and splitting your R code. We advise you to think through the structure of the project as it should be fully accessible through “main.R” script file. To organize your code, you can use the command For example for accessing the code located in “/Users/Wonderwomen/documents/script.R”, the script will look like: Learn more: about source command you can find in the official R documentation. |
|
Installing packages |
R from Git repository processor comes pre-installed with the most common packages, listed in the features section above. However, if you need additional packages it is possible to install them. Meiro Integrations uses Cran , Biocoductor or Github to install packages.
If you wish to use other packages than the preinstalled ones, first you need to know the package you would like to use. Have a look at the Cran , Biocoductor or Github and find packages you are interested in. Install package you are interested in with the command in your script Add your package to the workspace using below command in your script If you do not specify the latest version of the package in your command, the newest version will be downloaded. If you wish to specify the version you need to use the command
For example, if you wish to install package “ggplot version 0.1.1”, your code will look like
|
|
Paths |
Input files: Use absolute path Output files: Use absolute path
You need to use the absolute path, otherwise, the script from Git will not be able to find the files in data in, and Meiro Integrations will return an error. Remember: Use absolute paths when you need to access data files in your script. |
|
Standard output |
The analog console log in Meiro Integrations is the activity log, where you can see the result of running your script including errors and exceptions. |
Examples
Example 1
This example illustrates a simple code that imports an open dataset from an external source, writes it to an output file and prints a standard output to the console log. Usually, you will need to open the file from the input bucket, which was downloaded using Connector, but in some cases requesting the data from external resources can be necessary. Also, this example demonstrates how the parameters feature can be applied.
In this example, the URL of the dataset and its path and name are saved in the parameters property of the file config.json. All these values can easily be changed without changing the script in the repository.
Script (main.R in Git repository)
#import necessary libraries
library(data.table)

#request URL and save response to variable titanic
titanic<-fread("http://web.stanford.edu/class/archive/cs/cs109/cs109.1166/stuff/titanic.csv")

# write output to table and print first 10 rows
write.csv(titanic, file = "/data/out/tables/titanic.csv", row.names = FALSE)
print(titanic[1:10,"Survived"])
Example 2
The example is the same as the previous example but includes added Meiro Integrations Json Parameters. In this example we are importing an open dataset from an external source (URL), writes it to an output file and prints a standard output to the console log)from the URL address. The only difference is that we wish to store URL address in Parameters in Meiro Integrations, so we can easily change URL without the need of adjusting script in Git repository.
Parameters (in Meiro Integrations, here we add URL link):
{
  "url": "http://web.stanford.edu/class/archive/cs/cs109/cs109.1166/stuff/titanic.csv"
}
Script (main.R in Git repository)
#install package which will allow R to work with JSON language:
install.packages(“RJSONIO”)
library(RJSONIO)

#obtain URL property from config.json file with open('/data/config.json'):
Meirofile <-RJSONIO::fromJSON("/data/config.json")

#we save the result under “Meiroparameter”
Meiroparameter <- Meirofile [[‘parameters’]][[‘url’]]

#import necessary libraries
library(data.table)

#request URL and save response to variable titanic
titanic<-fread (Meiroparameter)

# write output to table and print first 10 rows
write.csv(titanic, file = "/data/out/tables/titanic.csv", row.names = FALSE)
print(titanic[1:10,"Survived"])
Example 3
This example illustrates opening, filtering and writing CSV file. In this script, we will use Titanic dataset which contains data of about 887 of the real Titanic passengers. This dataset is open and very common in data analytics and data science courses. Let’s imagine we need to analyze the data of male and all passengers separately and want to write the data input 2 separate files. Data in this example was previously downloaded using the Connector component. We used HTTP connector to load data from the following URL address http://web.stanford.edu/class/archive/cs/cs109/cs109.1166/stuff/titanic.csv.
Script (main.R in Git repository)
library(dplyr)
#for computing mean and piping operator usage
# titanic:
# Survived
# Pclass
# Name
# Sex
# Age
# Siblongs.Spouses.Aboad
# Parents.Children.Aboard
# Fare
#read table
titanic_in<-read.csv("/data/in/tables/titanic.csv",stringsAsFactors = FALSE)

#compute mean of ages and fares of all passengers and store it in data frame
mean_all<-data.frame(titanic_in%>%summarise(mean_age=mean(Age),mean_fare=mean(Fare)))

#filter table for only male passengers who survived
data_selected_male<-subset(titanic_in,Sex=='male'& Survived==1)

#compute mean of ages and fares of those male and survived and store it in data frame
mean_male_survived<-data.frame(data_selected_male%>%summarise(mean_age=mean(Age),mean_fare=mean(Fare)))

# write output means to tables
write.csv(mean_all, file = "/data/out/tables/mean_all.csv", row.names = FALSE)
write.csv(mean_male_survived, file = "/data/out/tables/mean_male_survived.csv", row.names = FALSE)
Reproducing and debugging
If you want to reproduce running the code on your computer for testing and debugging, or you want to write the script in a local IDE and copy-paste it in Meiro Integrations configuration, the easiest way to do this would be to reproduce the folder structure as below:
/data
     /in
          /tables
          /files
     /out
          /tables
          /files
    /repository
        main.R
   /config.json
Input files and tables should be located in the folder in/ in the corresponding subfolders, output files, and tables in out/files and out/tables respectively.
For reproducing the example 3, you will need to download the dataset and save it to the folder /data/in/tables as titanic.csv, paste the code from the example to the script file in the repository folder and run it.
New files will be written to the folder /data/out/tables/.
We draw your attention to the fact that in all the examples, absolute paths are used because of the specifics of R from Git repository processor.
No Comments