Mobile Push campaign creation: step-by-step
The Channels/ Mobile Push tab allows sending personalized push notification messages to a segmented audience originating from Firebase-enabled mobile applications.
Creating a Mobile Push campaign
Clicking on the 'Create Mobile Push' button on the top of the Mobile Push tab will bring you to push notification settings. It is possible to insert content for Mobile Push, select a segment created beforehand, send a notification immediately to the customers, or set a schedule.

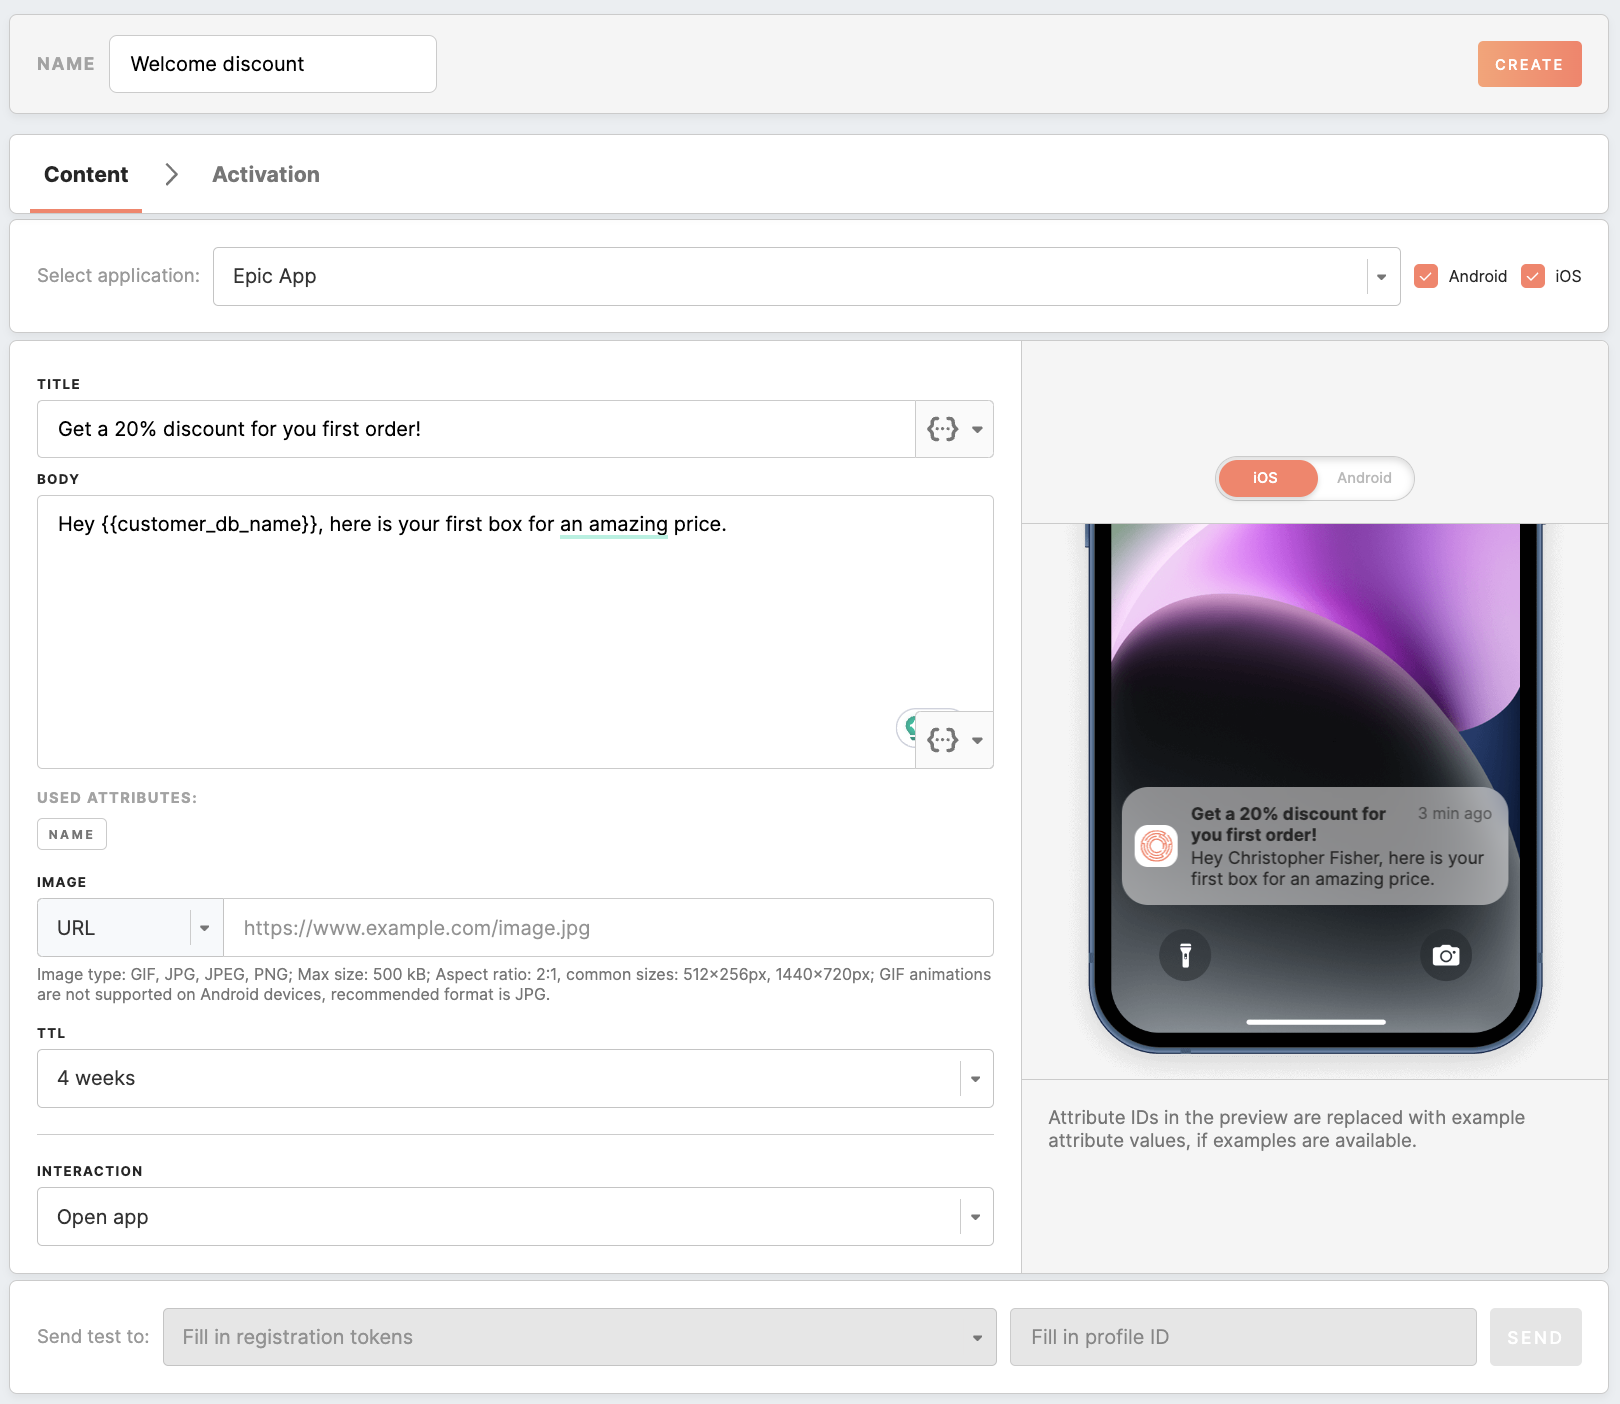
A new window with the content form of a mobile push campaign will be opened:

|
Name
(required)
|
Name of mobile push notification that will be visible in the list on the Channel / Mobile Push tab.
Remember: If performance reporting is set up for Mobile Push, frequently changing the campaign name may render the report difficult to understand. After the Mobile Push campaign is live and activated, we suggest changing the name as little as possible.
|
|
Select application
(required)
|
Select one application from the list of applications that are set under the Mobile push channel configurations.
If the selected mobile app supports both operating systems (Android and iOS), then both checkboxes are initially pre-checked. You can uncheck one operating system if needed, but keeping at least one checked for a valid selection is essential.
If the app supports only one operating system, the corresponding OS checkbox is automatically selected and cannot be changed.
|
|
Title template
(required)
|
The title of the Mobile Push that will be sent to the user's device is delivered in bold type to grab customers’ attention. CreatingIt is possible to generate a personalizedcustomized title by usingutilizing attributes andalong with the LiquidJS templating language is supported. language.
|
|
Body template
(required)
|
A message that the user wants to render as a notification to the customers’ mobile phones.
You can create a personalized body of Mobile Push content using attributes and LiquidJS templating language.
|
|
Image
(optional)
|
Provide a valid URL or directly upload an image file.
Supported formats include jpg, jpeg, png, and gif, with an advised aspect ratio of 2:1 (landscape).
Uploaded images shouldn't exceed 500KB in size.
Learn how to tailor your content with personalized images in this article.
Remember: GIF animations are not supported on Android devices. The recommended format is JPG.
|
|
TTL
(required)
|
TTL, or Time-to-Live, guarantees the delivery of notifications, even when a user's device is offline or out of network coverage.
The default and maximum TTL period is set to 4 weeks. This means notifications will be stored and delivered within this timeframe, ensuring users receive relevant information.
However, you can shorten the TTL if the push notification's content becomes outdated sooner than the default period. Possible to choose from 1 min, 2 mins, 3 mins, 5 mins, 10 mins, 30 mins, 1 hour, 2 hours, 4 hours, 1 day, 2 days, 3 days, 1 week, 2 weeks, 3 weeks, 4 weeks.
|
|
Interaction
|
|
Interaction type
(required)
|
Select one of the options:
- Open app (default): launches the mobile application associated with the notification when the user interacts with it, typically opening the app's main screen.
- Open browser: opens a web browser, directing the user to a specific URL or web page. You need to define the
url for redirection.
- Open deep link: navigates the user to a particular location in a mobile app. You need to define the
url for redirection.
|
|
URL
(optional)
|
If one of the open browser or open deeplink was selected, you should populate the URL field.
For example, /home/booking/:bookingUri/transport/:transportUri.
Use an attribute picker to personalize the deep links of your notification. You may want to use multiple attribute placeholders, e.g.
/home/booking/{{bookingUri}}/transport/{{transportUri}}
|
|
Send test to
|
Read more here.
|
Warning: the notification might be truncated on iOS devices if the title and body combined exceed 178 characters in length. The notification might be truncated on Android devices if the title exceeds 65 characters in length and the body 240 characters.
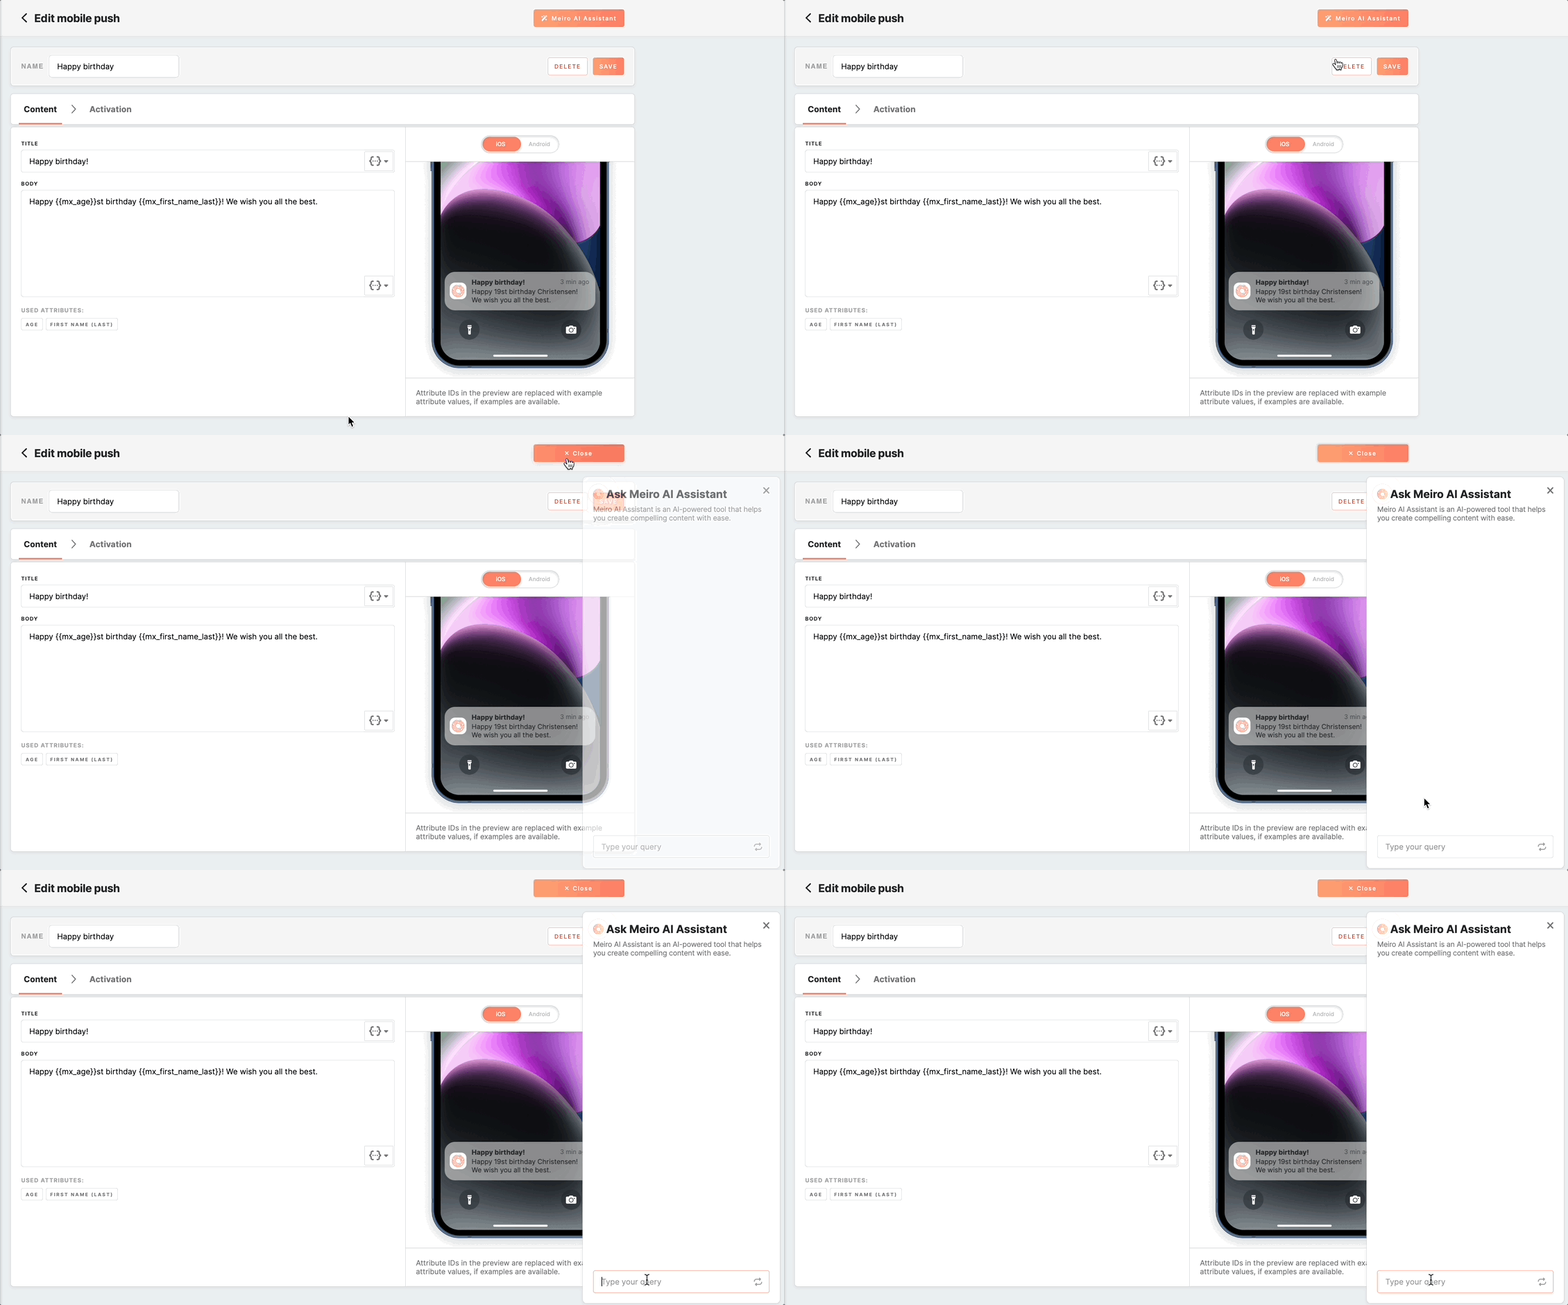
Meiro AI Assistant
The "Meiro AI Assistant" button provides AI assistance in creating a Mobile Push campaign. You can use it to generate ideas for push notification campaigns to communicate effectively with customers.

Learn more: about how to benefit from AI assistant.
Personalize Mobile Pushes
To personalize a Mobile Push, you can use attributes in the title and body, deep links and image URLs of the Mobile Push template.
Learn more: about how to personalize Mobile Push content with CDP Attribute Data in this article.
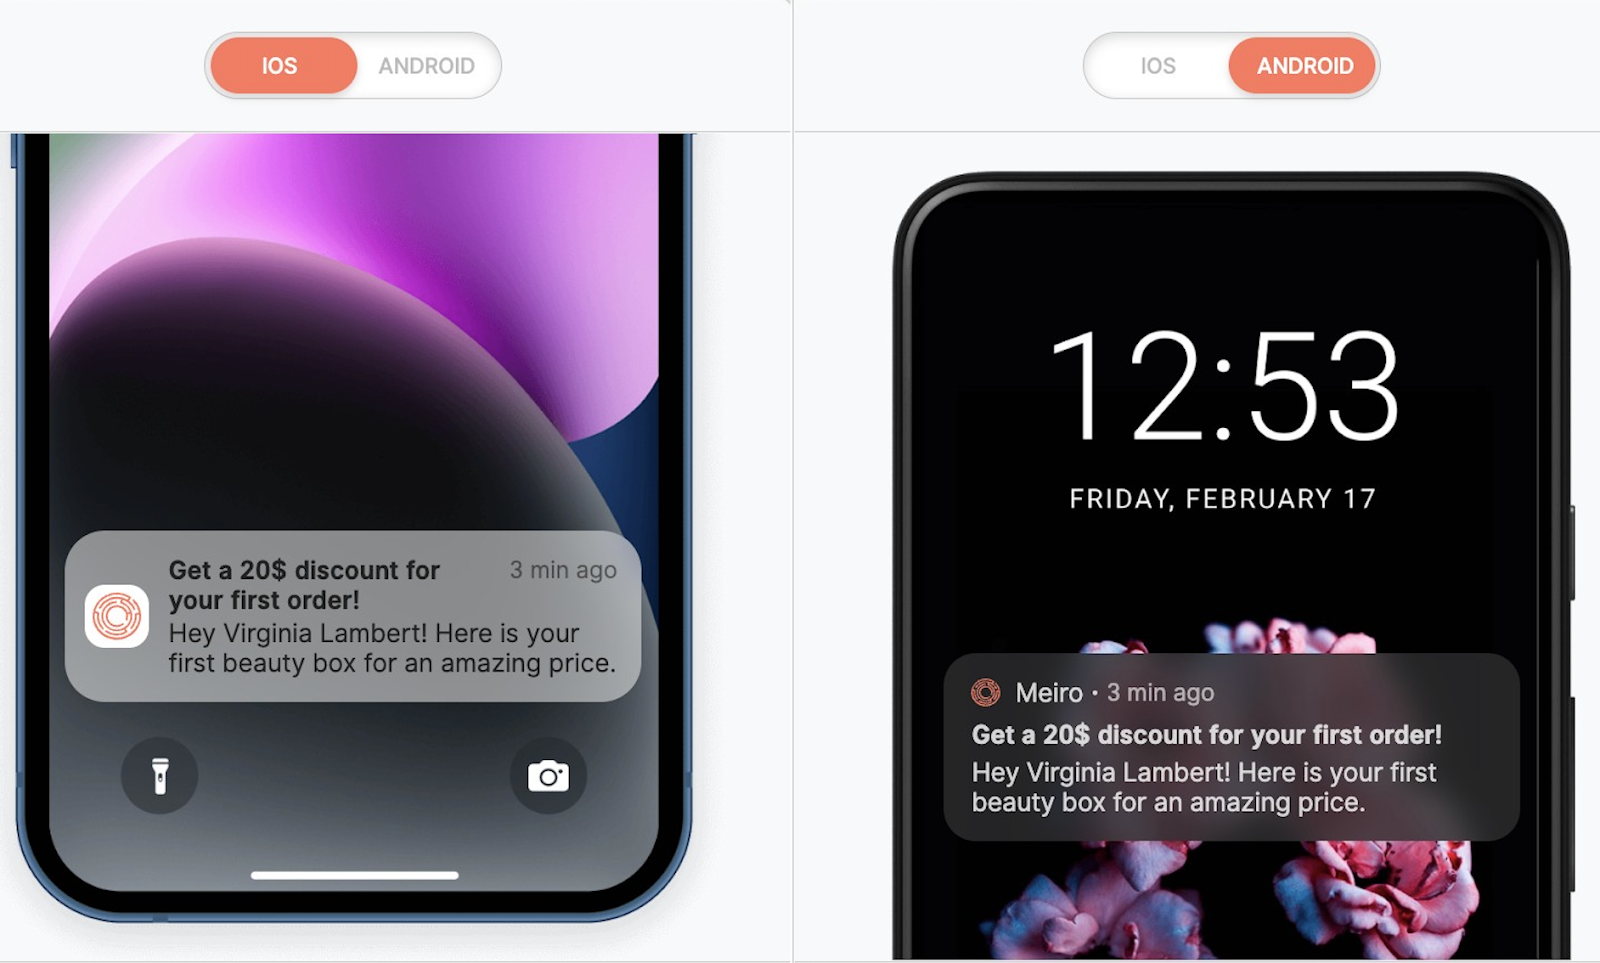
Preview
Users can see dynamic text appearing on the preview on the right. It is possible to switch previews between iOS and Android. If a user does not have the right to see the PII attribute set in “Attribute visibility protection”, then the PII attribute used in the Mobile Push will be displayed to the user on the preview as *protected information*.

Test
To test your mobile push, you must first save it using the "Save" button at the top of the page. Once you have saved your campaign, you can proceed with testing.
You can choose to test your mobile push campaign in various ways. For example, you can send a test notification to yourself or a group of users to confirm that your images and text appear as expected. You can also test it with attributes to ensure the personalized content is populated correctly. Furthermore, you can check the links in your notification to ensure they work correctly.
 To start testing, you need to fill in the following:
| Sent test to |
Registration token of the testing users (e.g., cn0JWYMfSGuJxdt-WdWCQR:APA91bGNIAebxr4-Q5rst3ey1DuYnTIpc6aJp0pqGjUhNnweLWQJqycQ_7oZLFj5dw6mgto1r_lLfUdwzyR0Tm-S3d203BKvhqSp2fGOKuGC4gst0c-xW30OG9BfPoHegaWRv5E4OUYZ). |
| Profile ID |
Utilize any customer profile ID to fill in relevant attributes used in the email subject and content (e.g., 3ff16c5c-4109-328a-684f-2381ef149c52).
Remember: each customer profile has its ID, which you can see in the URL of the detail page to the Customer Profile.
|
Click on the Save button to apply your changes in the Mobile Push campaign and enable the activation tab.
Learn more: about the activation of a mobile push campaign.
To start testing, you need to fill in the following:


