Web banners: use cases library (HTML for abandoned basket)
|
Prerequisites To work with web banners, first, they need to be set by the Meiro team: 1. Meiro Events must be implemented. 2. Meiro Events API connection must be set in the Administration/ Settings tab. 3. Web banners tabs must be enabled by the administrator for your user role. 4. For embedded web banners it is required to place a DOM element with a unique ID in the HTML code of the website where the banner will be displayed. In order for this use case to work, it is needed to investigate with the Meiro team possible solutions and analyze data architecture.
|
Warning: This use case covers data information stored under the client's API. If you store data information in cookies or local storage, more code changes will be required. Turn to the Meiro team for help.
Warning: please stay in touch with the Meiro team when setting this web banner up.
Remember: the web banner is real-time personalized for each customer, based on data extracted by the Meiro Audience API. Example below.

1. The use case that can be covered
The goal of an abandoned basket template is to show the customer a product, which was recently added to the shopping basket but was not purchased. Web banners will remind the customers of their purchase intention and guide them to finish the checkout process. At least 30 minutes should pass after the customer adds the product into the basket and before he sees a web banner. The web banner can be shown as well when a customer starts a new session but still there are remaining products in the basket. If many products were added to the basket and not purchased, the user can set individually which product will be shown in the web banner (e.g. show the last added product to the cart, show the product with the highest price, etc)
2. EXAMPLE OF CONDITIONS TO SET
Warning: Please keep in mind that each client may have a different set up. Below is just an example of the possible setup. For more details, please contact the Meiro team.
-
What should be displayed in the web banner
1.1. Select condition “Server: HTTP request”. This condition is individually defined with the client based on the individual client’s architecture and defines what should be displayed in the web banner.
Example of the setup with client’s API with cookie:
Insert URL to the client’s API that contains cookies about products in the basket (e.g. https://my-store.com/product_api?items={{cookie:YourBasketCookieName}}).
Check that the path to the first element of the product array ‘is set’. In the response, there is an array called products, check that the path ‘products[0]’ is set (the first element of the products array exists, the array is not empty).

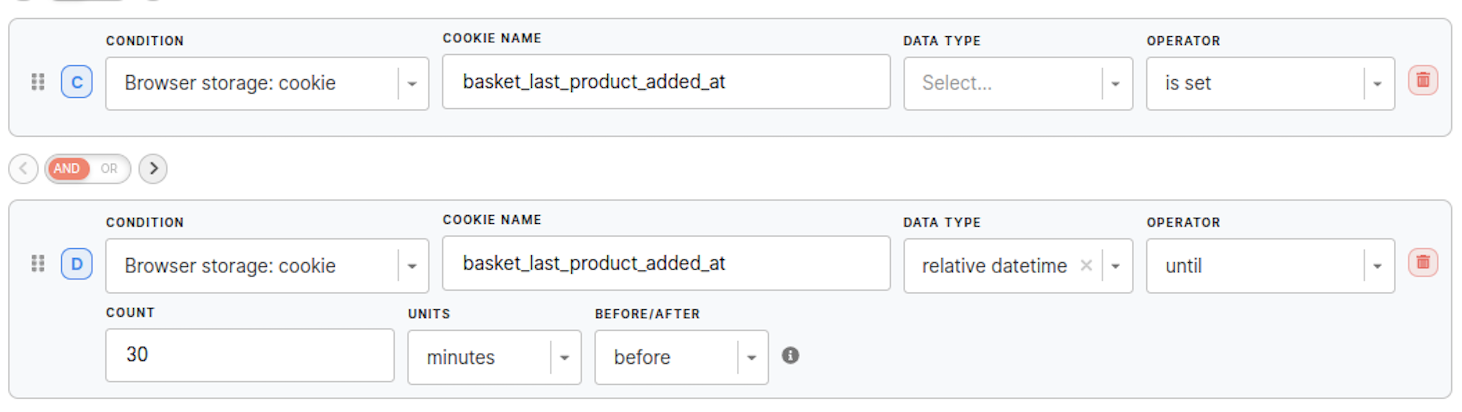
2.1 Example with cookie:
Check that the basket cookie is set and does not equal to [].
Check that the timestamp cookie is set and is at least 30 minutes old.
2.2. Add any other conditions needed (e.g. exclude the path to the checkout itself, specific device, URL to show/ not show the web banner)

3. Variables
Variables that are highlighted in the HTML code are dependent on the structure of the response to Server: HTTP condition described above and it is possible to adjust them to custom use cases.

Example of variables in the HTML template:
- checkoutURL - is an URL where the user will be directed after clicking on the web banner.
- getProductFromResponse - is a function that extracts the product information from the response and returns results, depending on what data is stored under API.
4. HTML code
<!DOCTYPE html>
  <html lang="en">
    <head>
      <meta charset="UTF-8" />
      <meta name="viewport" content="width=device-width, initial-scale=1.0" />
      <style>
        body {
          margin: 0;
          font-family: sans-serif;
          color: #222222;
        }

        .banner {
          display: flex;
          flex-direction: column;
          align-items: center;
          box-sizing: border-box;
          width: 100%;
          cursor: pointer;
          border-radius: 8px;
          padding: 15px;
          border: 1px solid #777777;
          background-color: white;
        }

        .text-container {
          align-self: stretch;
        }

        .text-container h1 {
          margin: 0;
          font-size: 20px;
          font-weight: 600;
        }

        .text-container p {
          margin-top: 5px;
        }

        #product-thumbnail {
          width: 100px;
          margin: 10px;
          border-radius: 4px;
        }

        #product-name {
          font-size: 12px;
          font-weight: 500;
        }

        .cta-button {
          height: 40px;
          border-radius: 20px;
          cursor: pointer;
          border: none;
          margin-top: 10px;
          padding: 0 20px;
          background-color: #fe7f66;
          color: white;
          font-size: 14px;
          font-weight: 600;
          transition: all 0.15s ease;
        }

        .cta-button:hover {
          background-color: #eb6c52;
        }
      </style>
    </head>
    <body>
      <div class="banner" onclick="goToCheckout()">
        <div class="text-container">
          <h1>Your order is waiting</h1>
          <p>Go to checkout to finish your order!</p>
        </div>
        <img id="product-thumbnail" src="https://www.meiro.io/pdf/web-layers/nike-shoes.jpg" />
        <div id="product-name"></div>
        <button class="cta-button">Go to checkout</button>
      </div>
      <script>
        var checkoutURL = "https://www.example.com"
        var getProductFromResponse = function (response) {
          const product = response.data.data.cart.items[0].product
          return { imgSrc: product.thumbnail.url, name: product.name }
        }

        function goToCheckout() {
          if (window.parent && window.parent.MeiroEvents) {
            window.parent.MeiroEvents.goToWebBannerUrl(checkoutURL)
          }
        }

        if (window.parent && window.parent.MeiroEvents) {
          var bannerID = window.parent.MeiroEvents.getWebBannerId()
          var responses = window.parent.MeiroEvents.getWebBannerHttpResponses(bannerID)
          var product = getProductFromResponse(responses[0])

          document.getElementById("product-name").textContent = product.name
          document.getElementById("product-thumbnail").setAttribute("src", product.imgSrc)
        }
      </script>
    </body>
  </html>