Events setup
Entities setup is usually done by the Meiro team.
In the Administration/Entities/Events tab, it is possible to create, edit, show/ hide events that will be used through Meiro Business Explorer (the basis for identity stitching and attribute calculation, displayed for each customer in the Customer Profile Detail tab/ Timeline).
A full list of events will be visible to users in the Data library/ Events tab.
|
Learn from this article: |
1. Create event
To create an event, please click on the Create Event button and fill out the form that will be displayed.
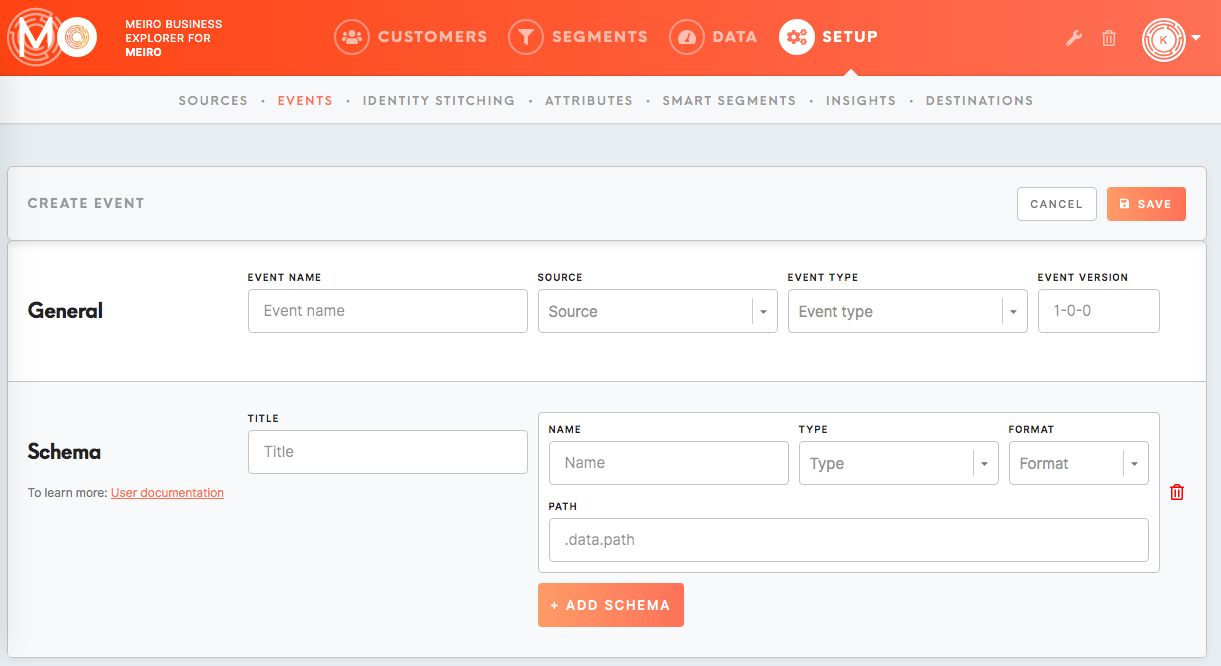
General |
|
|
Event Name |
Name your event that will be displayed across Meiro Business Explorer. It is possible to edit the name later on. |
|
Source (not editable later) |
Pick the data source from which this event comes from. |
|
Event Type (not editable later) |
Select an event type from available event types (for example, web_pageview, web_transactions, etc.). |
|
Event Version (not editable later) |
Assign the version of this event that you can refer to later. |
|
Event Retention (optional) Select after how many days events will be deleted (max 5000). It is recommended to avoid storing events for too long as it may influence the costs of data storage. There is no general recommendation about how long events should be stored, it depends on the nature of the event. Usually, more information is collected, and it is advised to store it for a longer time. By default, Event Retention is 0 (infinite). To learn more, contact the Meiro team. |
|
SchemaThe schema describes the way how event payload should be displayed in the user interface. It is possible to set multiple items that will be displayed. |
|
|
Title |
Set the title of the payload. The event title is the further specification of the event. For example, event type "Order Status Updated" may have the title "The customer's order changed the status to Awaiting bank payment" to specify the event further. The title will be visible under this name across Meiro Business Explorer. It is possible to edit it later on. |
|
Add items to display in the payload |
Name: Name your schema item. It will be visible under this name across Meiro Business Explorer. It is possible to edit it later on. Type: Set the item type (string, datetime, number). It is possible to edit it later on. Format: Pick one of the available formats (text, link, list). It is possible to edit it later on. Path: JSON path that points to value in payload corresponding to this payload item. It is possible to edit it later on. |
Warning: It will not be possible to edit Source, Event Type and Event Version later. In this case, It is recommended to hide the event and create a new one.
Remember: Changes will be saved after clicking on the Save button.
Remember: Newly created events will appear with the New badge that will stay for the next 7 days.
2. Edit/ show-hide events
You can edit events at any time, and if necessary, you can hide them from the Meiro interface. When hidden, events will not be displayed in the Meiro Business Explorer interface.
Warning: Fields that are not editable are: Source, Event Type, and Event Version. If filled wrong, it is recommended to hide the incorrect event and create a new one.
3. Event example
An example of an event listed in the Data library/ Events tab:
For this event:
- Event Name: Account created on web
- Event Source: Bank website
- Event Type: picked from the drop-down list (in this case "account-created")
- Event Version: the version of this event (for example 1-0-0)
- Schema Title: Bank web account created
- Schema Name: Device family
- Schema Type: string
- Schema Format: text
- Schema Path: JSON path to this event