Email channel configurations
The Administration/Configurations/Channels tab in Meiro Business Explorer enables businesses to configure channels for running campaigns. This guide provides a step-by-step tutorial on configuring the Email channel in Meiro Business Explorer.
|
Prerequisites for Emails To work with emails, ensure that the following prerequisites are met:
|
- Email provider settings
- Available SMTP Integrations
- Emails channel’s attribute settings
- Verified senders
- Opt-in email customization
Email provider
| Provider | Choose an email provider from the options provided. |
| Server name | the address of the SMTP server that will be used to send email messages. |
| Port name | specific port on which the SMTP server listens for incoming connections. The most commonly used port for SMTP is port 587, but other options are available, such as port 465 or port 25. |
| Username and password | the login credentials required to authenticate with the SMTP server. These are typically the same as the credentials used to access the email account that you're using to send email. |
| API key | the authentication credential for connecting to the SMTP server and sending emails securely. This adds an extra layer of security to your email communication. |
Remember: different email service providers may have slightly different processes for obtaining this information, so it's best to consult the documentation for the specific email service provider being used, e.g., on Gmail, Zoho Mail.
By default, the connection type is STARTTLS, which means that the CDP uses this protocol to encrypt the connection. STARTTLS is a security protocol used to encrypt the connection between the CDP and the SMTP server. This helps to ensure the privacy and security of the email messages being sent.
Available SMTP Integrations
This section presents a selection of SMTP providers suitable for email communication, including Mailjet, MessageBird, Brevo, MailerSend, Infobip, Mailgun, SendGrid, and Omnivery.
Configuration of email stitching category
At the next stage, you need to select the stitching category related to emails, keep in mind it cannot be changed later on. If there is no suitable stitching category yet, proceed with creating it first through the 'add stitching category' button.
Verified Senders
In the "Verified Senders" section, you need to configure the email addresses that will be available for use as sender and reply addresses in your email campaigns. When creating an email, you can select from a list of email addresses you have previously verified in the configuration section. If you have marked a default email address, it will automatically fill in the email creation form.
To add a new email address to your list of verified senders, fill in the email address in the designated field and click the 'add address' button. Every email address you add must be verified by following a link sent to that email address.
Remember: you can remove an email address from the list of verified senders if it is not currently being used in any email campaign. Additionally, at least one email address must be configured in the "Verified Senders" section. Setting Stitching Rule
To enable the inclusion of email events in the profile identity graph, the analyst must establish a stitching rule for the Meiro Email Message ID attribute and associate all pertinent email events with it.
Opt-in email customization
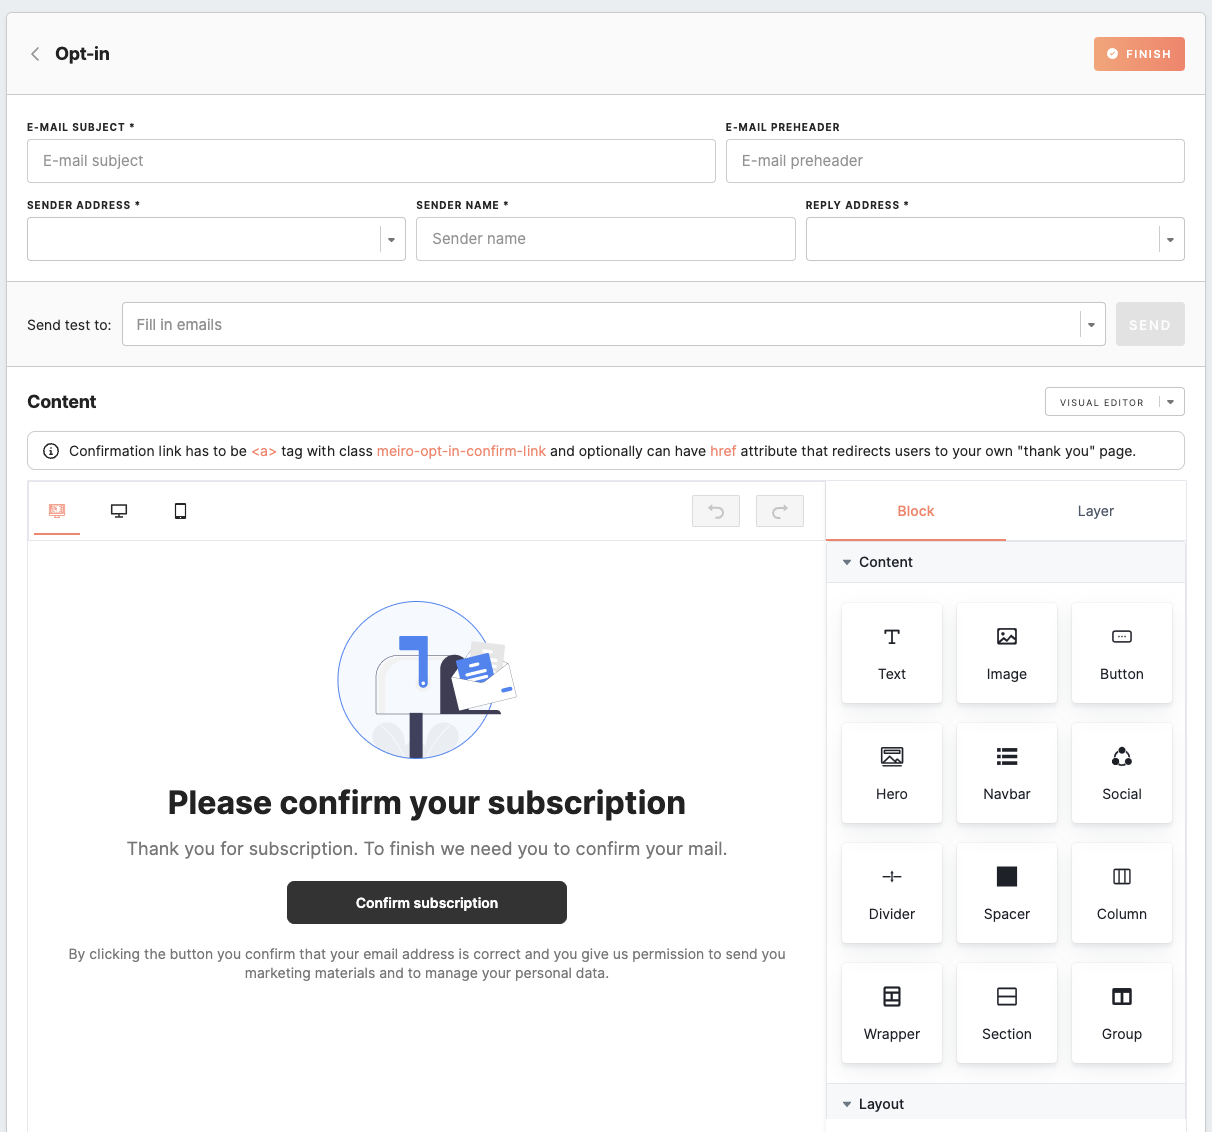
In this section, it is possible to configure opt-in email parameters and its page. A default template design will be provided, allowing you to get started without defining your own template immediately after channel activation.
|
Email Subject (required) |
A brief description that summarizes the topic or purpose of an email message, which is displayed at the top of the email message, above the body of the email. The limit is 150 characters. |
|
Email Preheader (optional) |
The text that appears next to or below the subject line in the inbox. The limit is 100 characters. |
|
Sender address (required) |
The email address will appear as the sender of the email. You can select from a list of email addresses that you have previously verified in the configuration section. |
|
Sender name (required) |
This field allows optionally providing the sender's name that recipients will see when they receive the email. |
|
Reply address (required) |
Select one from the dropdown list of configured emails. The email address will be shown to recipients when they hit the "Reply" button in the email. |
|
Send test to (optional) |
To start testing the appearance of opt-in email, you need to fill in the email addresses of the testing users (e.g., example@gmail.com) in the field and click the “Send” button. |
|
Content of Email (required HTML or Visual email) |
The default template design will be applied after you activate the Email channel. You may proceed with changing the template to your needs. Select the desired email type (HTML or Visual editor guide) and fulfill the content. When creating a customized opt-in template, it's essential to follow these specific requirements for the confirmation link:
To add class to the text block, use HTLM mode as on the example below:
Remember: once you switch to a custom opt-in template, you cannot go back to the default template. Remember: the attribute picker has been removed from opt-in customization, and manual insertion of attributes should be avoided. This is due to the impracticality of using attribute placeholders when requester identities are typically unknown, leading to empty values in the message. Learn more: about the content block available in the Visual editor guide. |
After setting all sections, the email channel will be configured and activated for use.


